
Animal flows - What, How and Why?
Animal flows are a great addition to any exercise plan, warm up routine or injury prevention plan. Learning to move like a monkey, frog, or bear helps to build full body strength, mobility and motor control which in turn will make you a more awesome human and less prone to injury. This blog with video tutorials will explain what these movements are, how to utilise them and why you should should be doing them
What are Animal Flows?
Animal flows essentially refer to movement and exercise patterns where we imitate different types of animals such as bears, monkeys, frogs or lizards. Moving in these patterns can be very challenging, especially for the stiff & inflexible among us, but can also be really fun & provide significant benefits.

Deep Squat
Practicing animal flows can help improve strength, flexibility, mobility and overall motor control which in turn will help to make you a better functioning human and less at risk of injury. These movements can really challenge us in unconventional ways demanding our joints and muscles learn to control movement in patterns and ranges we would rarely otherwise practice. They can provide a great way to warm the body up in preparation for other forms of exercise or can even act as a stand alone training session. Once you have tried some of these movements for a few minutes you will understand why!
Where do I start?
As with all areas of training and exercise when attempting something new or different our advice is always start slow and work safely within your own levels of capability. Never push through pain or injury and if in doubt about whether this is appropriate for you please seek advice from a qualified professional.
Very few people will be able to perform controlled animal flow movements perfectly or even well at the beginning. When incorporating these kinds of exercises with my patients it’s essential we first establish their base level where they feel safe to practice but also feel that it is challenging. I would advise starting with getting comfortable in the static positions required as the foundation for the movement. In this post we will look at 2 positions - Deep Squat & A-Frame (Downward dog). These are the foundation starting postures for progression onto the animal movements monkey, frog and bear.
Deep Squat
The squat is a great foundation exercise for strength and mobility in the lower limbs and yet for so many people it is a real area of weakness and frustration. A lot of us slowly lose our ability to sit into a deep squat mainly through neglect and lack of practice combined with our static and sedentary western lifestyles. We become weak, stiff and tight and can no longer control the range of motion required to allow a deep squat. We rarely challenge ourselves to sit into a deep squat position let alone spend time exploring and improving on our range and control in this position. So first things first lets get a measure of your baseline squat function - check out this video and see how you get on.
It may take weeks or months of work to improve your squat mobility and that’s okay. For a more detailed look at improving your hip and back mobility please click the links to see our previous blog posts on these areas. You can use these routines alongside your deep squat holds to improve your squat function.
If you feel up to increasing the mobility challenge of your deep squat lets check out this next video requiring some active hip rotation movements at the bottom of the squat - a great way to improve your range of motion and strength.
I would recommend slowly building these exercises into your routines, aim for 20-30 second rounds initially performed for 3-4 sets thereby accumulating 2-3 minutes in the deep squat. Try this at least 2-3 times per week. Long term the idea is to become comfortable spending longer periods in the deep squat and find it relatively easy to perform movements from this position. Try to build up to 5 minutes total in the deep squat per day of practice over several weeks.
Monkey & Frog Mobility
These animal flow progressions are suitable once you have a comfortable squat allowing you to sit at least to parallel depth without the need of hand support. Don’t worry if you’re not there yet, keep practicing the squat, back and hip mobility exercises and you can move on to these once you feel confident.
These exercises are difficult and physically demanding but the pay off of regular practice will be improved squat mobility, increased lower limb strength and motor control with an associated reduced injury risk in these areas. Give each of these a try and see how you get on.
Add these to your regular practice at least 2-3 times per week initially
Begin with 20-30 second rounds aiming to build up to 1-2 minutes or longer
Look to accumulate time in the positions - Try a 5 minute timer & while stopping for breaks when required, try to spend as much time actively moving in these flows
Ideally we want to develop a relaxed freedom of movement where you can drop comfortably into a deep squat and easily move through monkey and frog patterns. You can mix and match the movements to create variation in the flow and challenge your strength and mobility through mixed planes of movement. Don’t expect overnight success but as with all training with hard work and consistent practice you should be able to improve allowing you to move better and feel better.
A-Frame (Downward Dog)
This stretch position is probably best known in yoga circles, most people will of at least heard of the Downward Dog. Another term we will use is A-Frame which refers literally to the fact we are trying to get our body into a position whereby it looks the a capital letter ‘A’. This position is another staple in many exercise forms and for good reason, it challenges the flexibility and strength of our body in many areas. The shoulders, back, hips, knees and ankle joints will be tested and for many people deficiencies in strength and range of movement will limit the quality and range available in attempting this position.
For many of us just attempting this posture will be tough and tiring. A lot of you will be feeling significant resistance in the backs of the legs (hamstrings and calves) and through the shoulders and upper back. Build slowly and increase the time spent in the stretch as you feel able, again looking to improve on your own current baseline level. Before attempting bear movements from this position we can work on a couple of simple variations which are shown in the video - slow marching on the spot and active shoulder extension pushing the head and shoulders through. Let’s give it a try and see how you get on.
Bear Movement Flows
The bear crawl can be utilised as a full body exercise to develop strength, flexibility and control in many areas. It is challenging and will take time to develop the skill and movement control required to perform it well but as with all these exercises your only goal should be to steadily improve on your own current baseline level. Once you have developed some comfort and control with the A-Frame stretch the first Bear Crawl movement we will try is with straight arms and straight legs as demonstrated in the video below. The key here is control so take your time and just do what you can, even if it’s only a few seconds initially, you can build on that. Let’s give it a go.
In the next video we demonstrate a number of bear crawl variations to give you some more options to explore. Depending on your own levels of mobility and strength you may find some options easier and others harder but it is great to play around and explore a variety of positions to find any weaknesses or restrictions and ensure a variety of stimulus is achieved. The key is to safely work on your own issues and don’t be afraid to explore positions that are challenging as long as you do so gradually.
Add these to your regular practice at least 2-3 times per week initially
Try:
Straight arms & legs
Bent arms, straight legs
Bent arms, bent legs
Straight arms, bent legs
Begin with 20-30 second rounds aiming to build up to 1-2 minutes or longer
Move forwards, backwards and sideways
Look to accumulate time in the positions - Try a 5 minute timer & while stopping for breaks when required, try to spend as much time actively moving in these flows
Summary
In summary adding animal flow movement practice into your regular exercise routines or habits can have significant physical benefits by helping to improve full body strength, mobility and motor control. It is a challenging but fun way to mix up your normal exercise routines and pushes your body to explore a variety of joint postures and positions that are not routinely trained or strengthened. This variety of stimulus will help to ensure strong and healthy muscle and joint function. Enjoy exploring and playing with these movements and ultimately you can learn to move better & feel better.
Thank You
Thanks for taking the time to read this guide, we hope you find it useful. Please share with anyone who might benefit and if you have any questions comment and let us know. Please subscribe to our mailing list to receive more interesting and useful blogs. Good luck and remember to move better & feel better

Stiff achy hips? Tightness or weakness and what can you do about it?
Complete hip mobility routine to increase range of motion, reduce pain and improve function. Explore your own limitations and work to improve them with daily practice of this routine. Rid yourself of stiff achy hips and restore strong, healthy movement while improving athletic ability.
Why are my hips sore?
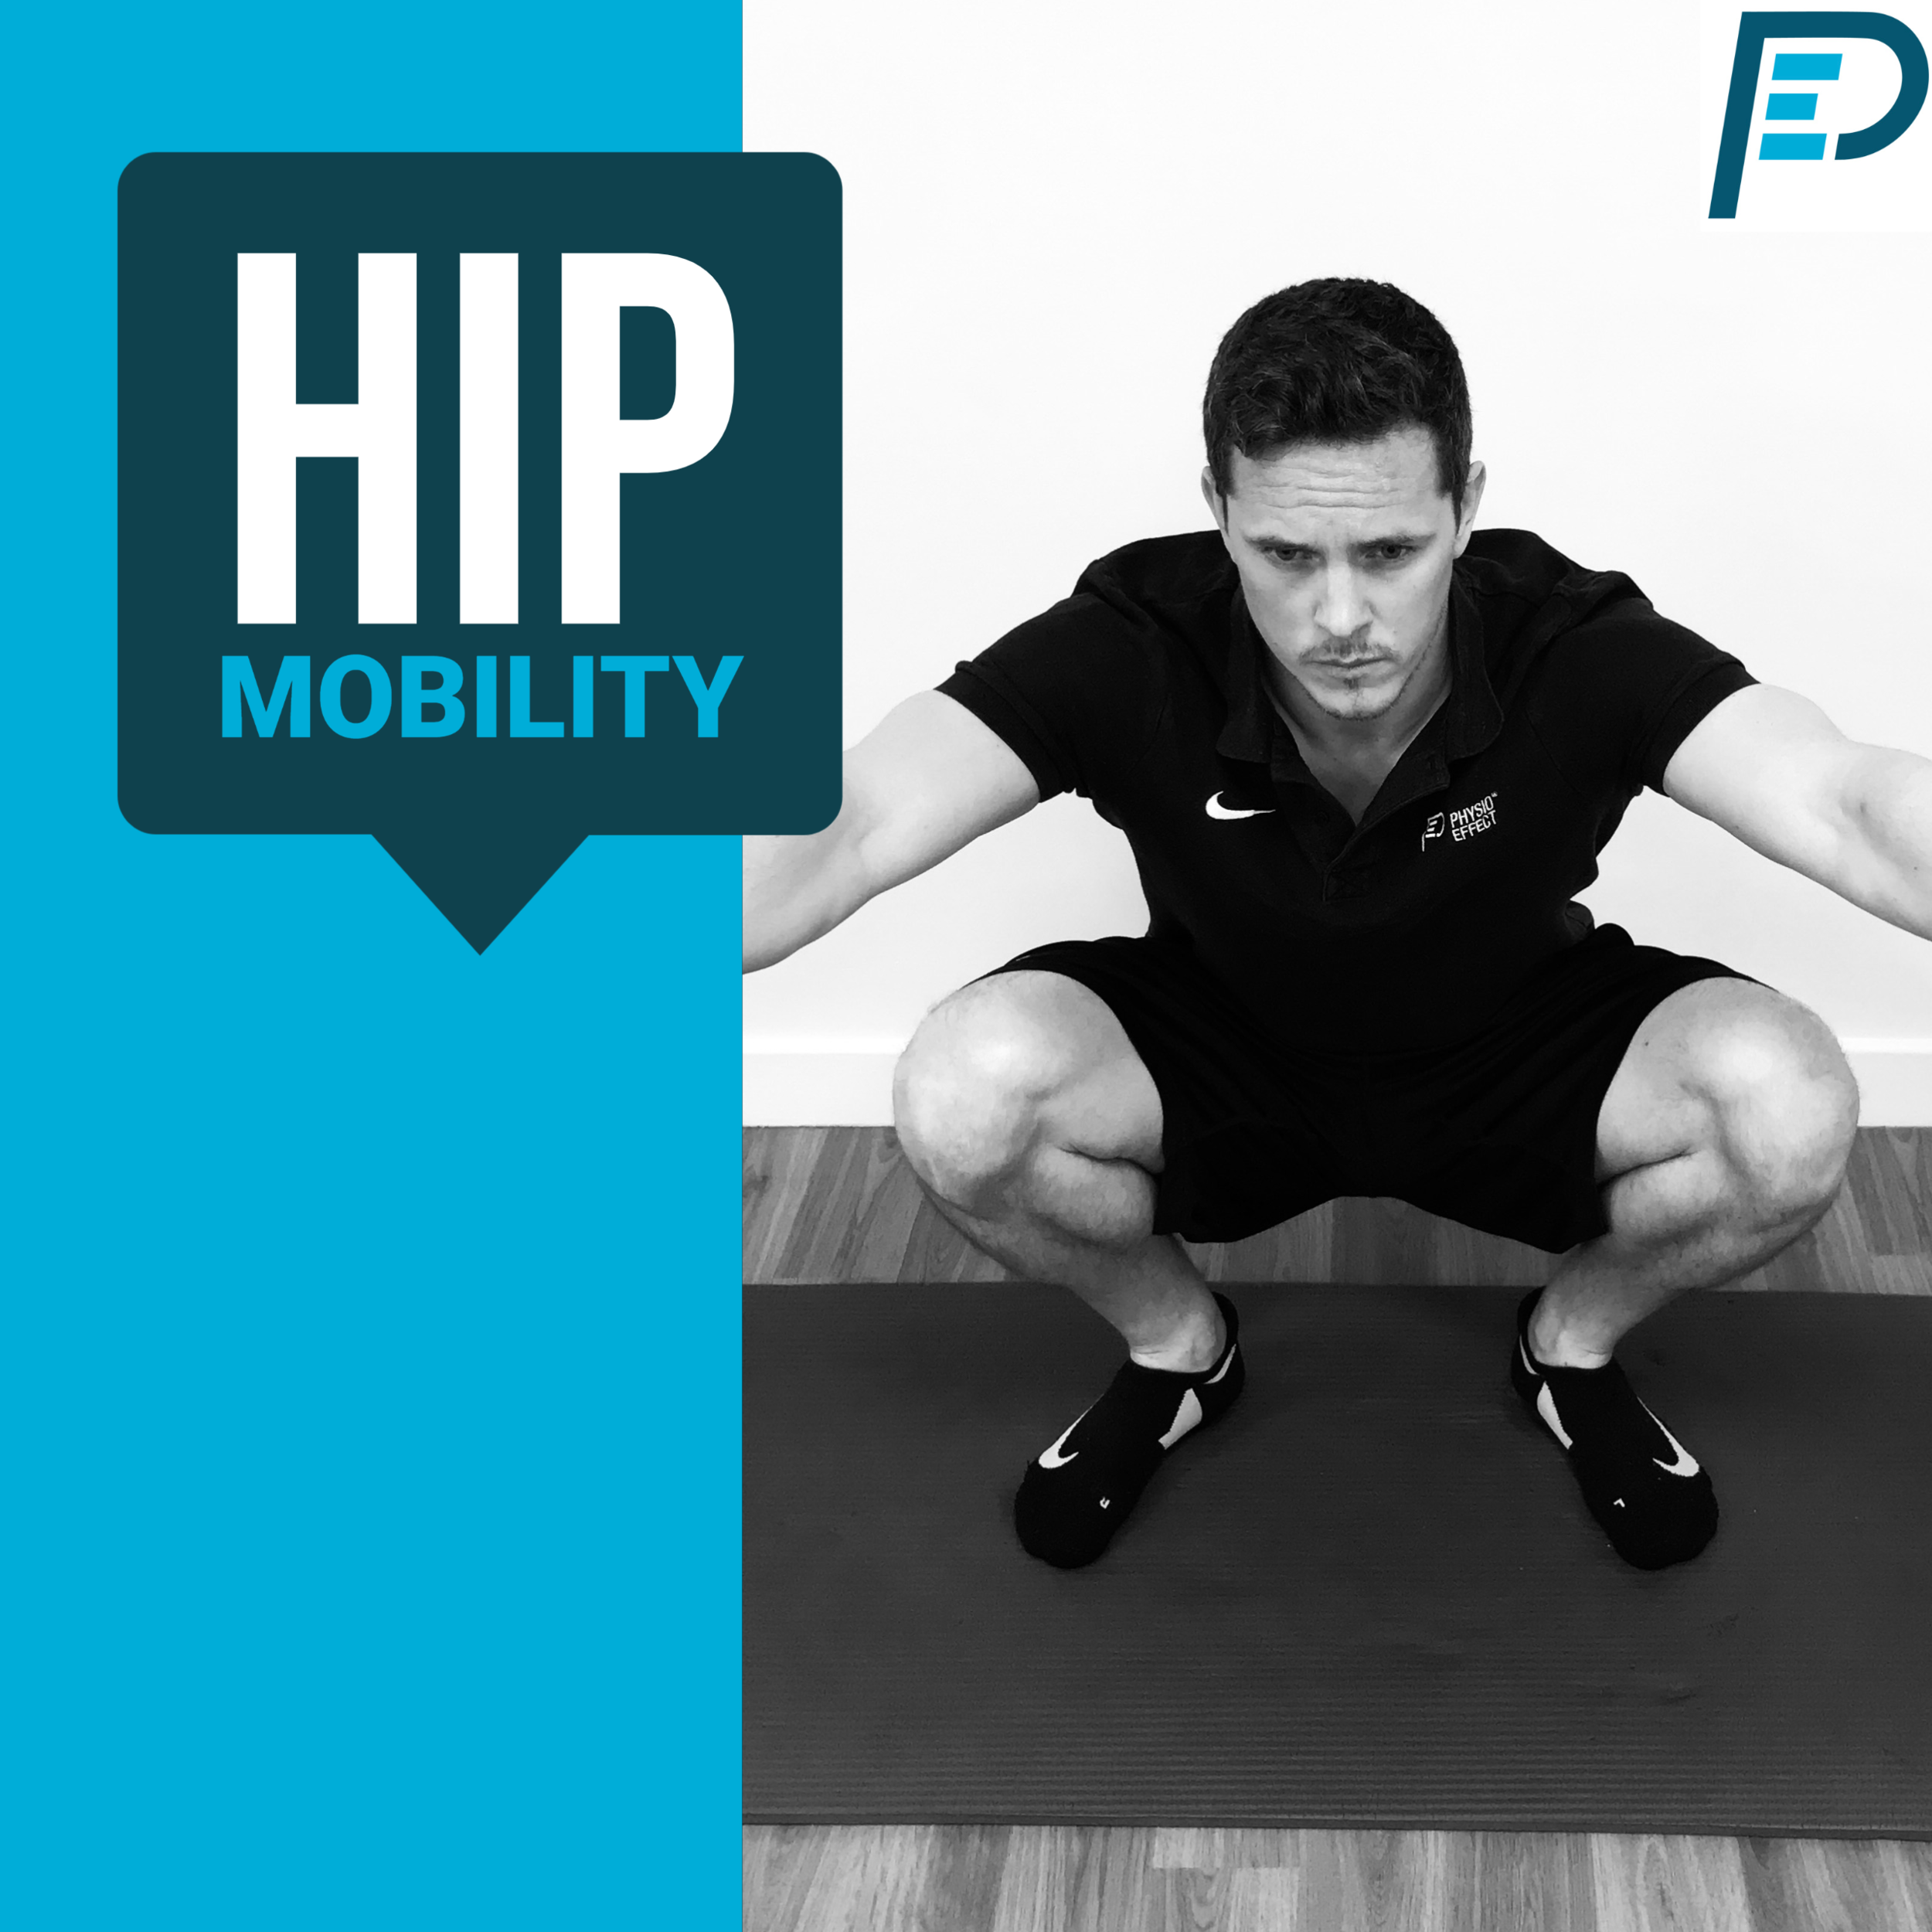
Deep Squat
Chances are if you’re reading this you have at least one hip and at some point it has given you trouble. Hip pain or stiffness has likely gotten in the way of your daily activities or restricted your ability to exercise on more than a few occasions. Our hips are at the centre of our body’s movement, so if they are functioning poorly then our ability to move freely and unrestricted will be compromised. Poor hip function can cause local issues around the hip but often contributes to pain and dysfunction in other areas like the lower back and knees.
The primary reason for developing hip pain for most people is a lack of movement and excessive sedentary behaviour, an all too common theme in our modern lives. You may workout regularly but chances are you still accumulate a lot of static postures through work or leisure and it’s unlikely that your exercise habits routinely explore and work the hip joints and muscles to anywhere near their full range or capacity. Though most hip pain is not serious and can be helped with the right exercise, we recommend consulting a health professional if you are worried or have persistent symptoms.

Modified Pigeon with Active Hip Internal Rotation
Am I Stiff or Weak?
Most likely it’s a combination of both. There is a lot of confusion out there around the terminology of flexibility, mobility and strength. Essentially flexibility can be considered passive and is about the soft tissues (muscles, tendons and ligaments) ability to temporarily elongate to allow movement through a range while mobility centers around our ability to move through a range of motion with control before becoming restricted. Mobility requires strength to control your flexibility.
Take for example someone who can squat 200 kilos to a parallel depth. This would obviously be considered strong in that range. However if the same individual cannot perform a body-weight squat below parallel depth without falling over or requiring support then we could say they have poor squat mobility. Passively if they can still achieve a deep squat position using some support we can say that they have reasonable flexibility in their soft tissues to allow this. Ideally this individual will work to improve their mobility so that they have better strength to control a greater degree of flexibility i.e they can drop comfortably and controlled into a deep body weight squat without assistance.
Should I Stretch or Strengthen
Again for most people the answer here is both but the key is identifying exercises that allow you to improve on both simultaneously whilst also offering functional value. Being inflexible is not great as your natural joint range of motion may be restricted and eventually painful. Inflexibility can lead to struggles with basic everyday activities like bending to pick something up or getting in and out of bed or your car. If you are weak then as discussed before you will not be able to control your flexibility or movement again making you more vulnerable to injury and pain.
This is where we need to be smart and specific in identifying our own needs and training with functional goals and targets in mind. You may have great flexibility and touching your toes is a breeze but when asked to do a basic lunge you lack the strength, balance and co-ordination. Conversely as with our example above you may have great strength for lifting weight but only in a limited range and the idea of touching your toes or sitting in a deep squat seems ridiculous. There is no single one recipe to fix all here but in essence mobility training will work both our strength and flexibility needs, we just need to identify the right exercises.
Try this mobility routine we have created to help identify your own personal problem areas. What to you find most difficult and are you struggling due to tightness, weakness or a combination of both?
Up for a challenge? Try this routine a few times and note the 3 exercises or positions which you find most restricted or difficult to perform. Now practice them consistently at lease 3 times per week for the next 4-6 weeks and see what changes and improvements you can achieve
At the bottom of this blog you can see each of the individual exercises that make up our hip mobility routine. Click the link below to download your FREE PDF copy of these exercises including some key tips .
Challenge to Change
For the vast majority of people our lives and even our exercise or training keep us moving in basic linear patterns (up and down). We don’t often (if ever) challenge our hips with lateral or rotational exercises and most people end up weak and unstable in these positions compromising their hip health and function. That’s why we designed these routines to explore and challenge these less common positions.
This next video demonstrates 3 more advanced hip mobility exercises that you can try. Please only attempt what you feel able and do not work into pain or through injury. Try the exercises in the video below and see how you feel. Chances are you will find this very tough but they are great exercises to improve overall hip mobility and function so if you feel able add them to your regular routine and with consistent practice you should see real improvements.
Exercise 1
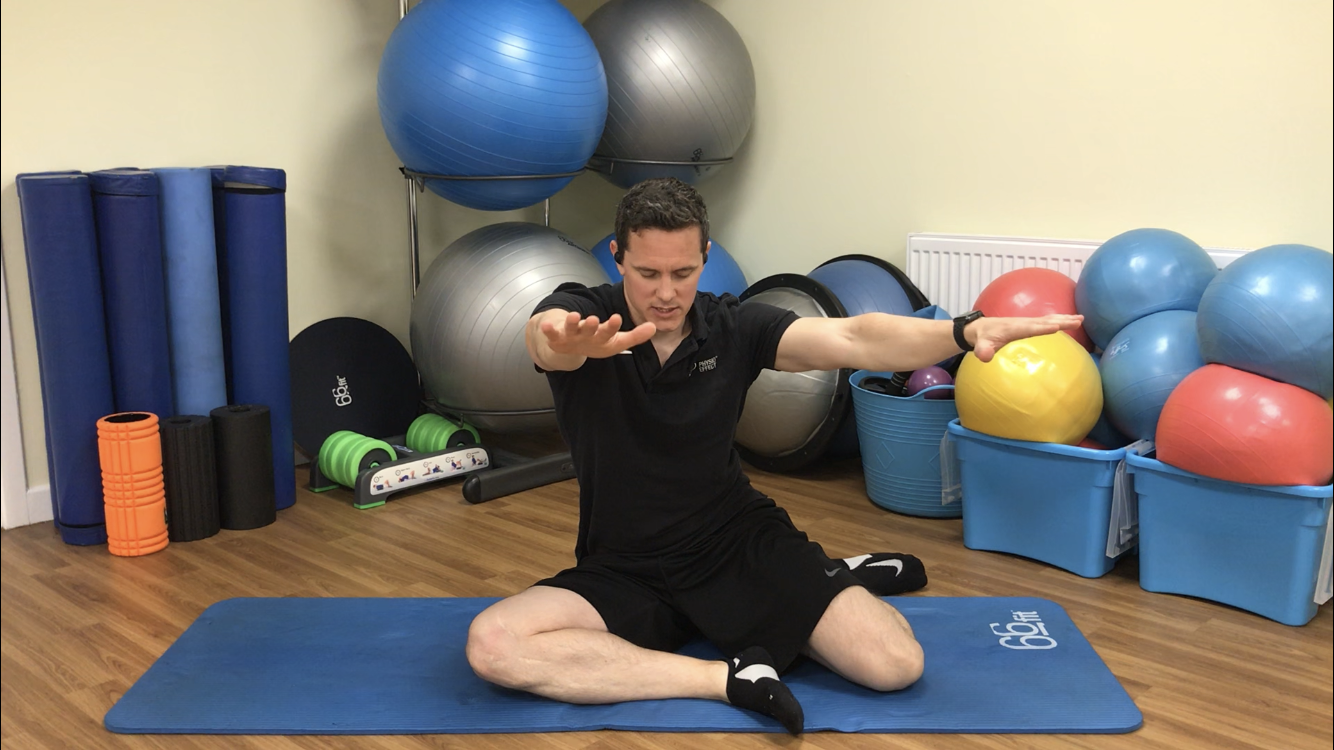
Seated hip Internal / External Rotation
Begin in sitting leaning back on straight arms, knees and hips bent and relaxed shoulder width apart with feet flat on floor.
Gently and with control lower both legs to one side trying to touch the outside of one knee and inside of the other knee to the floor. Don’t worry if this range is too much, just work as far as you feel is challenging but comfortable. Return to start and repeat to opposite side.
Perform this movement for 60 seconds

1- Floor Sitting, Lean back on hands, high chest

2- Slowly Rotate Both Legs to one side
Exercise 2
Deep Squat Hip Internal / External Rotation (Advanced Option)
Begin in a deep squat. Ensure heels remain in contact with the floor
Slowly rotate one knee across mid-line aiming to touch knee to floor in front of opposite foot which should remain flat with heel on floor. Allow moving leg to rotate up onto toes. Static leg should remain open and avoid any inward collapse of knee/hip position.
Return leg to starting deep squat position and repeat with opposite leg.
Repeat with alternate legs for 60 seconds

1- Deep Squat, Heels on floor

2- Deep Squat- Active Hip Rotations
Exercise 3
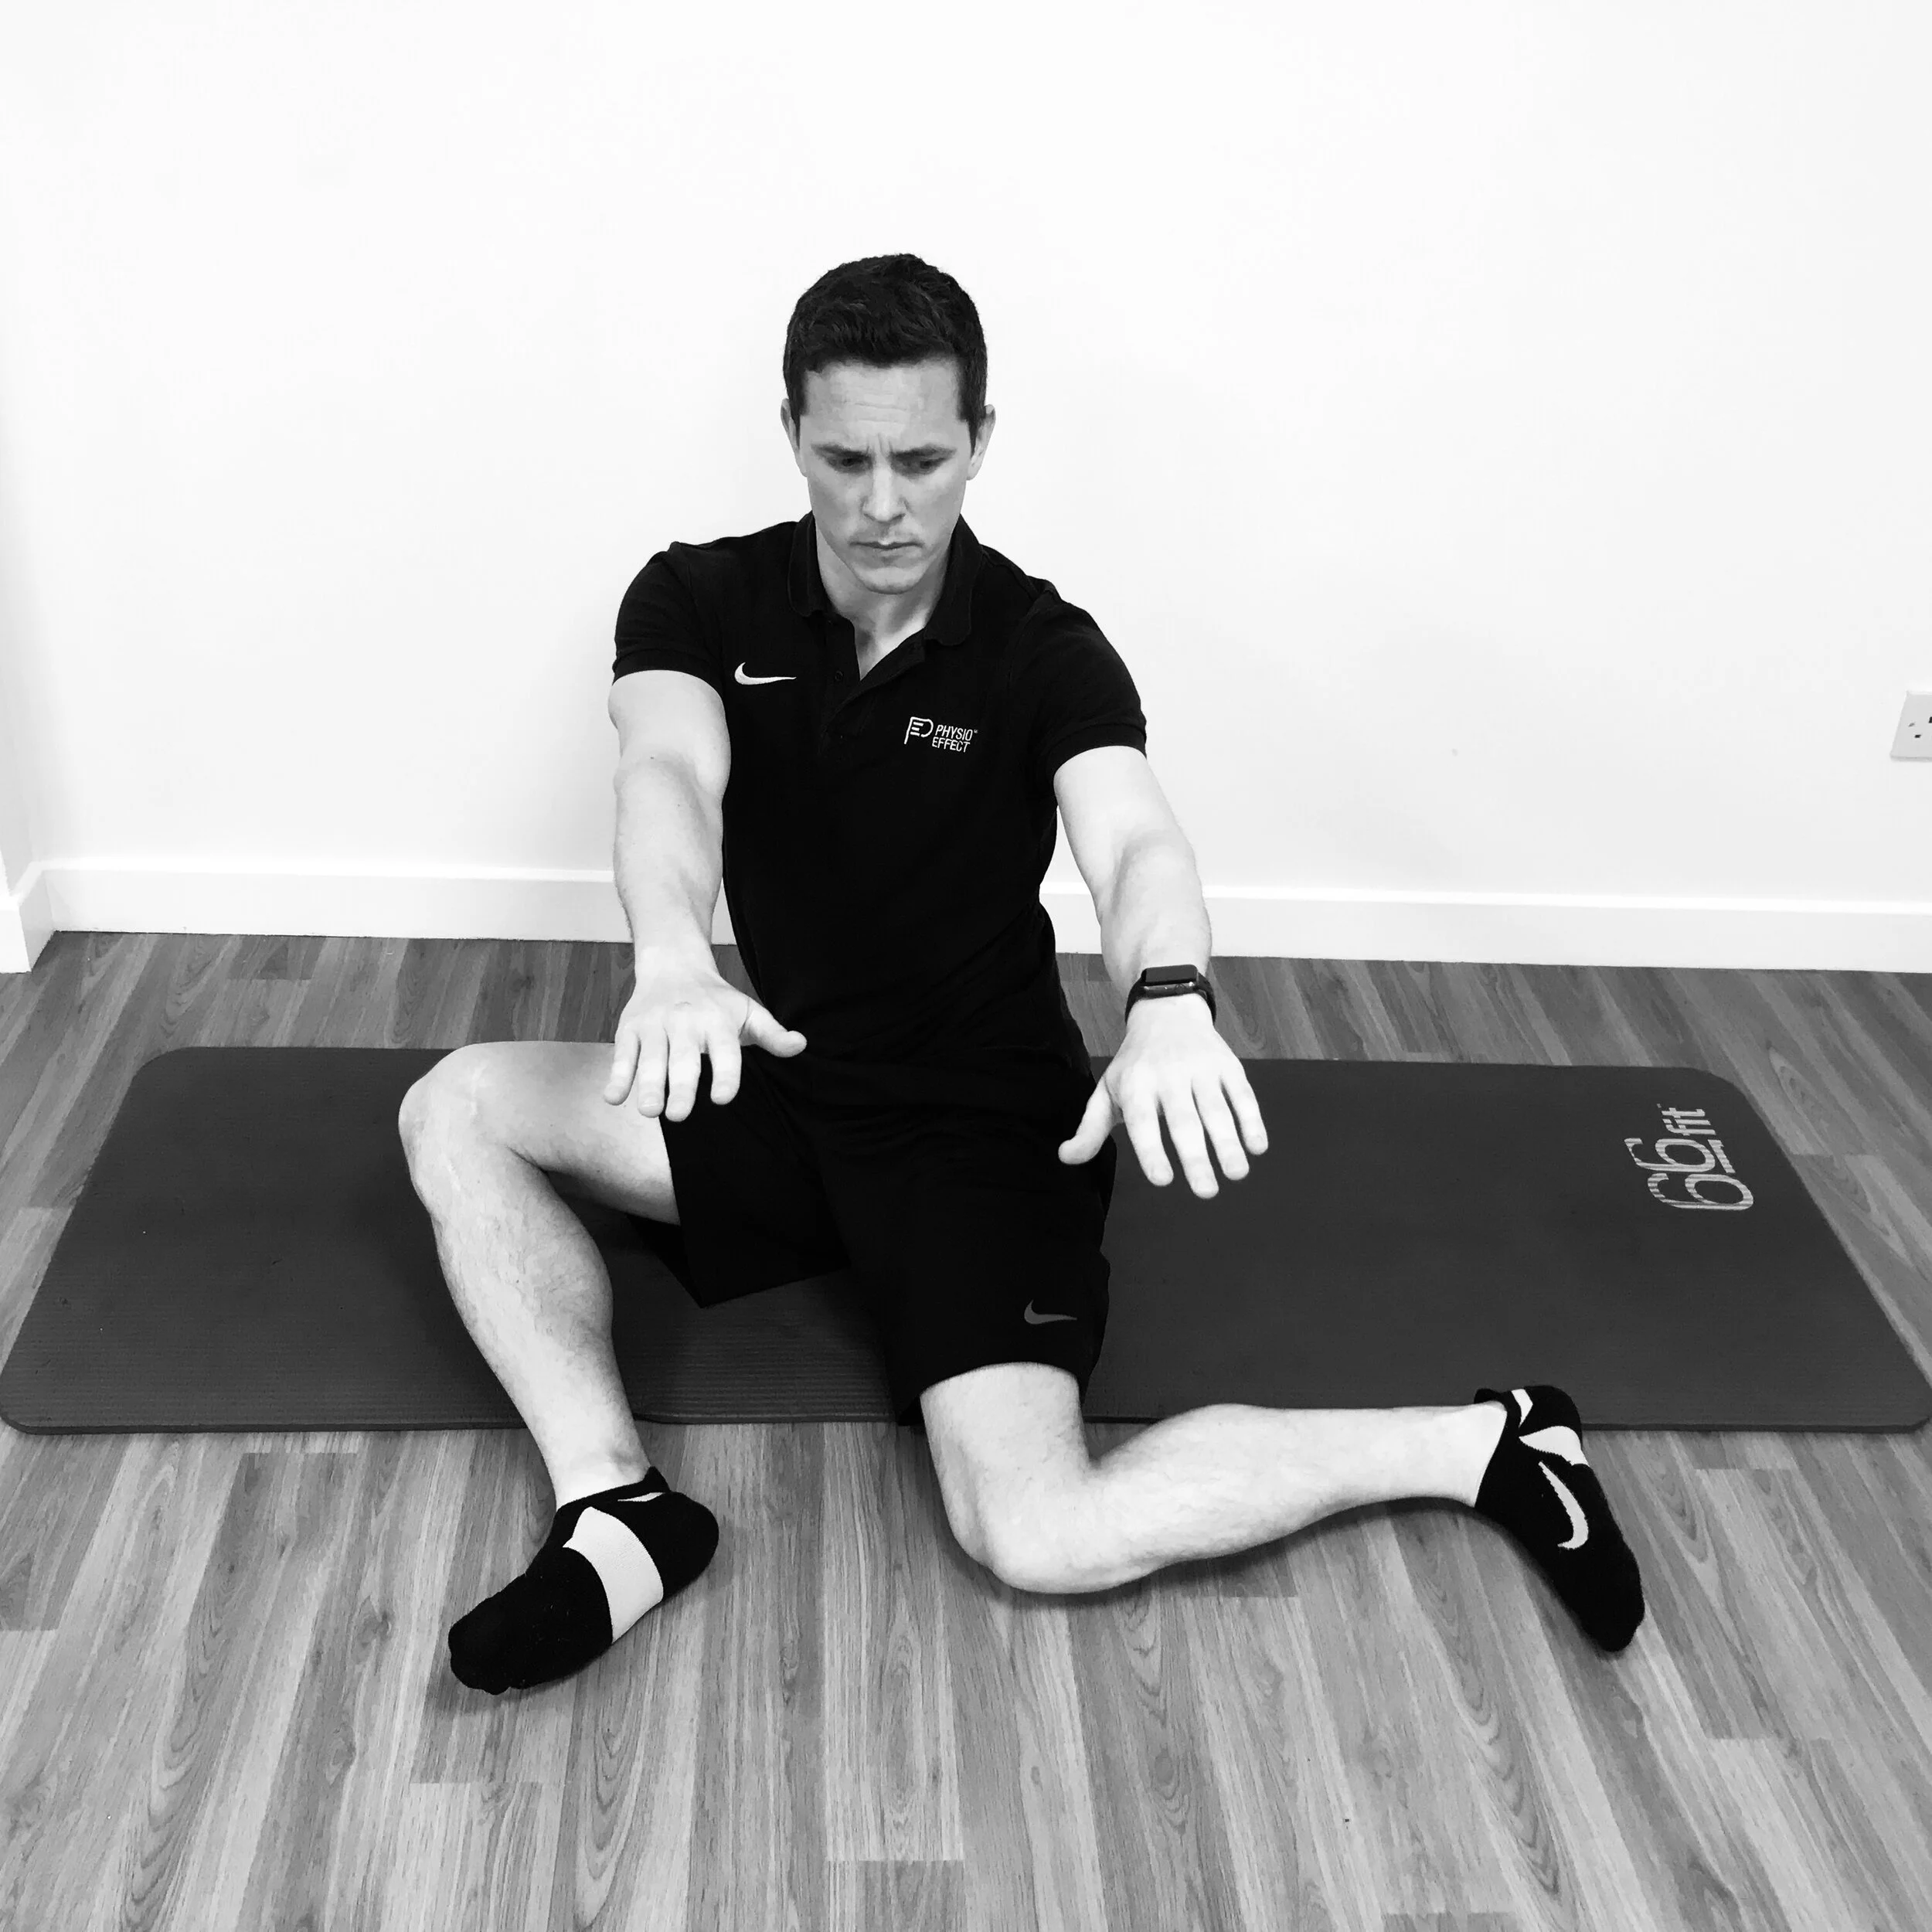
Modified Pigeon
Begin in 90/90 hip and knee position. Gently rotate and square hips up facing forwards
Gently lean chest forwards through your hips and rotate slowly leaning over the forward knee
Option to gently contract front leg pushing knee into floor, hold 5-10 seconds and release. Repeat 5-10 times.
Work into and explore stretch for at least 60 seconds

1- Modified Pigeon 90/90 Sitting

2- Modified Pigeon- forward lean & rotate over front knee
Exercise 4
Modified Pigeon Active Hip Internal Rotation Lift
Begin in the modified pigeon 90/90 sit with slight forward lean supporting weight on hands
Gently lift back foot off the floor. Squeeze and hold for 5 seconds. Repeat for at least 5 contractions
You will repeat this exercise for the opposite side once you’ve completed the routine on one side

1- Modified Pigeon Forward Lean on Hands

2- Modified Pigeon Active Hip Internal Rotation
Exercise 5
Modified Pigeon Hip Active External Rotation
Begin in the modified pigeon 90/90 sit with torso rotated facing forward leaning weight back with hands behind you
Gently lift the knee (with inside touching floor) & rotate outward through hip. Squeeze and hold for 5 seconds. Repeat for at least 5 contractions. Ensure opposite leg remains still with outside knee resting on floor
You will repeat this exercise for the opposite side once you’ve completed the routine on one side

1- Modified Pigeon Chest Open

2- Modified Pigeon Active Hip External Rotation
Exercise 6
90/90 Sitting Lift to High Kneeling
Begin in approximate 90/90 sitting as shown, use hands to maintain balance without leaning on floor
Gently lift through the hips into controlled high kneel. Squeeze the buttocks and hold for a few seconds. Return to start position and repeat 30-60 seconds
Switch legs so back leg begins as forward leg and vice versa. Repeat active sitting movement 30-60 seconds.
1 - 90/90 Sitting on floor (no hand support)

2 - High Kneeling
Exercise 7
Frogger
Begin in all 4s, forearms on floor. Walk knees open keeping insteps of feet and inside shins rotated inward in contact with floor
Gently rock back through hips/pelvis as if taking bum closer to heels, squeeze knees into the floor and hold/release for 5-10 second repetitions.
Gently work into and explore stretch for at least 60 seconds

1 - Frogger Start Position

2 - Frogger Rock Back Position
Exercise 8
Deep Lunge Hip Opener with Arm Rotations
Begin in lunge position, extend out back leg as far as is comfortable. Lean forward and try to come to rest on forearms. Actively drive open front knee/hip rotating out onto outside border of foot.
Take inside arm next to front leg and rotate upwards to ceiling with a straight arm. Stretch open through shoulder, chest and spine. Hold for 5 seconds at top position, return to start driving elbow back to the floor and repeat for 10 repetitions.
Switch legs front to back and vice versa. Repeat process.

1 - Deep Lunge, Forearms to floor, drive front knee open

2 - Deep Lunge Arm Rotations
Thank You
Thanks for taking the time to read this guide, we hope you find it useful. Please share with anyone else who might benefit and if you have any questions comment and let us know. Don’t forget to download your free hip mobility cheatsheet. Good luck and enjoy your improved hip health.

Deep Lunge with Arm Rotation
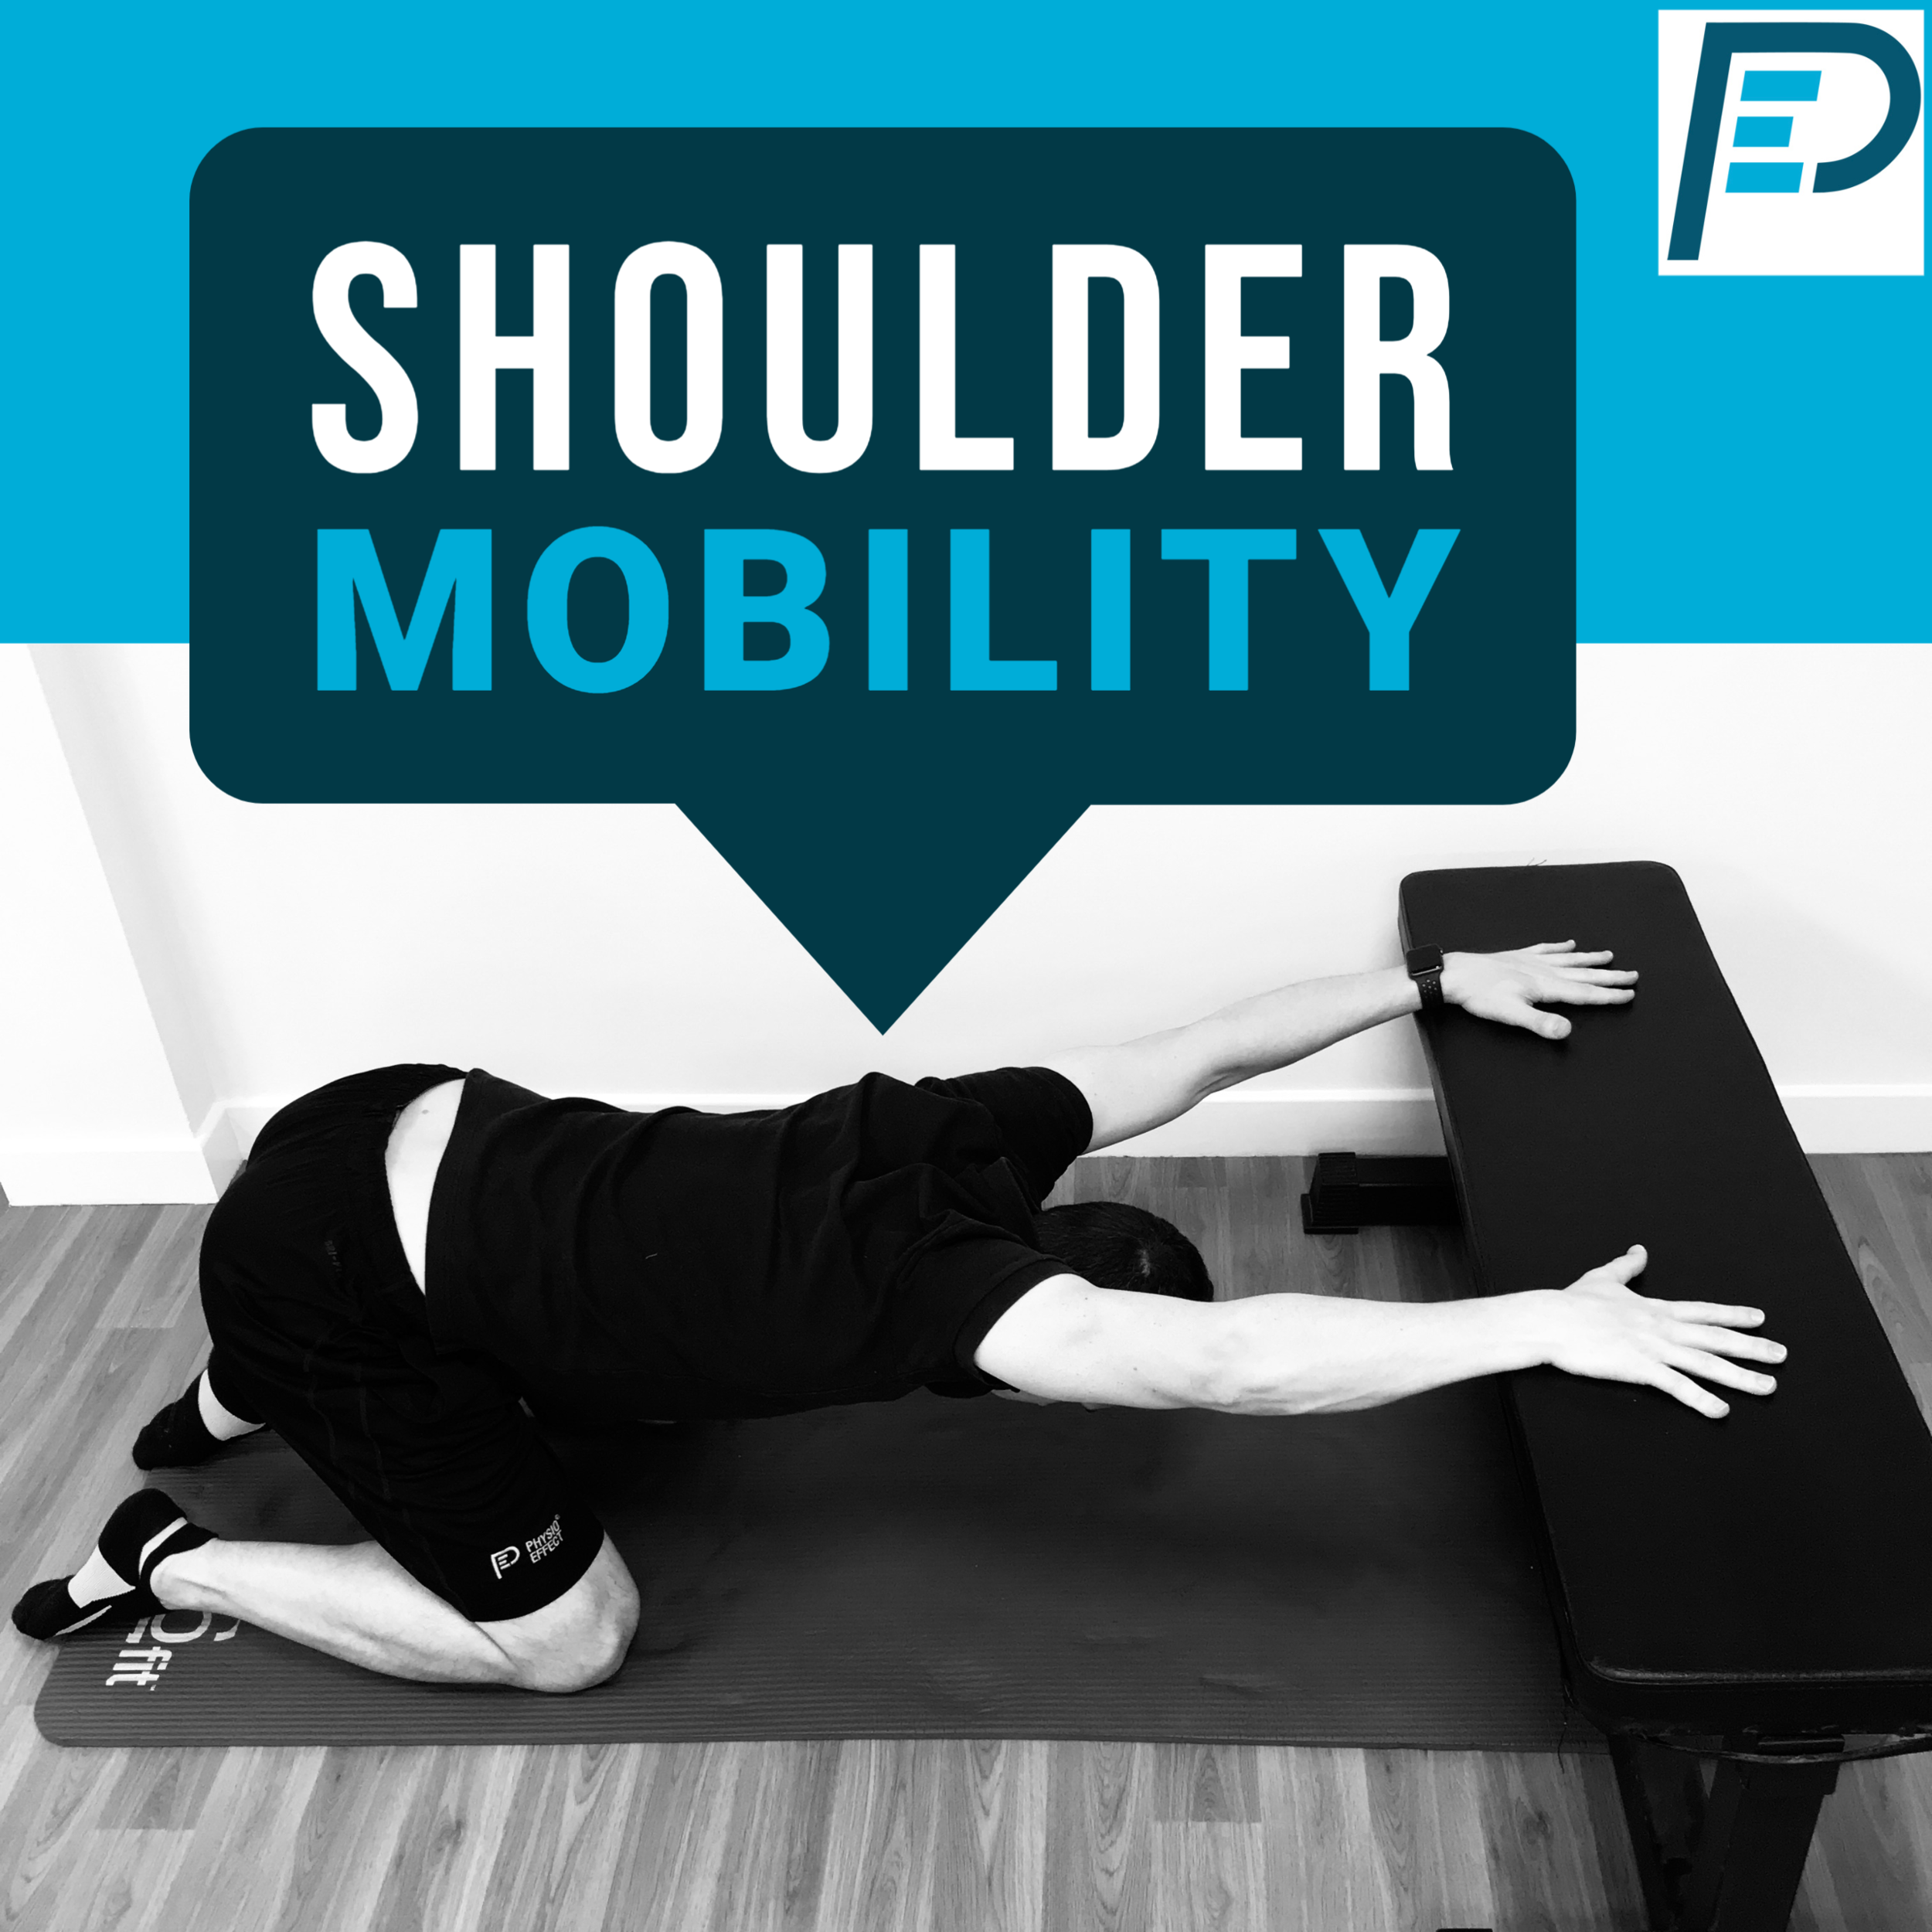
Tight shoulders? This routine will fix you up
5 step shoulder stretch routine to relieve stiffness and tension. Discover a new range of motion and rid yourself of nagging tightness in your shoulders and upper back
Why are my shoulders so tight?

Familiar Hunchback Posture?
Shoulders are a big sticking point for many of us. We constantly assess and help people with long histories of stiff, tight, achy shoulders and upper backs. More often than not there is no significant injury history but very commonly there is a base of sedentary behaviour, such as office work and driving, and a significant lack of any structured stretching or mobility exercise. Welcome to our modern lives!
Most shoulder pain can be fixed without the need for invasive surgery but it can take time to undo a lifetime of poor habits which have lead to soft tissue adaptations with weakness in some areas and tightness or stiffness in others.
1/2 Crucifix Chest Stretch
Shoulders are very mobile and we put them through a lot over our lifetime with an expectation they will be fine with no real consideration given to tuning or maintenance work. Tightness and pain can easily creep in and often presents initially as discomfort reaching overhead, pain opening a door, or a struggle to weight bear through our arms. This can develop to more constant nagging pain and stiffness and a reduced ability to perform daily tasks or enjoy physical exercise or activities.
Many people just put up with having a dodgy shoulder and accept it as a new norm but with the right guidance and exercises most situations can be at least significantly improved if not completely fixed. Like everything in life though you won’t get something for nothing and commitment to changes in habit and daily routines will be required. A balance of stretching and strengthening exercises is normally key and we have provided a great starting point here with our 5 point stretching routine.

Let’s get started!
We must bear in mind that every body is different as is each individuals unique history and circumstances so please use this routine as a guide to start improving your shoulder health and flexibility but do so carefully. Start slowly and gently and never push in to pain. Work to better your own range of motion but do not compare yourself to the video or anyone else. Practice daily and be patient but also persistent. If you can only do part of the movement or a modified / reduced range that is fine, just do what you can. Of course as with all advice please consult with a health professional if you have significant pain or loss of normal function.
Mobility Flow Video:
Exercise 1
Shoulder rolls / Scapular circles
Begin in all 4s position.Hands fixed under shoulders shrug shoulders to ears thenslide back and down and release. Then spread shoulder blades apart stretching across upper back, relax and allow shoulders and back to hollow.
Try to perform this as a slow circular rolling motion working in various directions
Perform this movement for 60 seconds

1- Shoulder shrug

2- Shoulder spread
Exercise 2
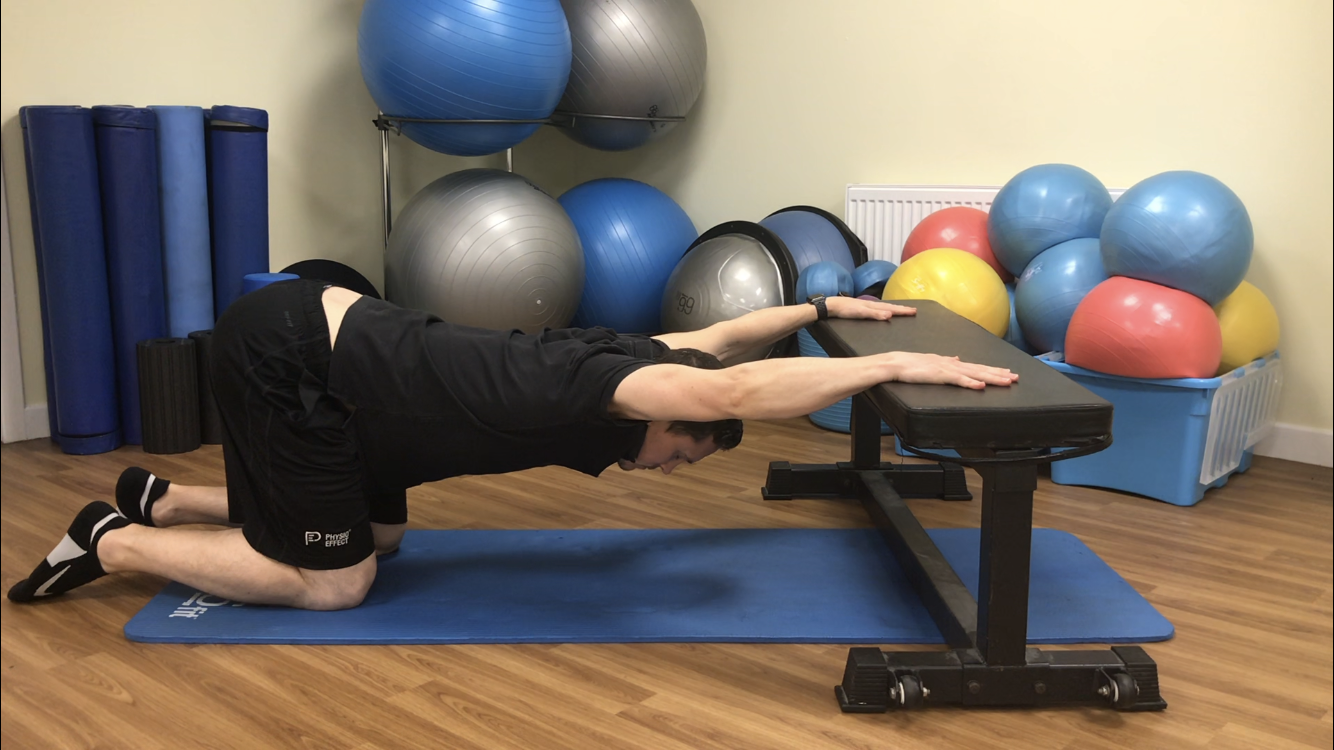
Elevated Arms to Partial Childs Pose / Prayer Stretch
Begin in all 4s position with arms straight out elevated on flat surface. Gently sit bottom back towards heels and let weight drop down between shoulder blades and through upper back
When in position try gently squeezing shoulders together and releasing and light pressing through the hands with slight twist/rotation movement
Try breathing in deeply and coming out of the stretch slightly then breathing out slowly and dropping deeper into stretch
Explore the stretch position with subtle movements and breathing for 60 seconds +

1- 4 point kneel arms elevated

2- Sit weight back and down between shoulders
Prayer Stretch (Option 2)
Perform stretch as above but move to have elbows resting on flat surface with arms positioned in ‘Prayer’ posture
Sit weight gently back and down relaxing between shoulder blades and across upper back. Try to let head bypass the bench (surface)
Try breathing in deeply and coming out of the stretch slightly then breathing out slowly and dropping deeper into stretch
Explore the stretch position with subtle movements and breathing for 60 seconds +

Prayer Stretch Start Posture

Prayer Stretch - Sit back position
Exercise 3
Shoulder Dislocates (Stick or Band)
Begin in high kneeling or standing - Holding a stick or band keep arms straight and core tight, slowly bring arms straight overhead and around down towards lower back. Allow shoulder blades to gently shrug then rotate and slide down as you circle arms overhead
Return to start point slowly ensuring not to over-arch through lower back
Repeat for 10-15 repetitions

1- Shoulder Dislocates - Stick (Overhead)

2- Shoulder Dislocates Stick (behind back)
Exercise 4
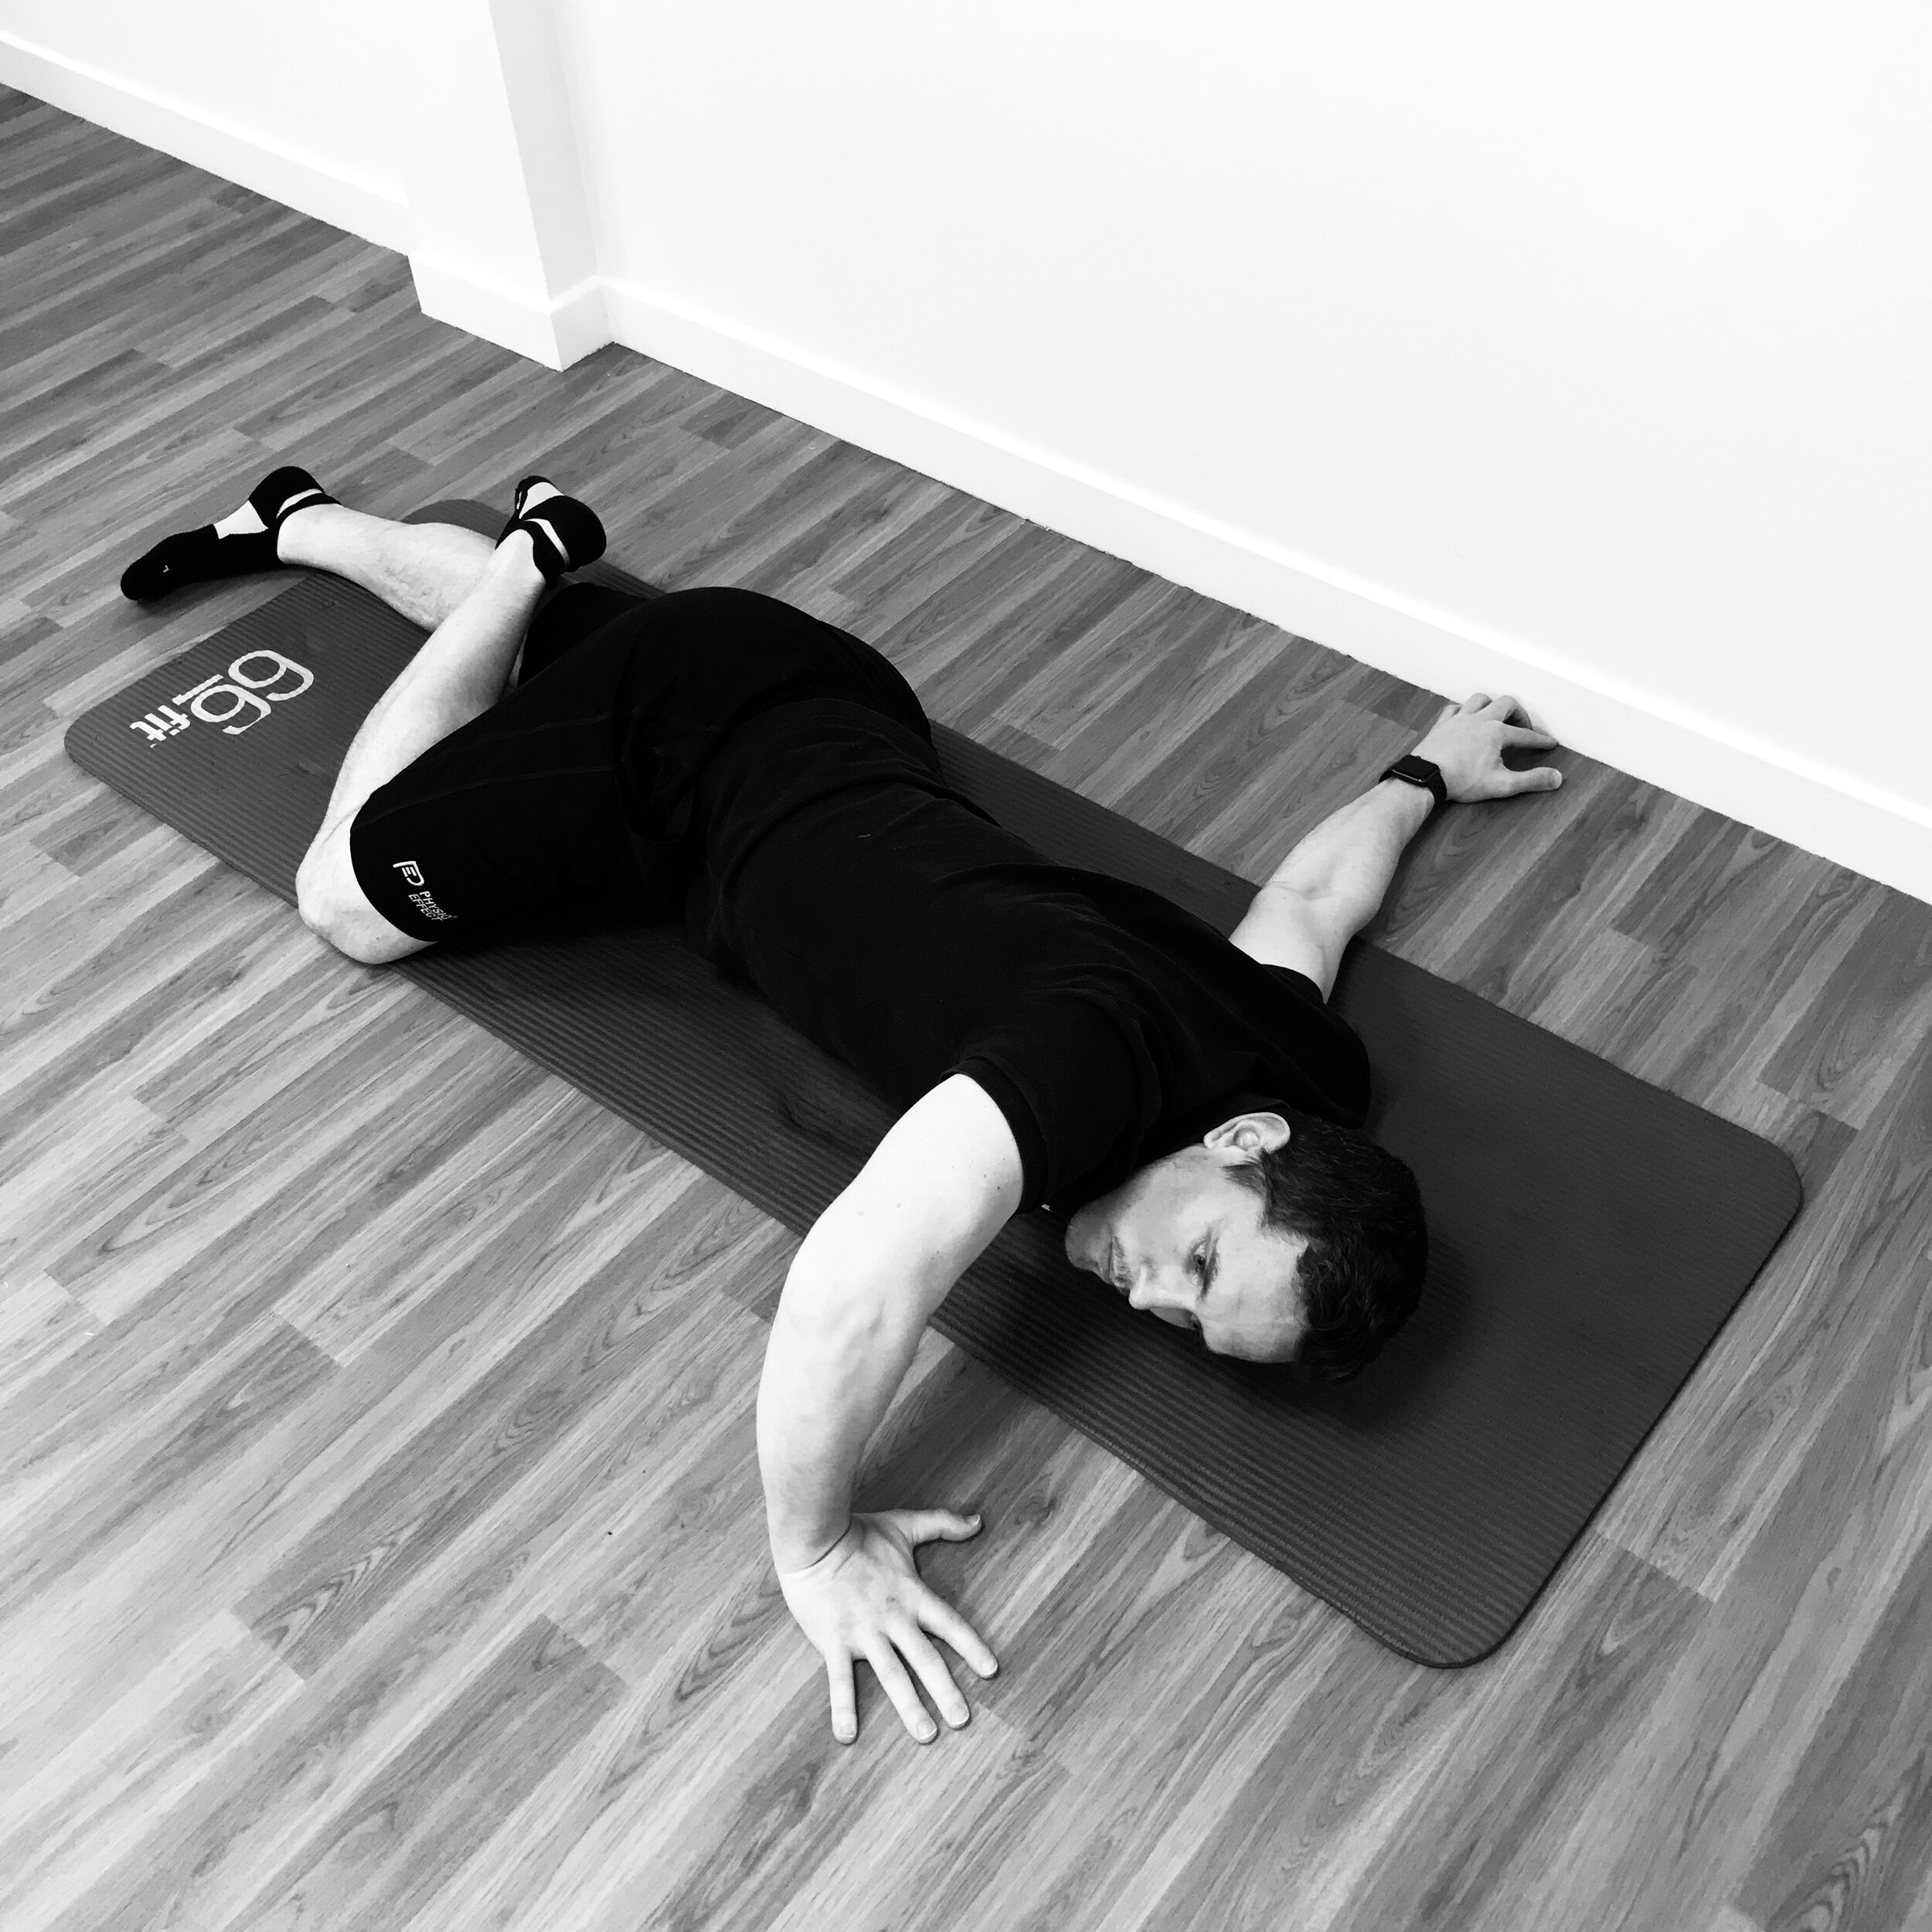
‘L’ Position Prone Shoulder Stretch
Begin lying on your front. Gently reach with shoulder to be stretched under and across your body at shoulder height with palm facing up. Allow other arm to stretch straight overhead forming an ‘L’ shape with your arms
Gently rotate into the stretch as if trying to square up shoulder blades increasing the pull/stretch felt in back of the shoulder reaching across body. Hold and release this motion for several repetitions
Work in this position for 60 seconds + on each arm

1- ‘L’ Position Shoulder Stretch Part 1
2- ‘L’ Position Shoulder Stretch Part 2
Exercise 5
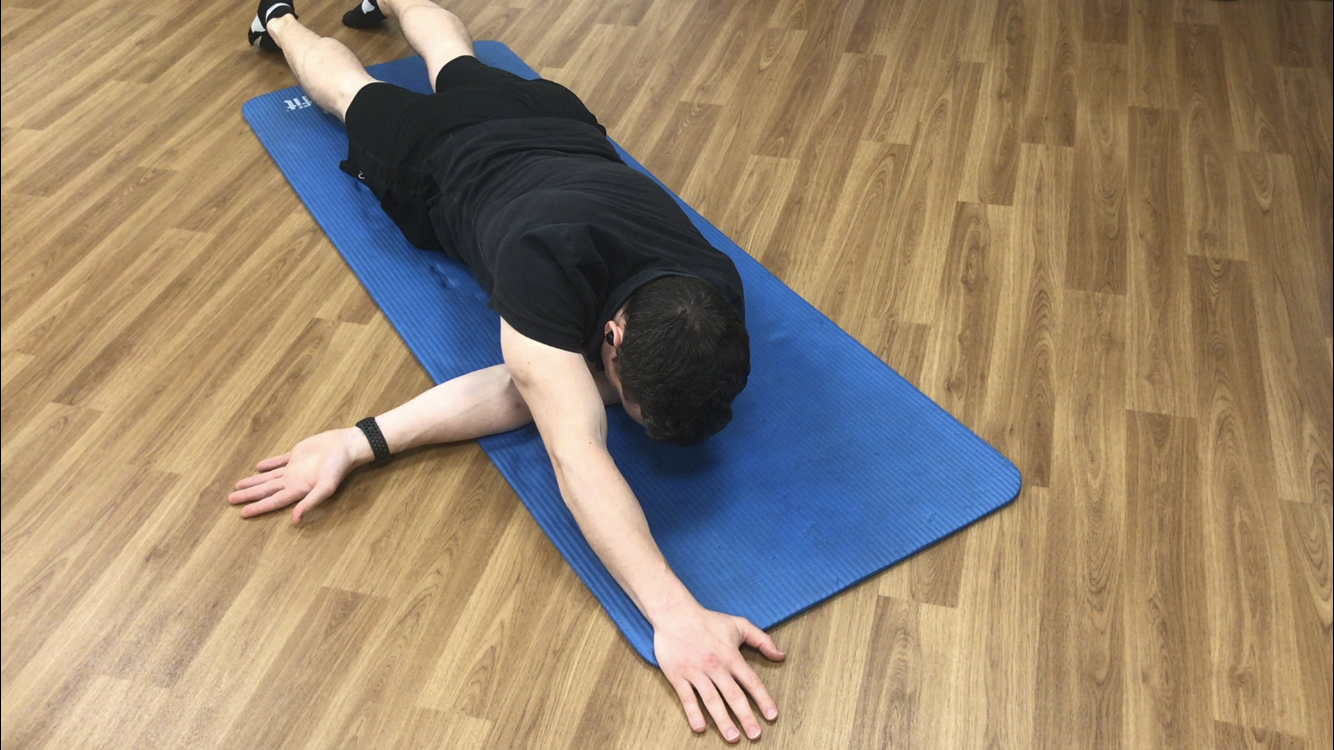
1/2 Crucifix Chest Stretch
Start face down with side to be stretched arm extended fully out at shoulder height palm down. Opposite arm is bent at 90 degrees at elbow hand at shoulder height ready to push into stretch
Gently push with bent arm while rolling weight of legs over to create a strong opening stretch of the chest of the straight arm
Gently push in and out of the stretch holding for a few seconds then releasing and repeat
Explore this stretch for 60 seconds + on each arm

1- 1/2 Cucifix Start Posture

2- 1/2 Crucifix Chest Opening
Thanks for taking the time to read this guide, we hope you find it useful. Please share with anyone else who might benefit and if you have any questions comment and let us know. Don’t forget to download your free mobility cheatsheet. Good luck and enjoy your improved shoulder health.
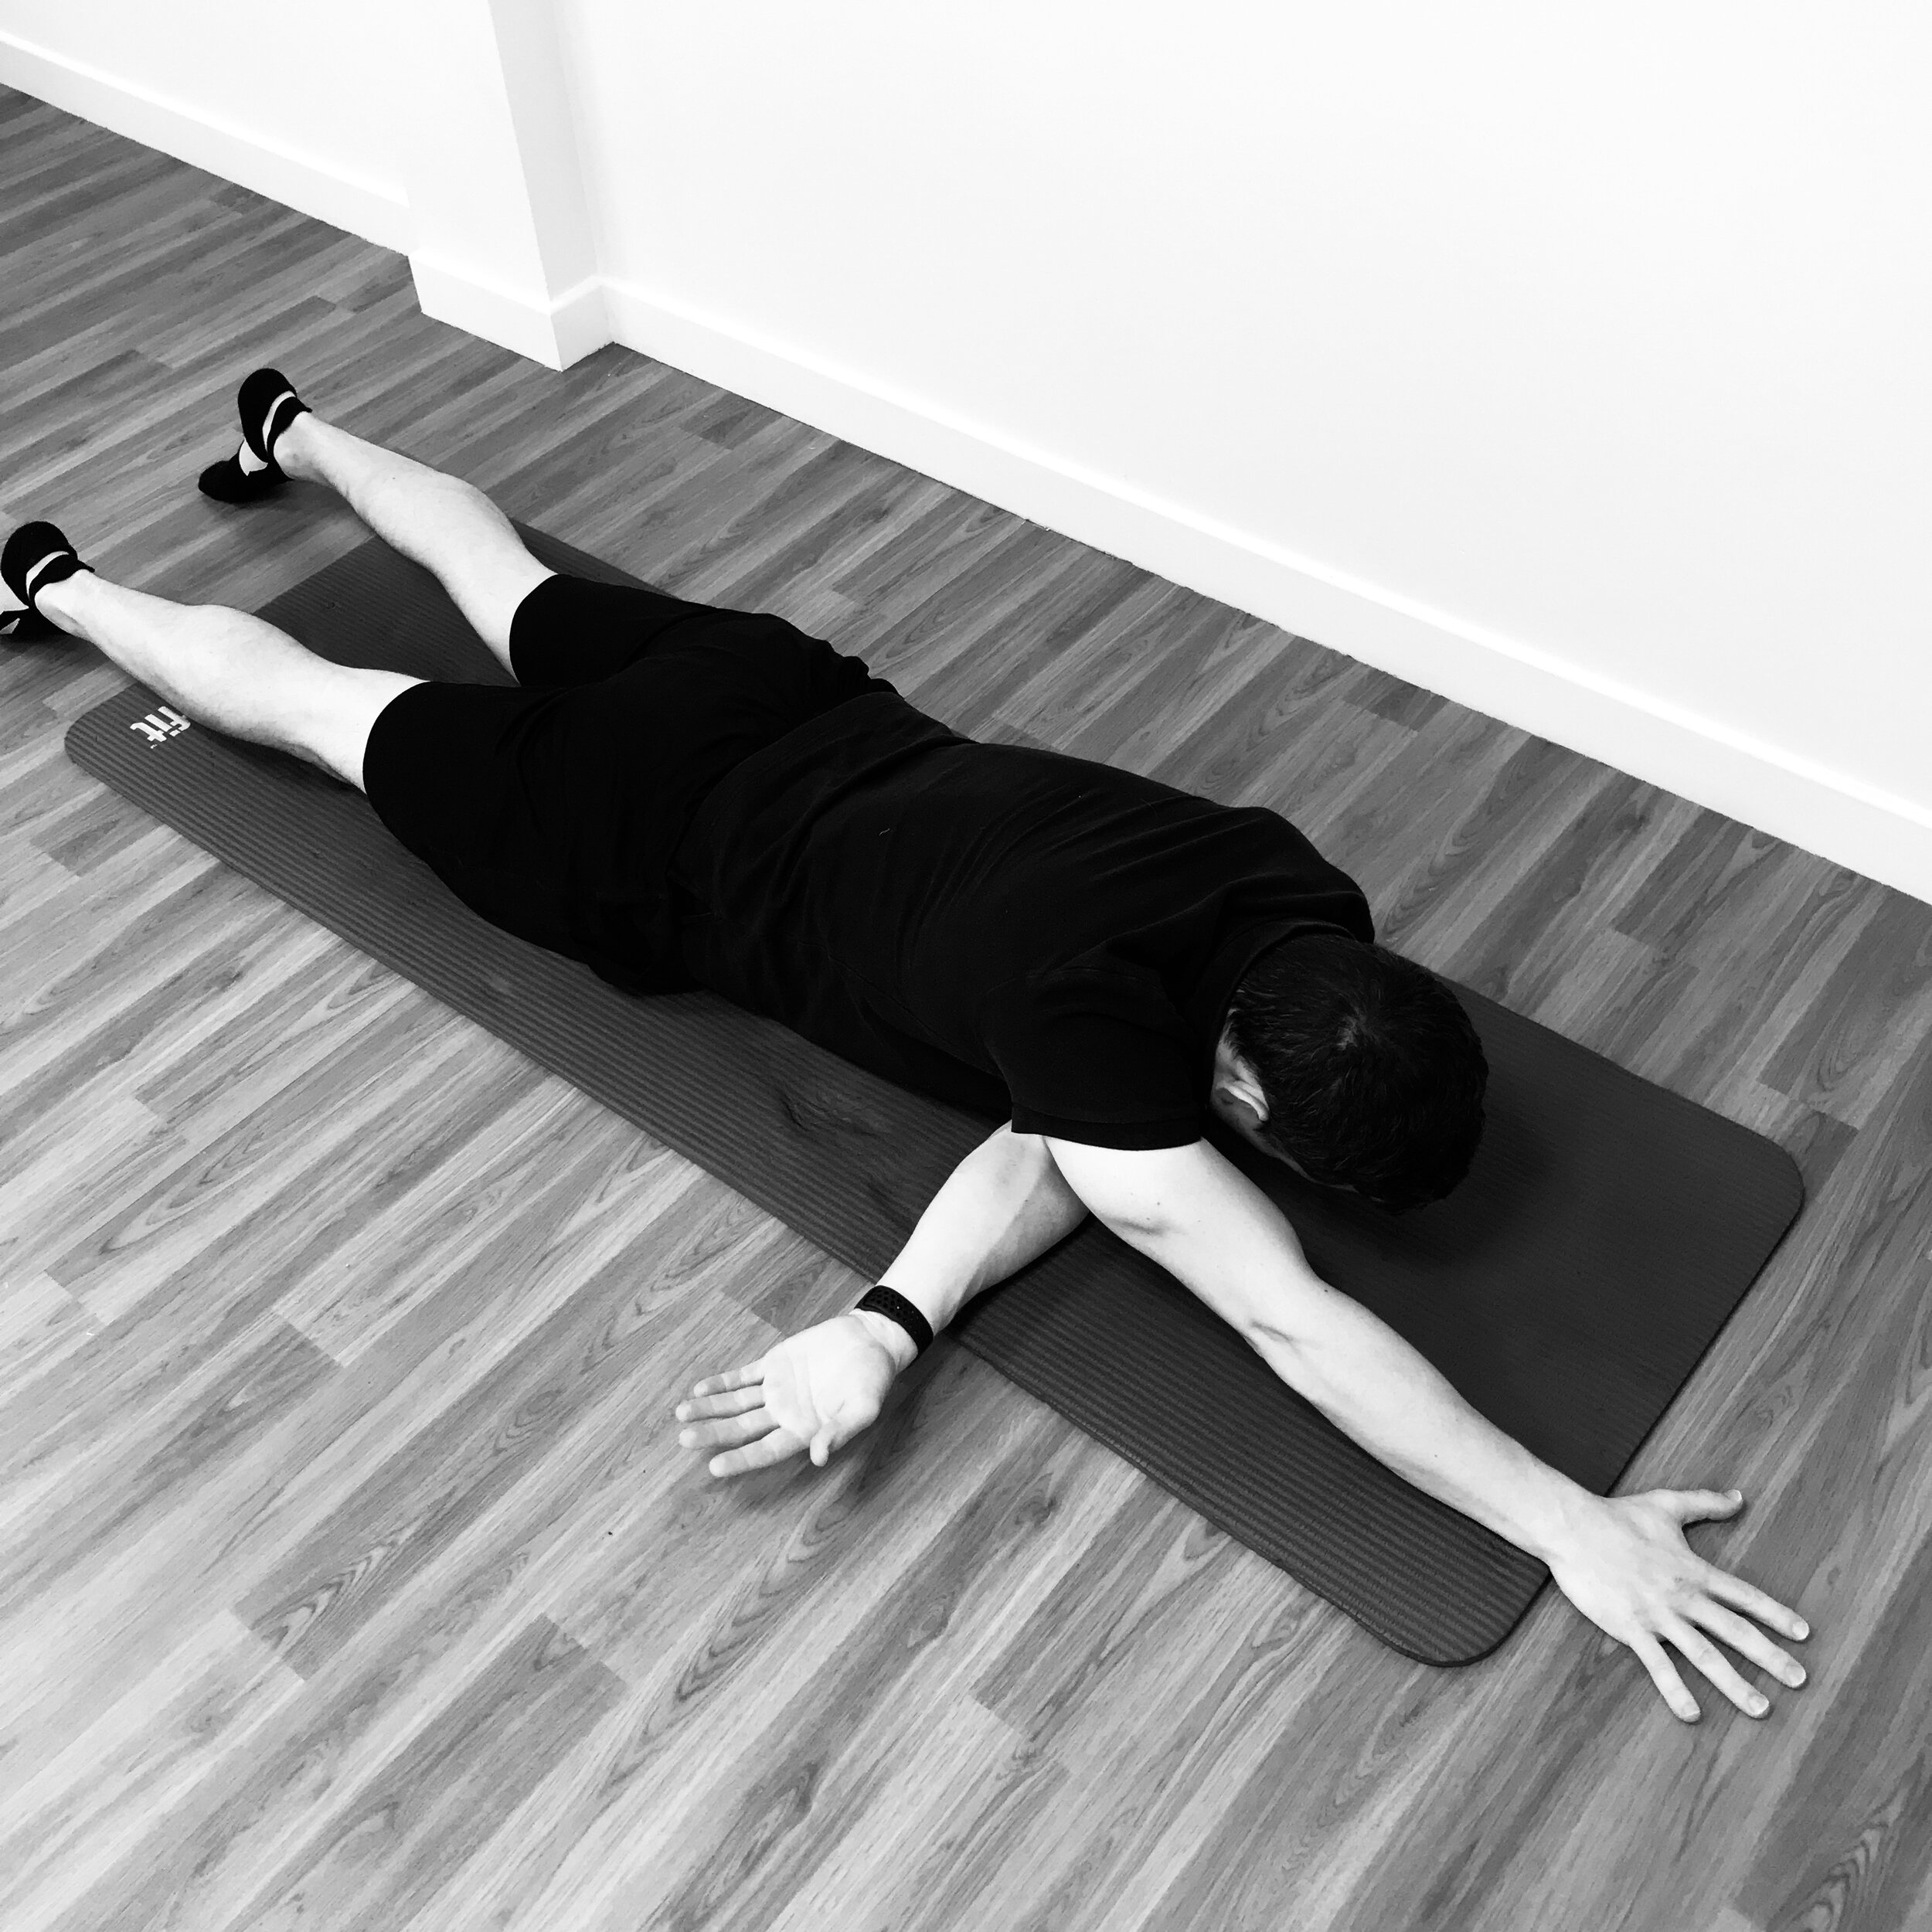
‘L’ Position Prone Posterior Shoulder Stretch