
You are not your MRI: A Rehab Story.
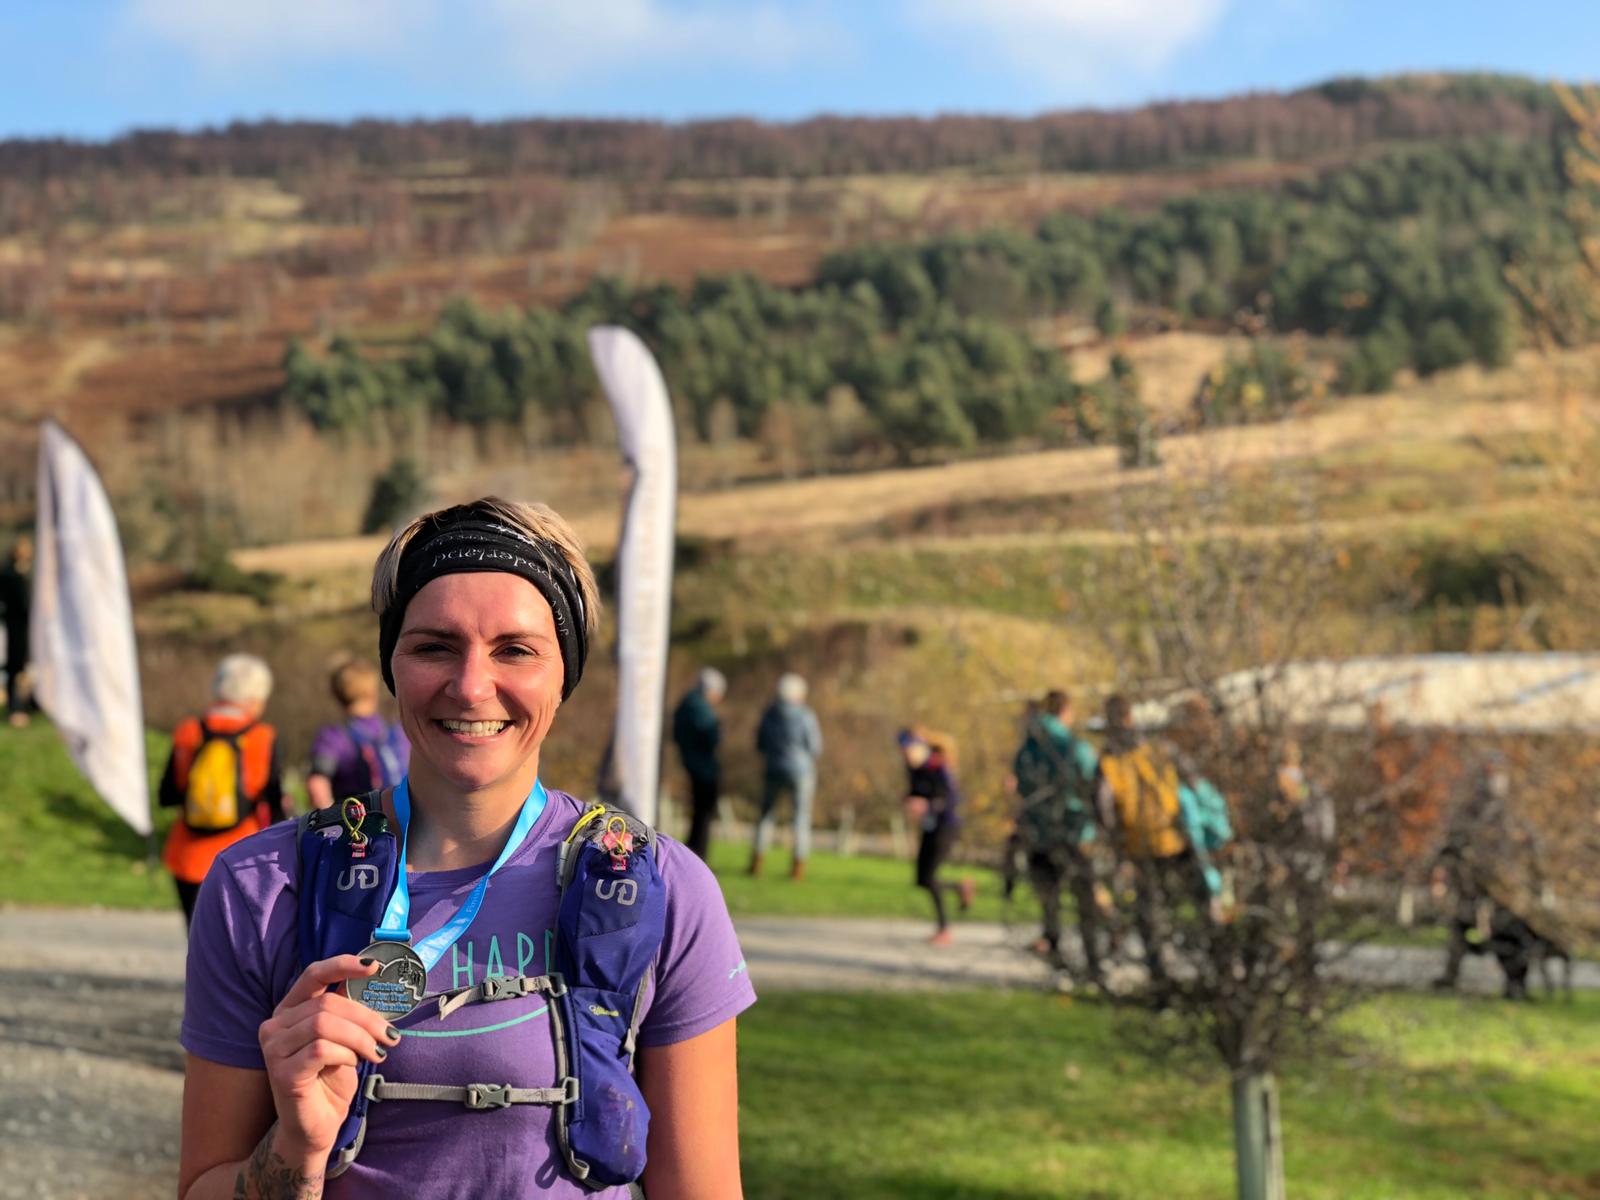
Fiona Callan is a CrossFitter and Ultra-marathoner who injured her back in 2017. She had an MRI which showed an “L5/S1 disc bulge with nerve root irritation”. In this interview we discussed how she chose to avoid surgery and returned to the things she loved doing best.
Written by Mariam Kilpatrick, Physiotherapist and Clinical Pilates Lead at Physio Effect
Fiona Callan is a CrossFitter and Ultra-marathoner who injured her back in 2017. She had an MRI which showed an “L5/S1 disc bulge with nerve root irritation”. In this interview we discussed how she chose to avoid surgery and returned to the things she loved doing best.
Hi Fiona, thank you for taking the time to share your experience with us. Before we begin, tell us a bit about yourself…
I work in the NHS, primarily an office based job. Preceding my injury I was also studying for an MSc so basically spent all day and night sitting at a desk.
I started running in 2008, mainly 5k and 10k distance on roads but I wasn’t very good and didn’t enjoy it so moved to trail and hill running instead when I started gradually to increase my distance. I met some really cool people to run with as well. In 2012, I was talked into a trip to Nepal by a friend but it wasn’t until around 4 weeks to go that I found out he had signed me up to an ultra marathon. I didn’t even know what that was! It was sheer determination that got me through that and I really caught the ultra marathon bug.
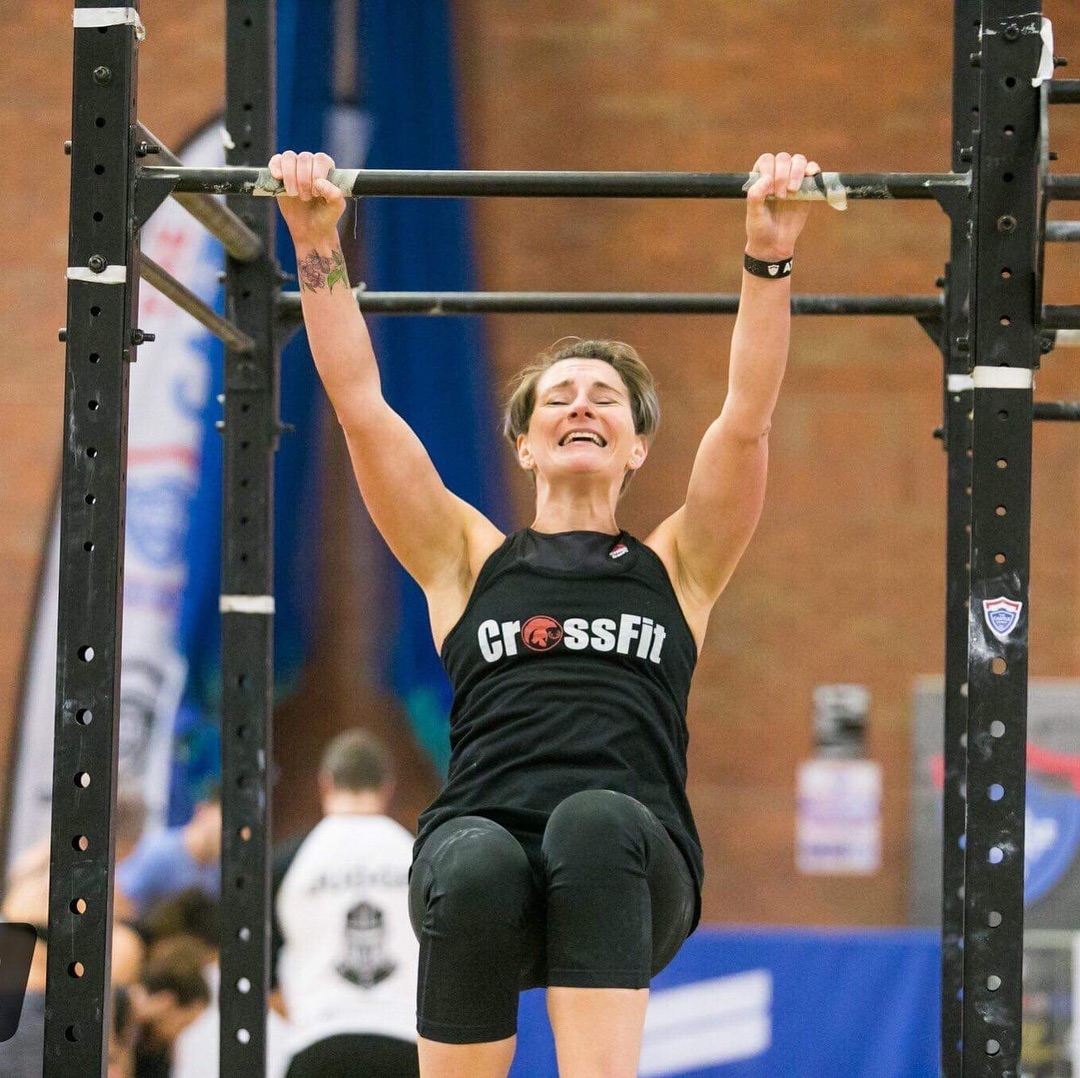
In 2014 I started CrossFit as I thought some strength and conditioning type training would help with my running and I had no idea what I was doing in a conventional gym. The coaching and set workout approach has really worked for me and made me use muscles I didn’t know I had.
So the key question… how did you injure your back?
To be honest I’ve always had a bit of a lower back niggle, probably postural, but thought it would just go away. It was definitely something I started to feel more when I started CrossFit as I really had to use my back and core more than I had been doing running. Slowly I noticed it had started to affect my running, I had pain in my right buttock that shot down my leg now and again and my leg generally felt heavy. If I left it a few days it would go away but it meant I couldn’t really run or CrossFit as much as I wanted to.
It started affecting my job as I couldn’t sit comfortably for any period of time. I was travelling by train to Edinburgh at least twice a week which became difficult. On one journey I had to get off the train and go back to Glasgow as I couldn’t face sitting for an hour.
Then during a workout involving a barbell I cried so much I had to admit that something wasn’t right.
My initial symptoms were primarily in my lower back, there was a build up of pressure around my stomach and back even when I bent over the sink to wash my face. I tried to keep active but really scaled back on what I was doing. I kept up my hill walking as this is an activity I love doing with my nephew – I used poles and made Ewan carry my bag as he’s the young one! I tried running but could only manage 1k before I felt my back stiffen.
One Saturday I went walking with Dad and Ewan in the Lake District. It was an amazing day. The hill wasn’t too hard; we took our time and enjoyed it. It was the shooting pain in my right leg that woke me up early on the Sunday morning. I tried to stand up but my leg just wouldn’t work. I limped to the bathroom hanging onto the wall and at that point I knew there was something seriously wrong. It sounds dramatic but I genuinely felt paralysed down that whole side of my lower body, first thoughts were ‘I’ll never run again!’ and panicked. My boyfriend called NHS24 and a nurse managed to calm me down and suggested I took paracetamol with ibuprofen and try find a comfortable position until a doctor could get to me. A few hours and one injection later the pain had dulled. He said it was my sciatic nerve; I should try to relax and spend less time sitting down!
What treatment did you seek initially?
I got an appointment with Jonny who did some needling on my lower back/ glutes and gave me some exercises to do. I am the most impatient person and after a week of exercises I didn’t feel any different so I saw another physio (sorry!) who basically told me the same thing and gave me the same exercises. I really was in denial about how serious it was. I spoke to coaches in the gym, chatted to other runners and did a lot of Googling but all the answers were the same.
It was the mental part I actually found the toughest to deal with. I have made so many friends through running and CrossFit and my social media is full of it too so I was always seeing and hearing about all these amazing runs and PBs. I just felt stuck and disconnected. I saw my GP as I really felt like I was struggling to cope. People were always asking how I am and telling me I should ‘do this and do that’ and eventually I just got fed up talking about it. My GP didn’t really help me; she referred me to her physio friend but I didn’t go.
At the same time, Jonny had referred me to see Mariam for Clinical Pilates and it was during my consultation that she suggested some short term medication for my nerve problem in my right leg. I went to another GP for this and as well as giving me the medication, he was really keen to get me back running and to the gym so he referred me for an MRI.
What happened after your MRI?
I was really lucky in that I got an MRI pretty quickly. A few weeks after the scan. I received a letter with a hospital appointment but with no other information. Frustrating and worrying. I thought well there must be something not quite right and because of my problem with patience, I called the GP and asked him to give me a brief overview of the scan. He said he could see a disc bulge and I should continue doing my physio exercises until my appointment (with the consultant). I had just started with the Clinical Pilates class so I let Mariam know the issue and she tailored exercises for me until I found out more about the problem.
How did you feel after speaking to the neurosurgeon?
I remember getting a phone call from a surgeon in the spinal unit and it made me feel sick. I actually don’t remember what he said to me as the idea of back surgery just terrified me. I wasn’t exactly in crippling pain so the idea of surgery just felt a bit extreme to me. This was something I definitely wanted to avoid. I just really trusted my physios and they really believed I could get better without it. I didn’t feel that my pain was bad enough for surgery – for me this was the last resort.
At the appointment, the doctor went through my scan which I found fascinating. I actually felt a bit of weight come off my shoulders when I could physically see the issue. It had been hard to accept when I didn’t know for sure what the problem was but there it was clear in front of me. She then told me that they would do surgical intervention if I was getting sharp pains down the top of my leg. I told her I had that a few weeks before but it had been getting much better. We left it at that and I was told to get in touch if anything changed.
I had so many conversations with my boyfriend, my parents (and myself) and decided that it wasn’t the end of the world if I couldn’t run 50 miles or couldn’t deadlift 100kg as long as I could stay active. I would just scale back what I was doing.
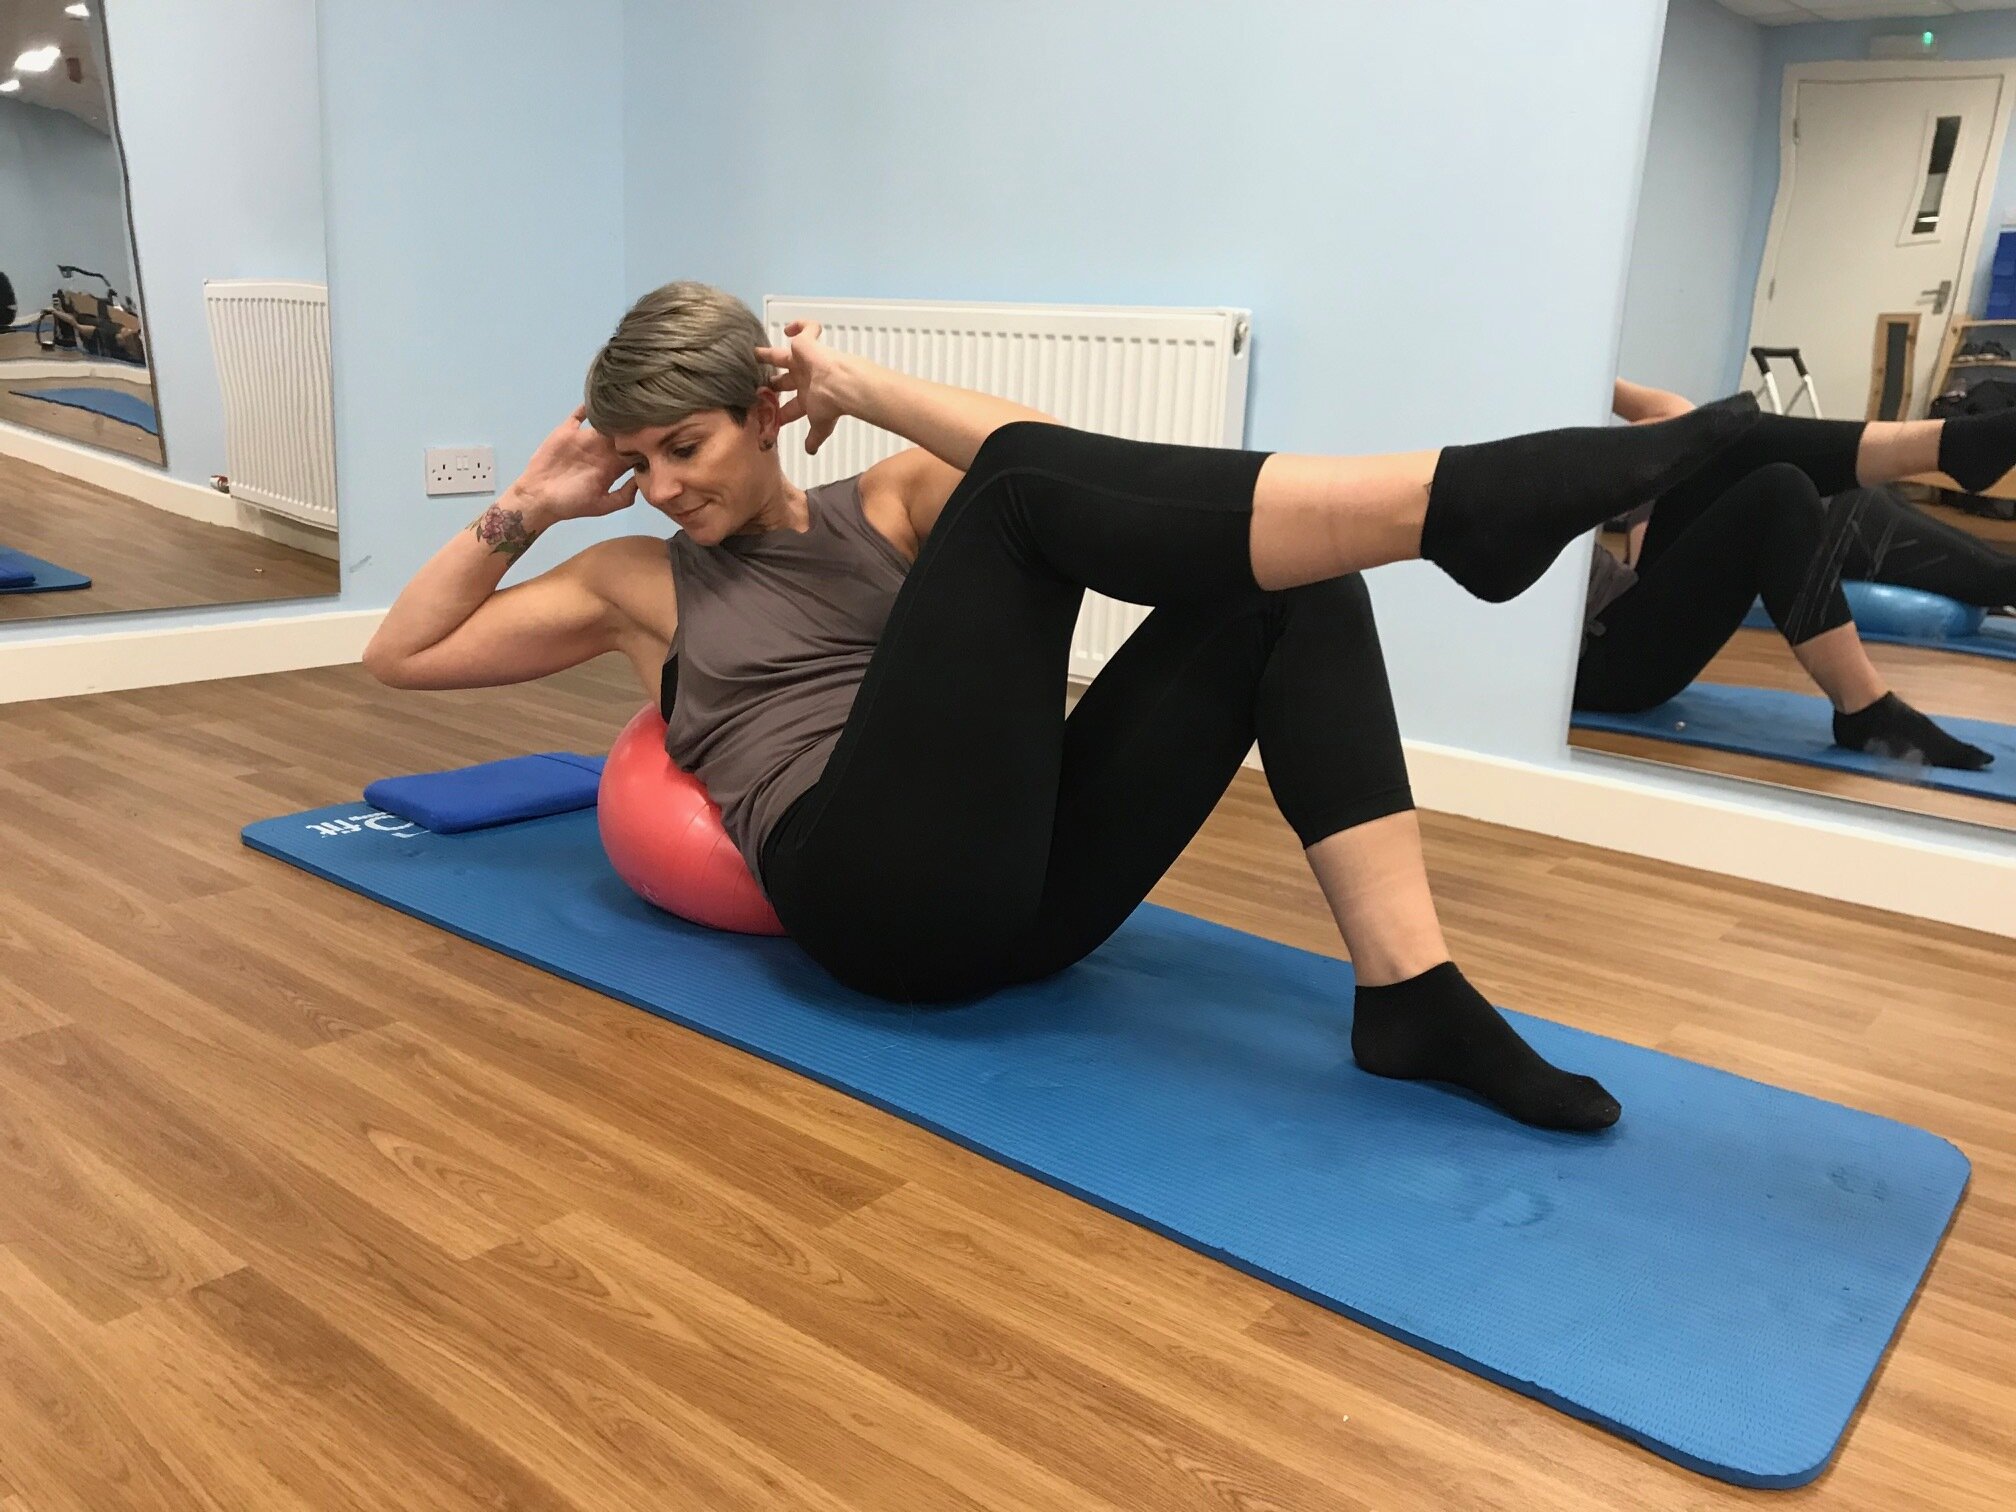
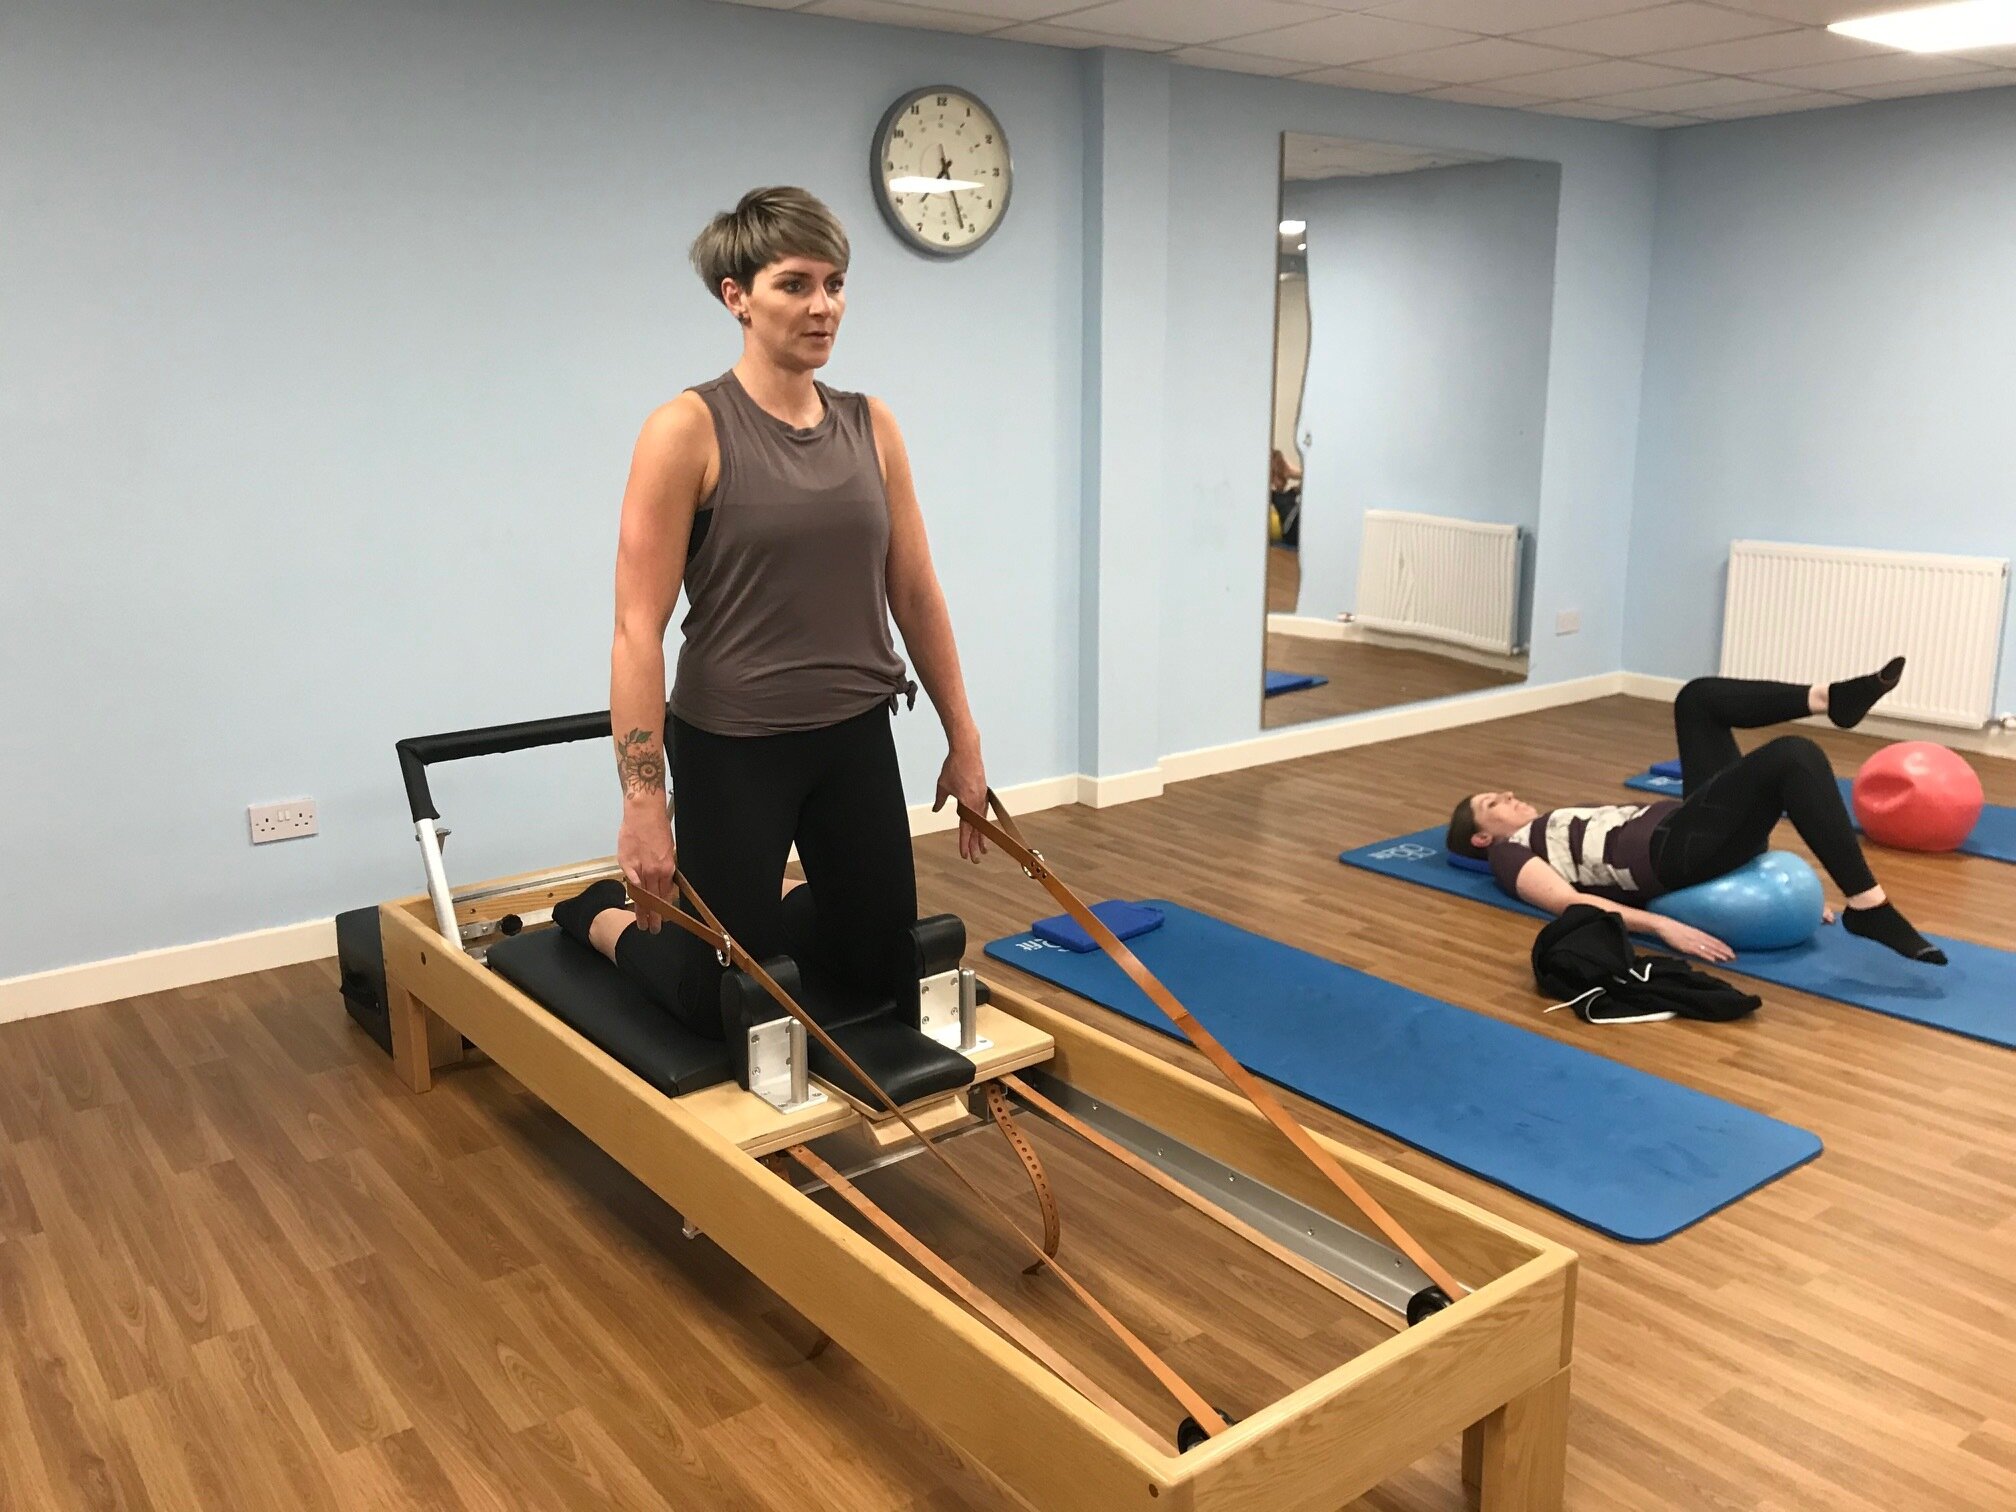
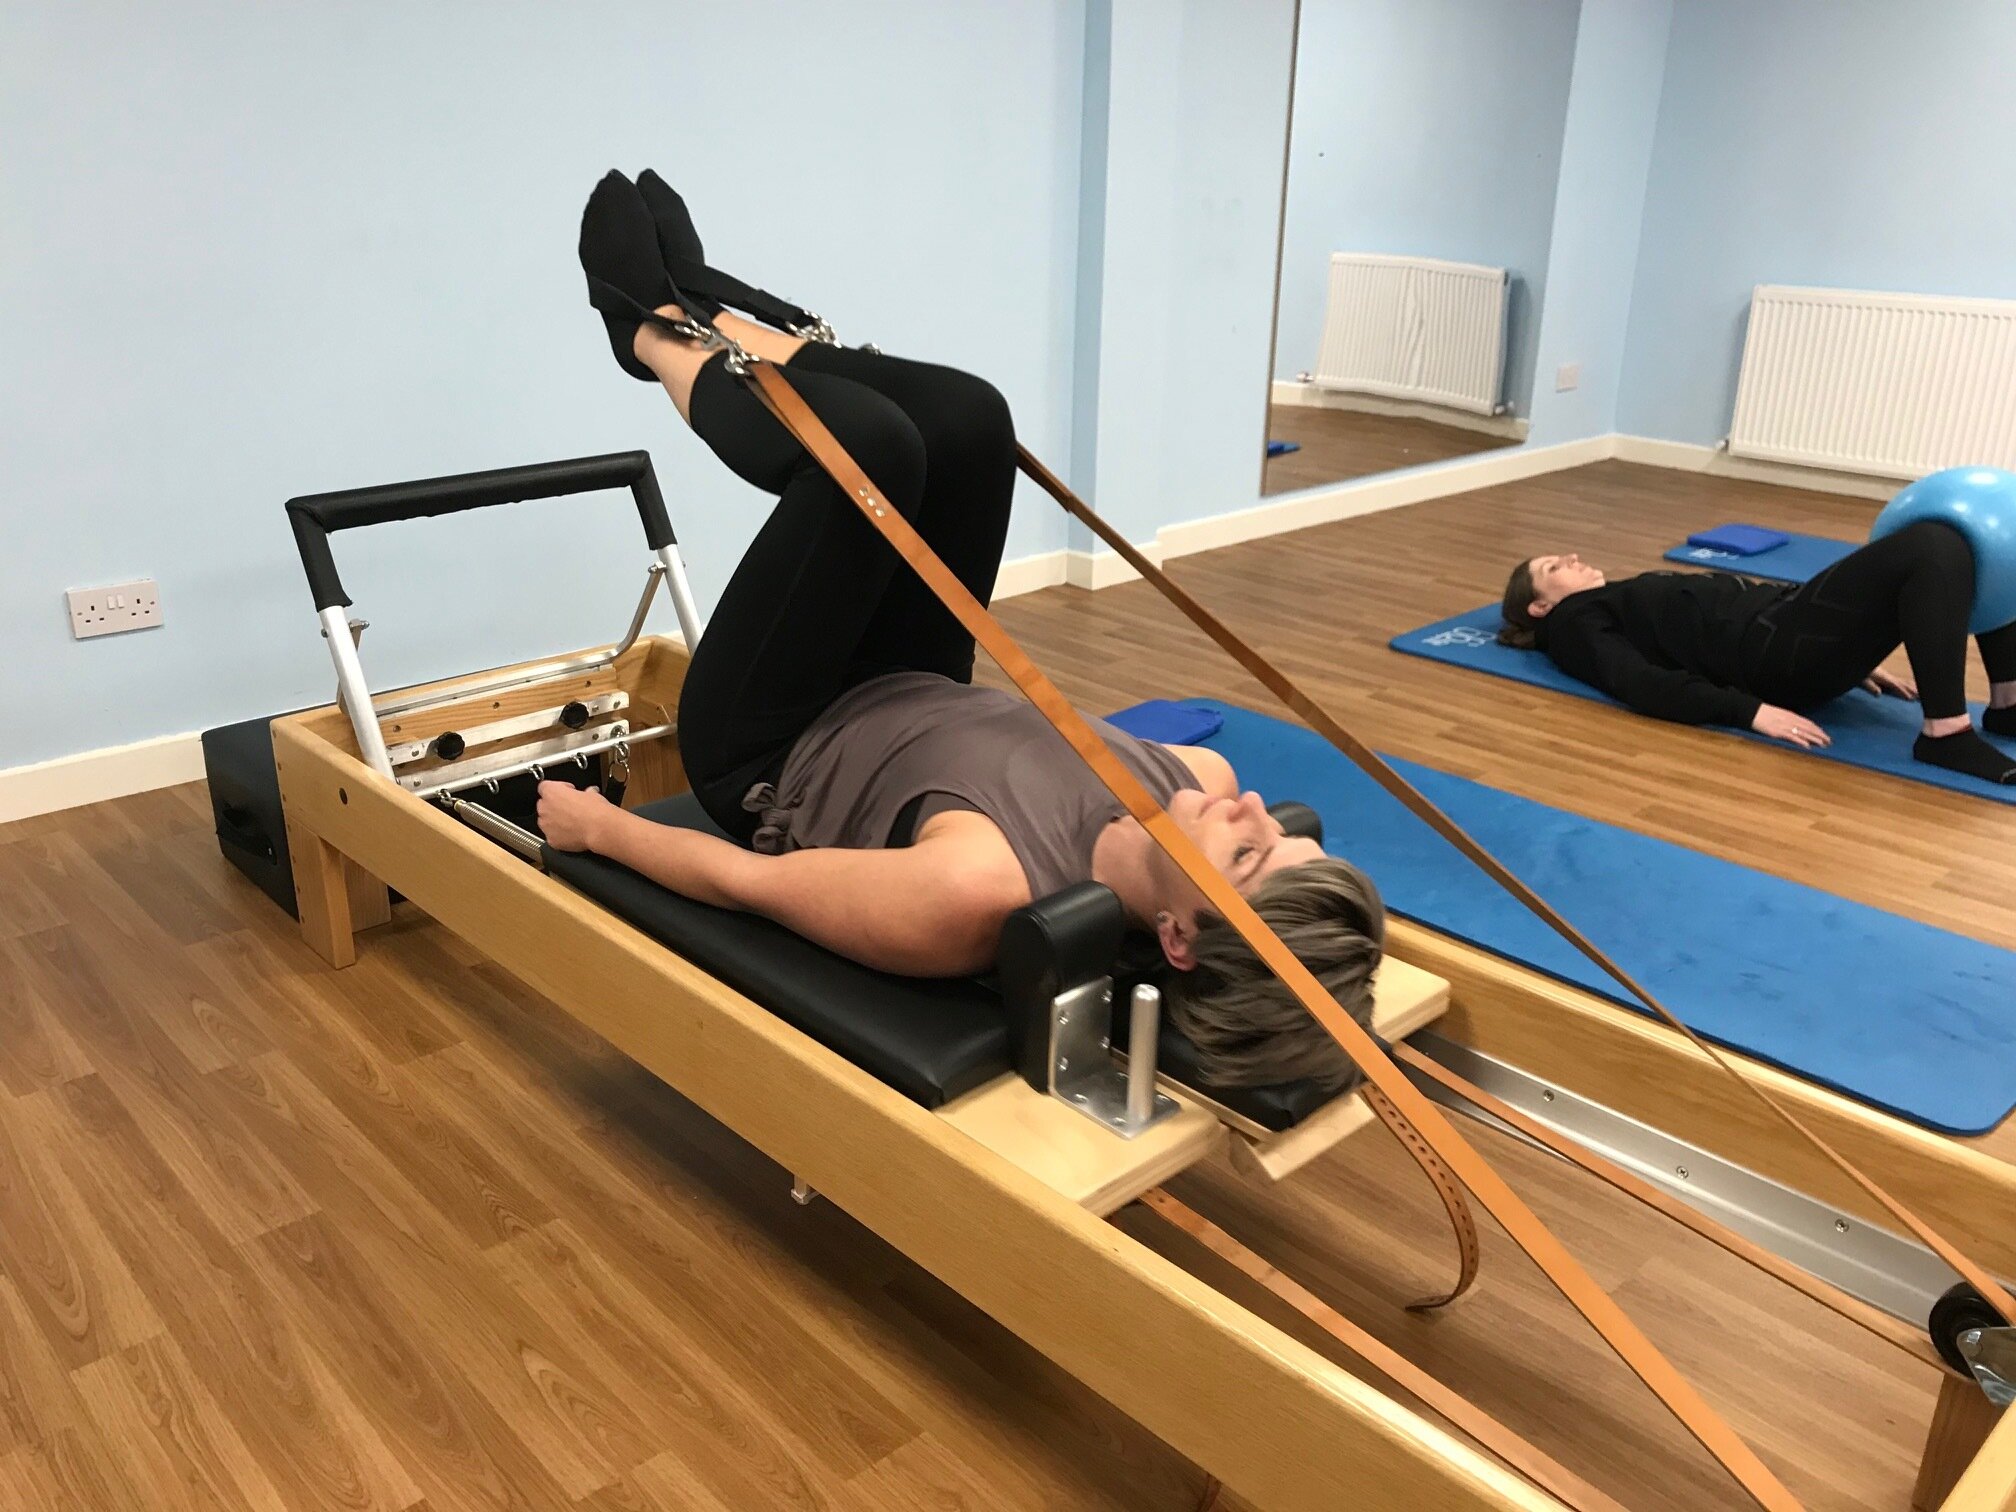
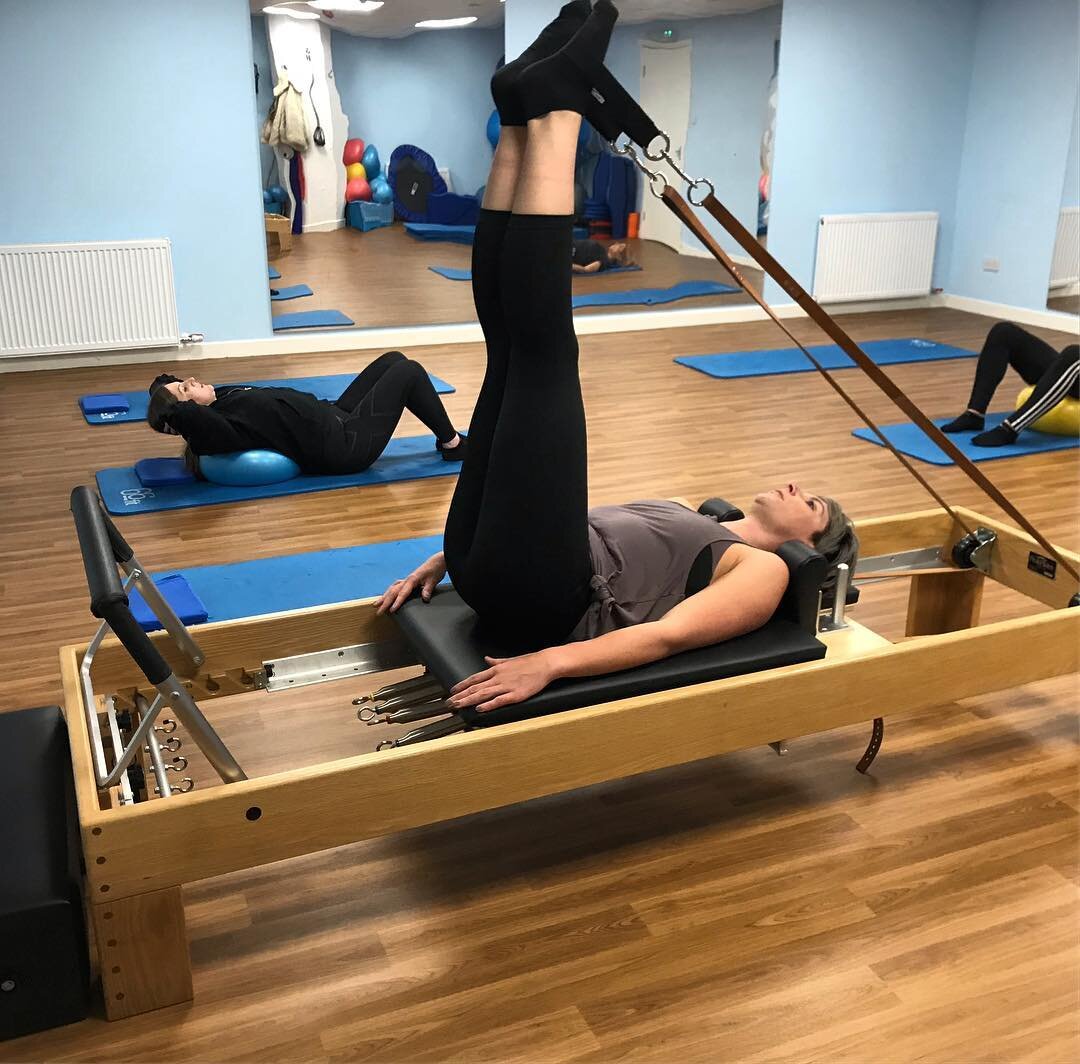
You've spent the best part of a year doing some serious rehab with Clinical Pilates. In your own words, what is it and how did it help you?
I had done a bit of Pilates before as I’d read and heard it was good for runners. It was one of those things I struggled to stick to because I never left the class feeling like I’d worked hard and my issue with patience didn’t help. When I told my boyfriend about it he signed me up for 6 weeks because he knew I’d have to go if he paid for it! I noticed a huge difference after these 6 weeks.
It is basically pilates but physio-led so your exercises are all tailored to whatever issue you may have so we’re all doing something different generally. It’s a small class but everyone is in the same boat and really friendly. Mariam checks in with you regularly during the class and pushes you when you’re ready but also changing exercises if something isn’t quite feeling good.
I expected my exercises to all be lower back focused as that’s where my injury was but actually they’ve been full body movements. As well as having a stronger back, I feel stronger and much improved posture. Mariam also spent some time working on my legs, particularly my right leg as the nerve had been affected and I had limited movement and very little strength.
Eventually you returned to CrossFit and trail-running. How long did that take from when you first injured yourself?
I was always doing a scaled back version of CrossFit and a bit of trail running while I was injured but I was mindful of undoing my hard work. It was important to me mentally that I kept in touch with coaches/ friends in the gym and my runner friends.
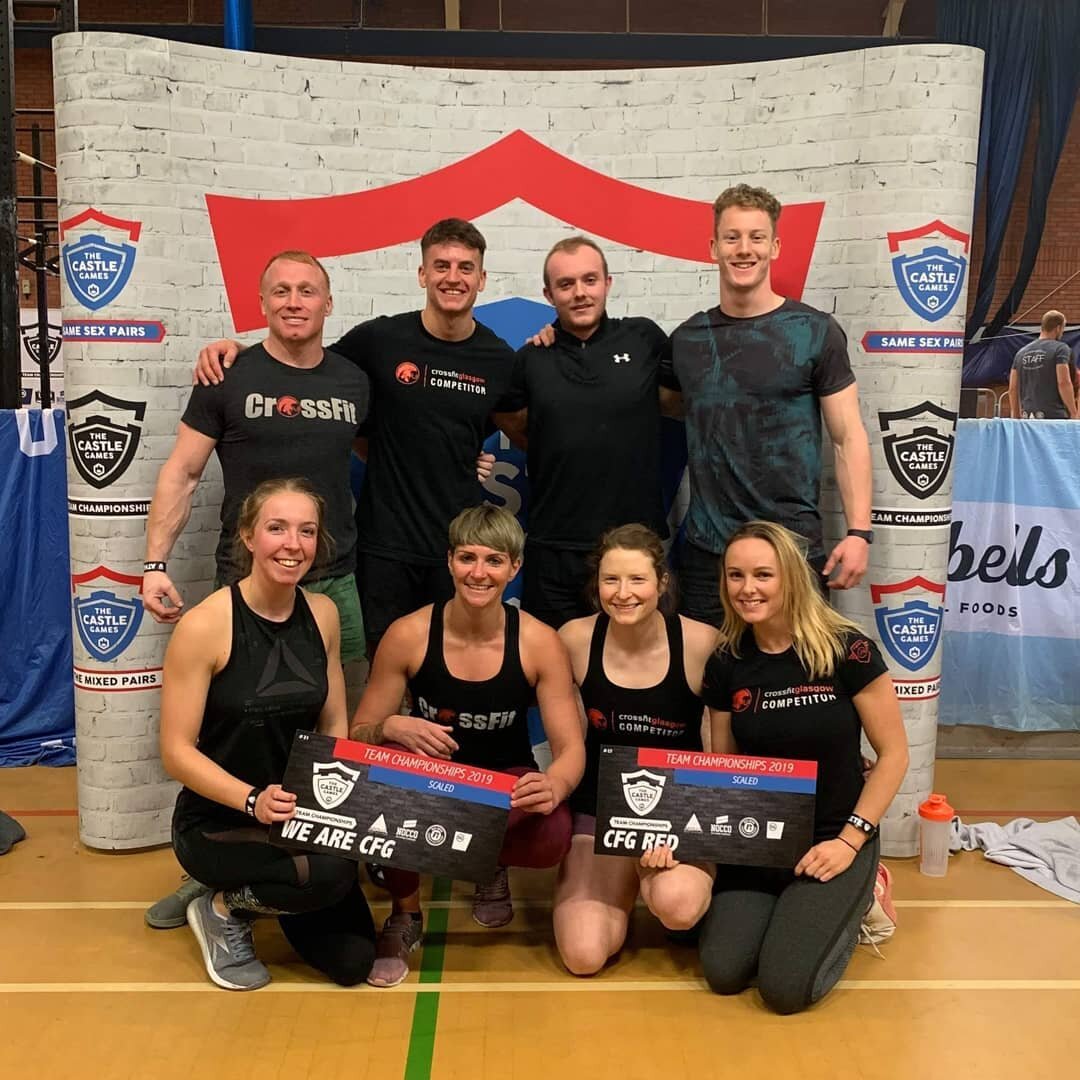
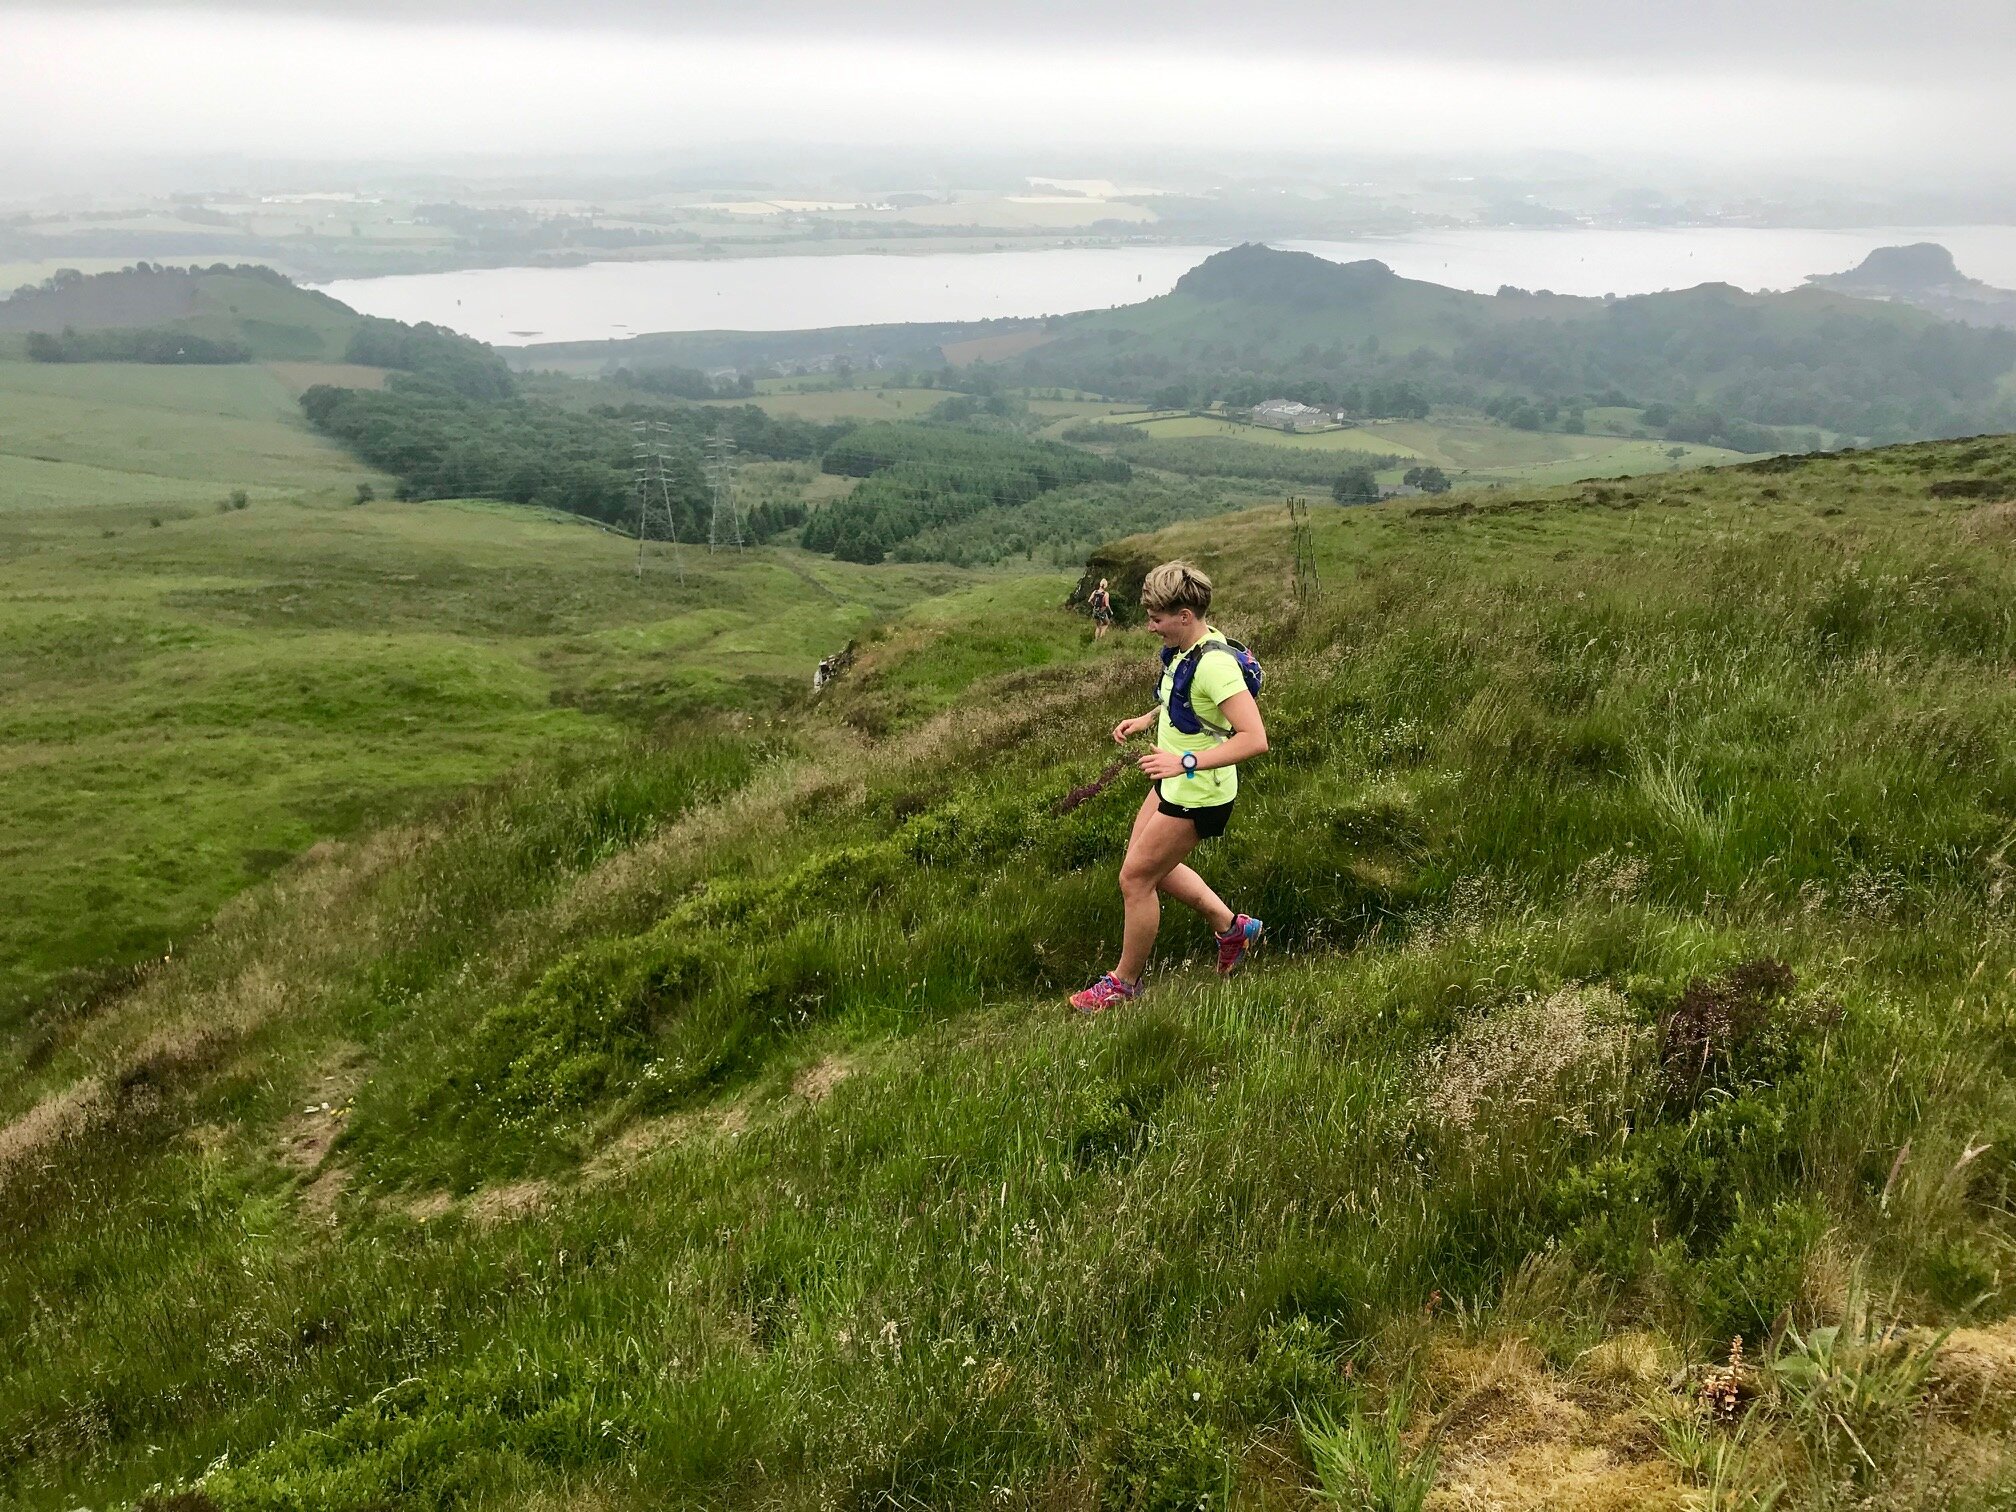
I accepted my injury in May 2017 and started Clinical Pilates in the October. In May 2018 I was a more confident runner so decided to train for a race following a plan, building up in distance and I finished the Mad Hatters Half Marathon and the Glentress Half Marathon with a PB and no back or leg pain. Not quite back at ultra marathon distance but I’m actually enjoying the shorter runs at the moment. In June 2018 I started back at CrossFit and noticed that I’m better at a lot of the movements as I actually use my back and core as I should. I’m always conscious of loading too much weight on bars and I know certain movements still aggravate my back but I know when to stop and I just need to gradually build my strength back up. I was asked if I’d like to be part of a team from the gym for a CrossFit competition, I said yes why not I can try and we finished in 3rd place with no back pain!
Most people seek the "quick-fix" or miracle cure. What advice would you give them?
Your back is such a major part of your body so decisions on surgery should never be made lightly. Unless a professional is telling you there is no other option, I would encourage people to commit to the exercises and rehab, spend less time being sedentary and stay active by doing anything you find fun.
Working through this injury has taught me so much about my body and my lifestyle as well as making me a better runner and CrossFitter. This is all coming from the most impatient person!
SEEKING GUIDANCE? WE CAN HELP
Our experienced team at Physio Effect Glasgow are specialists in back pain and have helped 1000s of people recover and get back their quality of life. We talk the talk and walk the walk and will combine exercise based rehab such as Clinical Pilates with highly skilled hands on therapies to ensure you get the best possible treatment.
Most importantly we will listen and work with you in partnership to identify your specific issues and formulate an agreed unique treatment plan. We will relieve your back pain and give you long term self management strategies to strengthen your back and reduce the chance of pain relapse.
Please contact us if you have questions about our physiotherapy and Clinical Pilates services. Book an appointment and get your journey to back pain recovery under way.

Animal flows - What, How and Why?
Animal flows are a great addition to any exercise plan, warm up routine or injury prevention plan. Learning to move like a monkey, frog, or bear helps to build full body strength, mobility and motor control which in turn will make you a more awesome human and less prone to injury. This blog with video tutorials will explain what these movements are, how to utilise them and why you should should be doing them
What are Animal Flows?
Animal flows essentially refer to movement and exercise patterns where we imitate different types of animals such as bears, monkeys, frogs or lizards. Moving in these patterns can be very challenging, especially for the stiff & inflexible among us, but can also be really fun & provide significant benefits.

Deep Squat
Practicing animal flows can help improve strength, flexibility, mobility and overall motor control which in turn will help to make you a better functioning human and less at risk of injury. These movements can really challenge us in unconventional ways demanding our joints and muscles learn to control movement in patterns and ranges we would rarely otherwise practice. They can provide a great way to warm the body up in preparation for other forms of exercise or can even act as a stand alone training session. Once you have tried some of these movements for a few minutes you will understand why!
Where do I start?
As with all areas of training and exercise when attempting something new or different our advice is always start slow and work safely within your own levels of capability. Never push through pain or injury and if in doubt about whether this is appropriate for you please seek advice from a qualified professional.
Very few people will be able to perform controlled animal flow movements perfectly or even well at the beginning. When incorporating these kinds of exercises with my patients it’s essential we first establish their base level where they feel safe to practice but also feel that it is challenging. I would advise starting with getting comfortable in the static positions required as the foundation for the movement. In this post we will look at 2 positions - Deep Squat & A-Frame (Downward dog). These are the foundation starting postures for progression onto the animal movements monkey, frog and bear.
Deep Squat
The squat is a great foundation exercise for strength and mobility in the lower limbs and yet for so many people it is a real area of weakness and frustration. A lot of us slowly lose our ability to sit into a deep squat mainly through neglect and lack of practice combined with our static and sedentary western lifestyles. We become weak, stiff and tight and can no longer control the range of motion required to allow a deep squat. We rarely challenge ourselves to sit into a deep squat position let alone spend time exploring and improving on our range and control in this position. So first things first lets get a measure of your baseline squat function - check out this video and see how you get on.
It may take weeks or months of work to improve your squat mobility and that’s okay. For a more detailed look at improving your hip and back mobility please click the links to see our previous blog posts on these areas. You can use these routines alongside your deep squat holds to improve your squat function.
If you feel up to increasing the mobility challenge of your deep squat lets check out this next video requiring some active hip rotation movements at the bottom of the squat - a great way to improve your range of motion and strength.
I would recommend slowly building these exercises into your routines, aim for 20-30 second rounds initially performed for 3-4 sets thereby accumulating 2-3 minutes in the deep squat. Try this at least 2-3 times per week. Long term the idea is to become comfortable spending longer periods in the deep squat and find it relatively easy to perform movements from this position. Try to build up to 5 minutes total in the deep squat per day of practice over several weeks.
Monkey & Frog Mobility
These animal flow progressions are suitable once you have a comfortable squat allowing you to sit at least to parallel depth without the need of hand support. Don’t worry if you’re not there yet, keep practicing the squat, back and hip mobility exercises and you can move on to these once you feel confident.
These exercises are difficult and physically demanding but the pay off of regular practice will be improved squat mobility, increased lower limb strength and motor control with an associated reduced injury risk in these areas. Give each of these a try and see how you get on.
Add these to your regular practice at least 2-3 times per week initially
Begin with 20-30 second rounds aiming to build up to 1-2 minutes or longer
Look to accumulate time in the positions - Try a 5 minute timer & while stopping for breaks when required, try to spend as much time actively moving in these flows
Ideally we want to develop a relaxed freedom of movement where you can drop comfortably into a deep squat and easily move through monkey and frog patterns. You can mix and match the movements to create variation in the flow and challenge your strength and mobility through mixed planes of movement. Don’t expect overnight success but as with all training with hard work and consistent practice you should be able to improve allowing you to move better and feel better.
A-Frame (Downward Dog)
This stretch position is probably best known in yoga circles, most people will of at least heard of the Downward Dog. Another term we will use is A-Frame which refers literally to the fact we are trying to get our body into a position whereby it looks the a capital letter ‘A’. This position is another staple in many exercise forms and for good reason, it challenges the flexibility and strength of our body in many areas. The shoulders, back, hips, knees and ankle joints will be tested and for many people deficiencies in strength and range of movement will limit the quality and range available in attempting this position.
For many of us just attempting this posture will be tough and tiring. A lot of you will be feeling significant resistance in the backs of the legs (hamstrings and calves) and through the shoulders and upper back. Build slowly and increase the time spent in the stretch as you feel able, again looking to improve on your own current baseline level. Before attempting bear movements from this position we can work on a couple of simple variations which are shown in the video - slow marching on the spot and active shoulder extension pushing the head and shoulders through. Let’s give it a try and see how you get on.
Bear Movement Flows
The bear crawl can be utilised as a full body exercise to develop strength, flexibility and control in many areas. It is challenging and will take time to develop the skill and movement control required to perform it well but as with all these exercises your only goal should be to steadily improve on your own current baseline level. Once you have developed some comfort and control with the A-Frame stretch the first Bear Crawl movement we will try is with straight arms and straight legs as demonstrated in the video below. The key here is control so take your time and just do what you can, even if it’s only a few seconds initially, you can build on that. Let’s give it a go.
In the next video we demonstrate a number of bear crawl variations to give you some more options to explore. Depending on your own levels of mobility and strength you may find some options easier and others harder but it is great to play around and explore a variety of positions to find any weaknesses or restrictions and ensure a variety of stimulus is achieved. The key is to safely work on your own issues and don’t be afraid to explore positions that are challenging as long as you do so gradually.
Add these to your regular practice at least 2-3 times per week initially
Try:
Straight arms & legs
Bent arms, straight legs
Bent arms, bent legs
Straight arms, bent legs
Begin with 20-30 second rounds aiming to build up to 1-2 minutes or longer
Move forwards, backwards and sideways
Look to accumulate time in the positions - Try a 5 minute timer & while stopping for breaks when required, try to spend as much time actively moving in these flows
Summary
In summary adding animal flow movement practice into your regular exercise routines or habits can have significant physical benefits by helping to improve full body strength, mobility and motor control. It is a challenging but fun way to mix up your normal exercise routines and pushes your body to explore a variety of joint postures and positions that are not routinely trained or strengthened. This variety of stimulus will help to ensure strong and healthy muscle and joint function. Enjoy exploring and playing with these movements and ultimately you can learn to move better & feel better.
Thank You
Thanks for taking the time to read this guide, we hope you find it useful. Please share with anyone who might benefit and if you have any questions comment and let us know. Please subscribe to our mailing list to receive more interesting and useful blogs. Good luck and remember to move better & feel better

Stiff achy hips? Tightness or weakness and what can you do about it?
Complete hip mobility routine to increase range of motion, reduce pain and improve function. Explore your own limitations and work to improve them with daily practice of this routine. Rid yourself of stiff achy hips and restore strong, healthy movement while improving athletic ability.
Why are my hips sore?
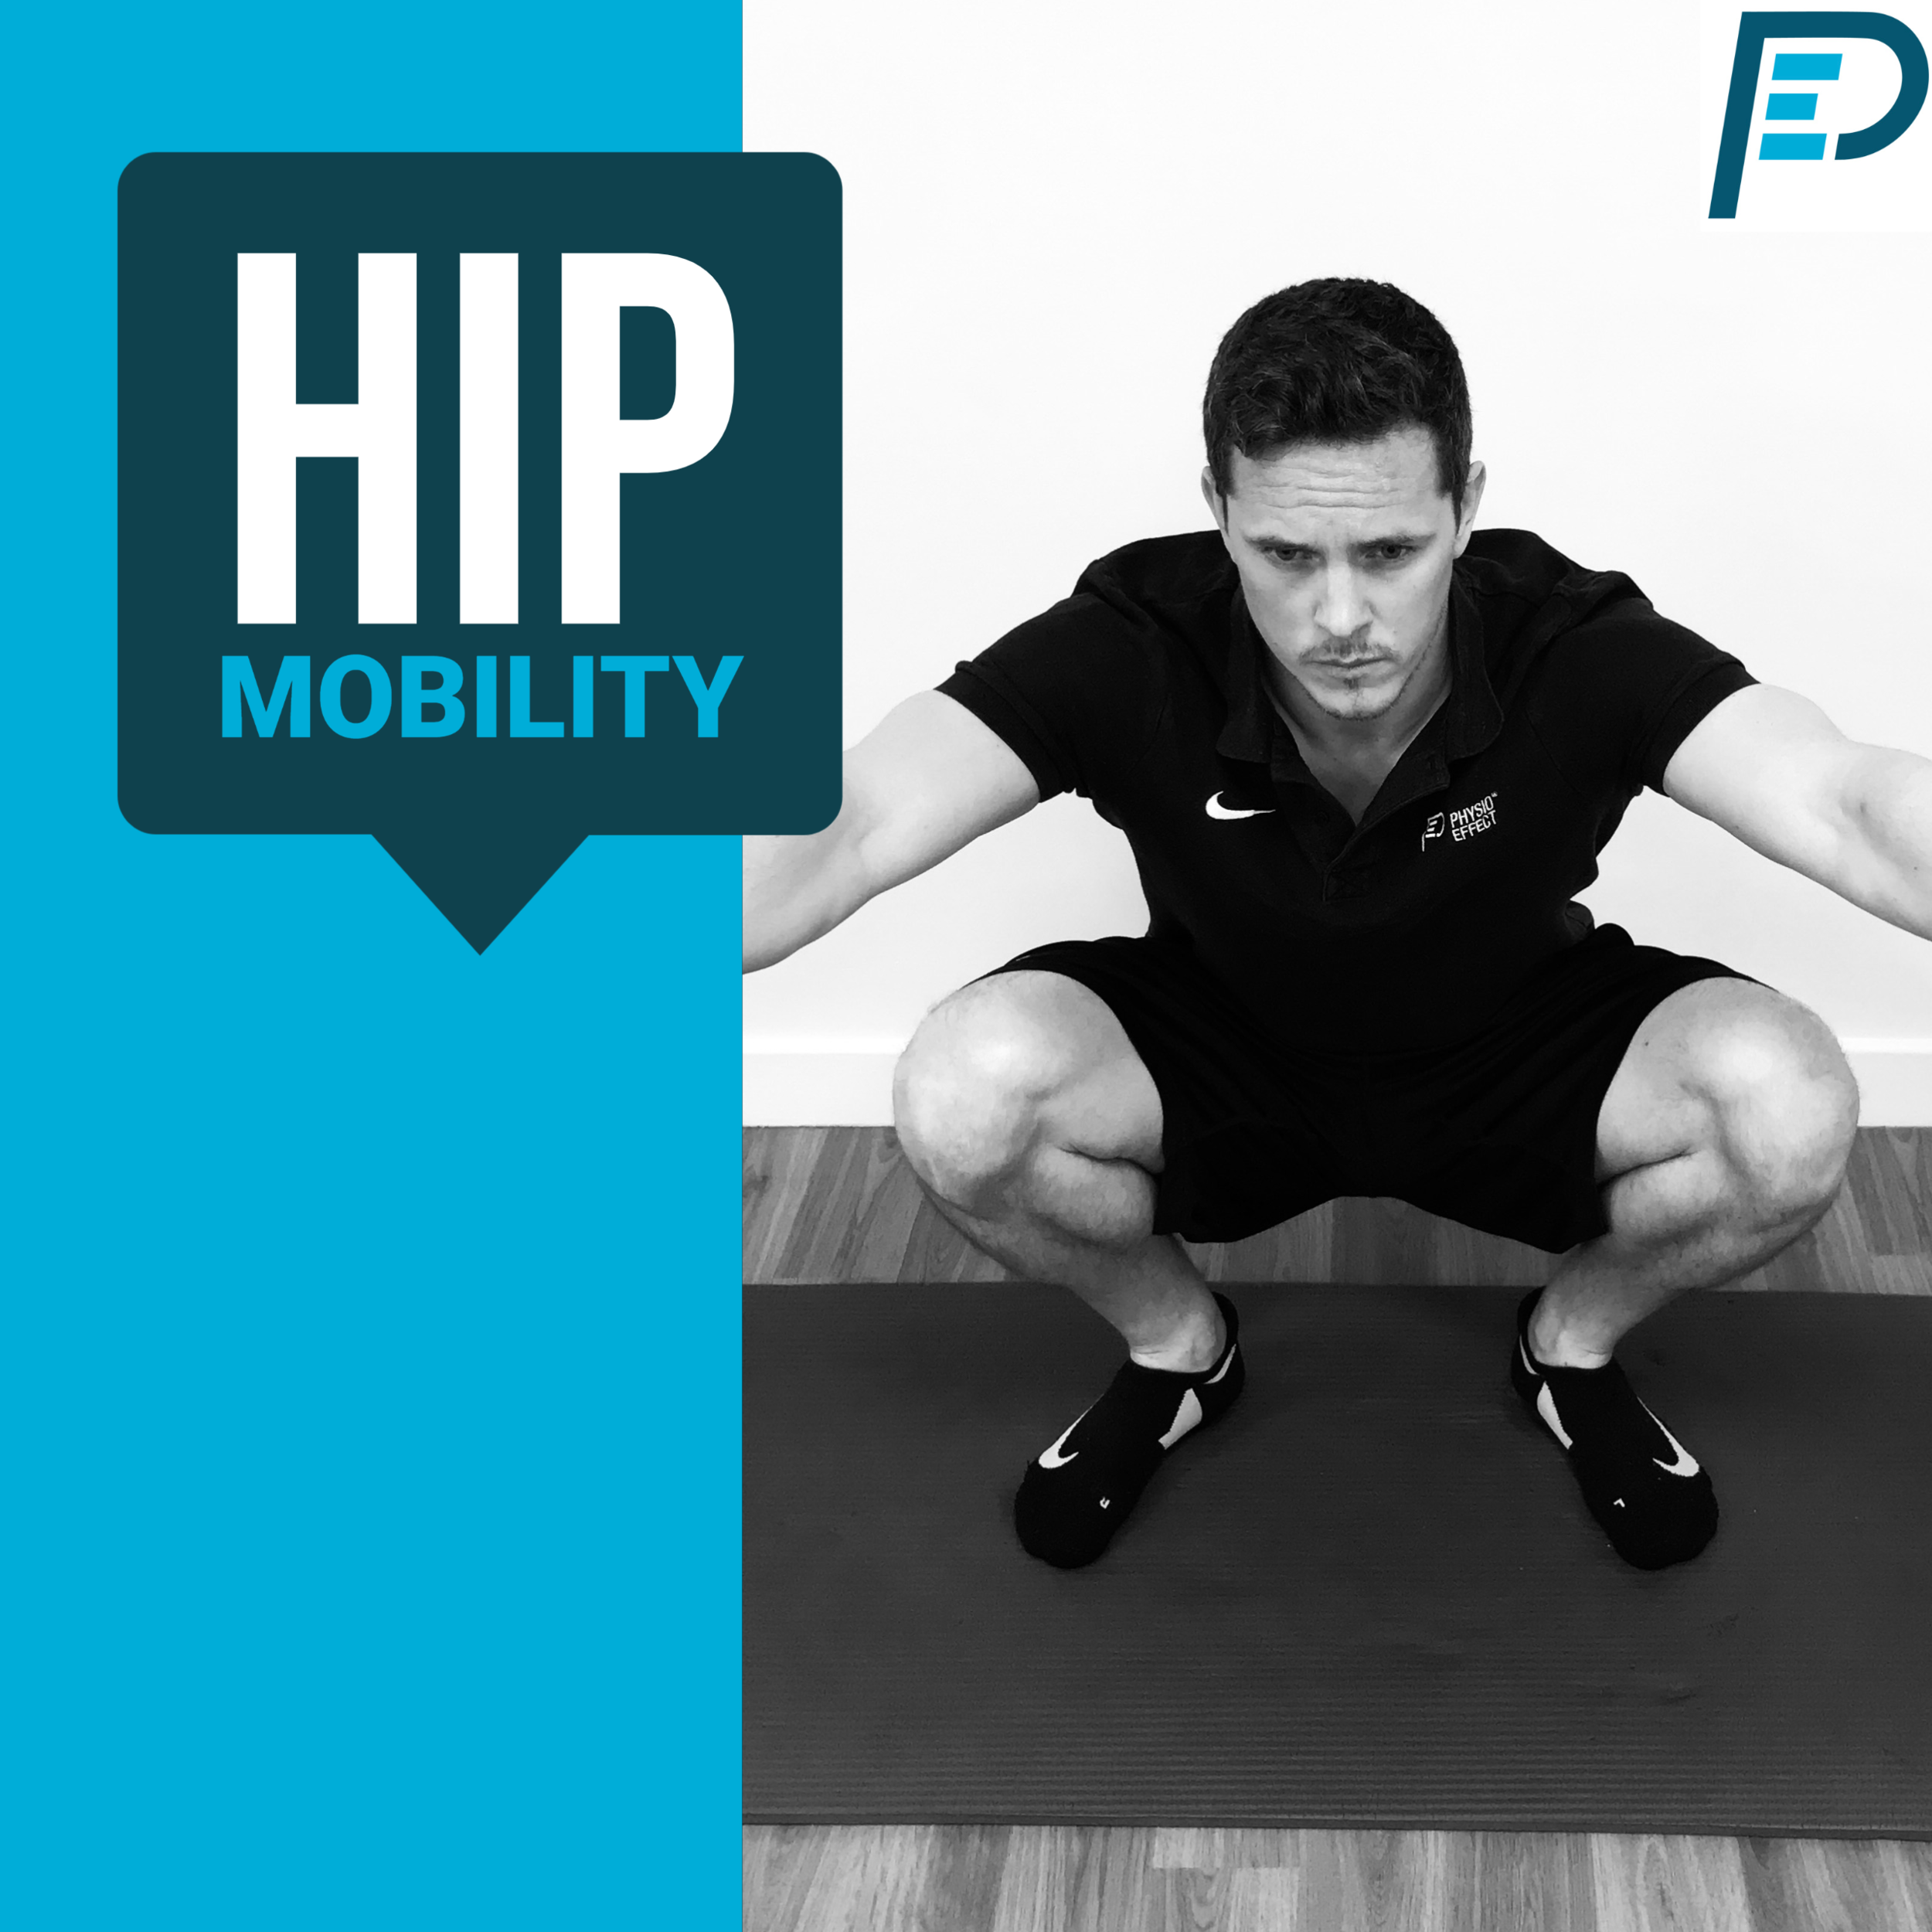
Deep Squat
Chances are if you’re reading this you have at least one hip and at some point it has given you trouble. Hip pain or stiffness has likely gotten in the way of your daily activities or restricted your ability to exercise on more than a few occasions. Our hips are at the centre of our body’s movement, so if they are functioning poorly then our ability to move freely and unrestricted will be compromised. Poor hip function can cause local issues around the hip but often contributes to pain and dysfunction in other areas like the lower back and knees.
The primary reason for developing hip pain for most people is a lack of movement and excessive sedentary behaviour, an all too common theme in our modern lives. You may workout regularly but chances are you still accumulate a lot of static postures through work or leisure and it’s unlikely that your exercise habits routinely explore and work the hip joints and muscles to anywhere near their full range or capacity. Though most hip pain is not serious and can be helped with the right exercise, we recommend consulting a health professional if you are worried or have persistent symptoms.

Modified Pigeon with Active Hip Internal Rotation
Am I Stiff or Weak?
Most likely it’s a combination of both. There is a lot of confusion out there around the terminology of flexibility, mobility and strength. Essentially flexibility can be considered passive and is about the soft tissues (muscles, tendons and ligaments) ability to temporarily elongate to allow movement through a range while mobility centers around our ability to move through a range of motion with control before becoming restricted. Mobility requires strength to control your flexibility.
Take for example someone who can squat 200 kilos to a parallel depth. This would obviously be considered strong in that range. However if the same individual cannot perform a body-weight squat below parallel depth without falling over or requiring support then we could say they have poor squat mobility. Passively if they can still achieve a deep squat position using some support we can say that they have reasonable flexibility in their soft tissues to allow this. Ideally this individual will work to improve their mobility so that they have better strength to control a greater degree of flexibility i.e they can drop comfortably and controlled into a deep body weight squat without assistance.
Should I Stretch or Strengthen
Again for most people the answer here is both but the key is identifying exercises that allow you to improve on both simultaneously whilst also offering functional value. Being inflexible is not great as your natural joint range of motion may be restricted and eventually painful. Inflexibility can lead to struggles with basic everyday activities like bending to pick something up or getting in and out of bed or your car. If you are weak then as discussed before you will not be able to control your flexibility or movement again making you more vulnerable to injury and pain.
This is where we need to be smart and specific in identifying our own needs and training with functional goals and targets in mind. You may have great flexibility and touching your toes is a breeze but when asked to do a basic lunge you lack the strength, balance and co-ordination. Conversely as with our example above you may have great strength for lifting weight but only in a limited range and the idea of touching your toes or sitting in a deep squat seems ridiculous. There is no single one recipe to fix all here but in essence mobility training will work both our strength and flexibility needs, we just need to identify the right exercises.
Try this mobility routine we have created to help identify your own personal problem areas. What to you find most difficult and are you struggling due to tightness, weakness or a combination of both?
Up for a challenge? Try this routine a few times and note the 3 exercises or positions which you find most restricted or difficult to perform. Now practice them consistently at lease 3 times per week for the next 4-6 weeks and see what changes and improvements you can achieve
At the bottom of this blog you can see each of the individual exercises that make up our hip mobility routine. Click the link below to download your FREE PDF copy of these exercises including some key tips .
Challenge to Change
For the vast majority of people our lives and even our exercise or training keep us moving in basic linear patterns (up and down). We don’t often (if ever) challenge our hips with lateral or rotational exercises and most people end up weak and unstable in these positions compromising their hip health and function. That’s why we designed these routines to explore and challenge these less common positions.
This next video demonstrates 3 more advanced hip mobility exercises that you can try. Please only attempt what you feel able and do not work into pain or through injury. Try the exercises in the video below and see how you feel. Chances are you will find this very tough but they are great exercises to improve overall hip mobility and function so if you feel able add them to your regular routine and with consistent practice you should see real improvements.
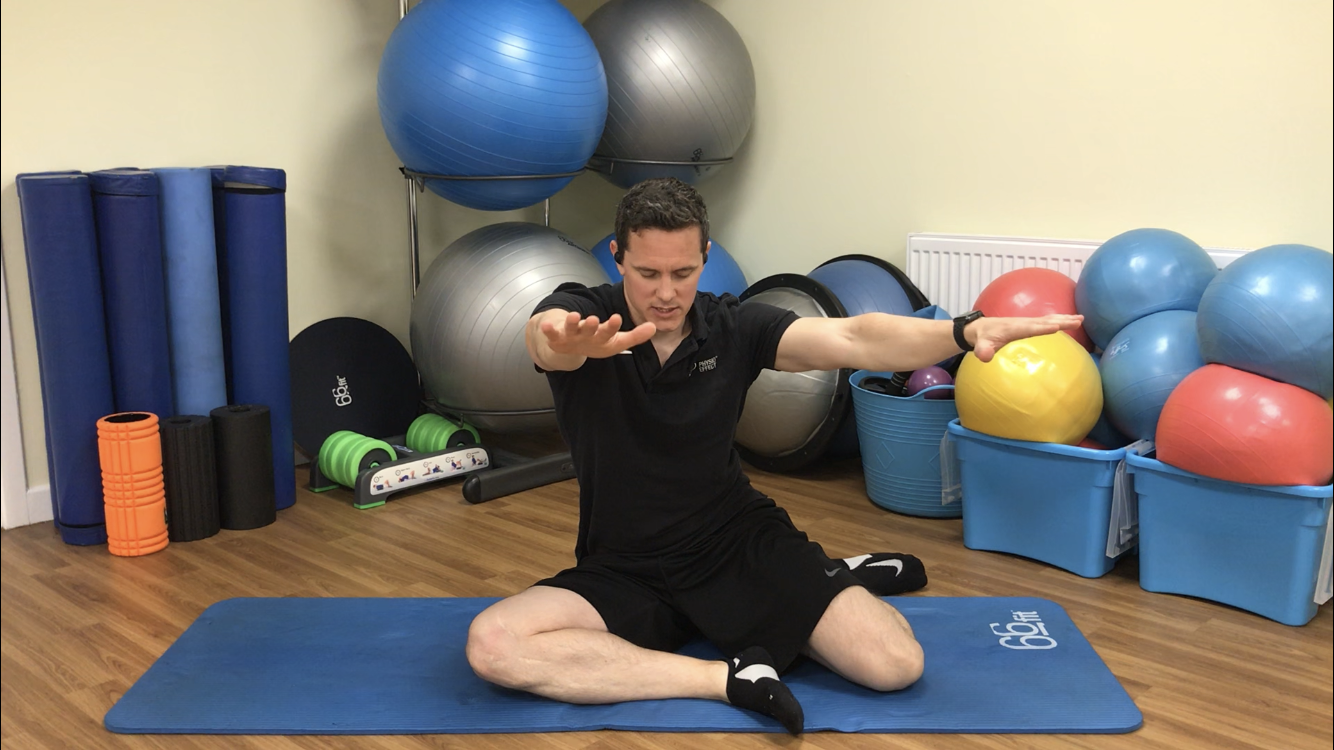
Exercise 1
Seated hip Internal / External Rotation
Begin in sitting leaning back on straight arms, knees and hips bent and relaxed shoulder width apart with feet flat on floor.
Gently and with control lower both legs to one side trying to touch the outside of one knee and inside of the other knee to the floor. Don’t worry if this range is too much, just work as far as you feel is challenging but comfortable. Return to start and repeat to opposite side.
Perform this movement for 60 seconds

1- Floor Sitting, Lean back on hands, high chest

2- Slowly Rotate Both Legs to one side
Exercise 2
Deep Squat Hip Internal / External Rotation (Advanced Option)
Begin in a deep squat. Ensure heels remain in contact with the floor
Slowly rotate one knee across mid-line aiming to touch knee to floor in front of opposite foot which should remain flat with heel on floor. Allow moving leg to rotate up onto toes. Static leg should remain open and avoid any inward collapse of knee/hip position.
Return leg to starting deep squat position and repeat with opposite leg.
Repeat with alternate legs for 60 seconds

1- Deep Squat, Heels on floor

2- Deep Squat- Active Hip Rotations
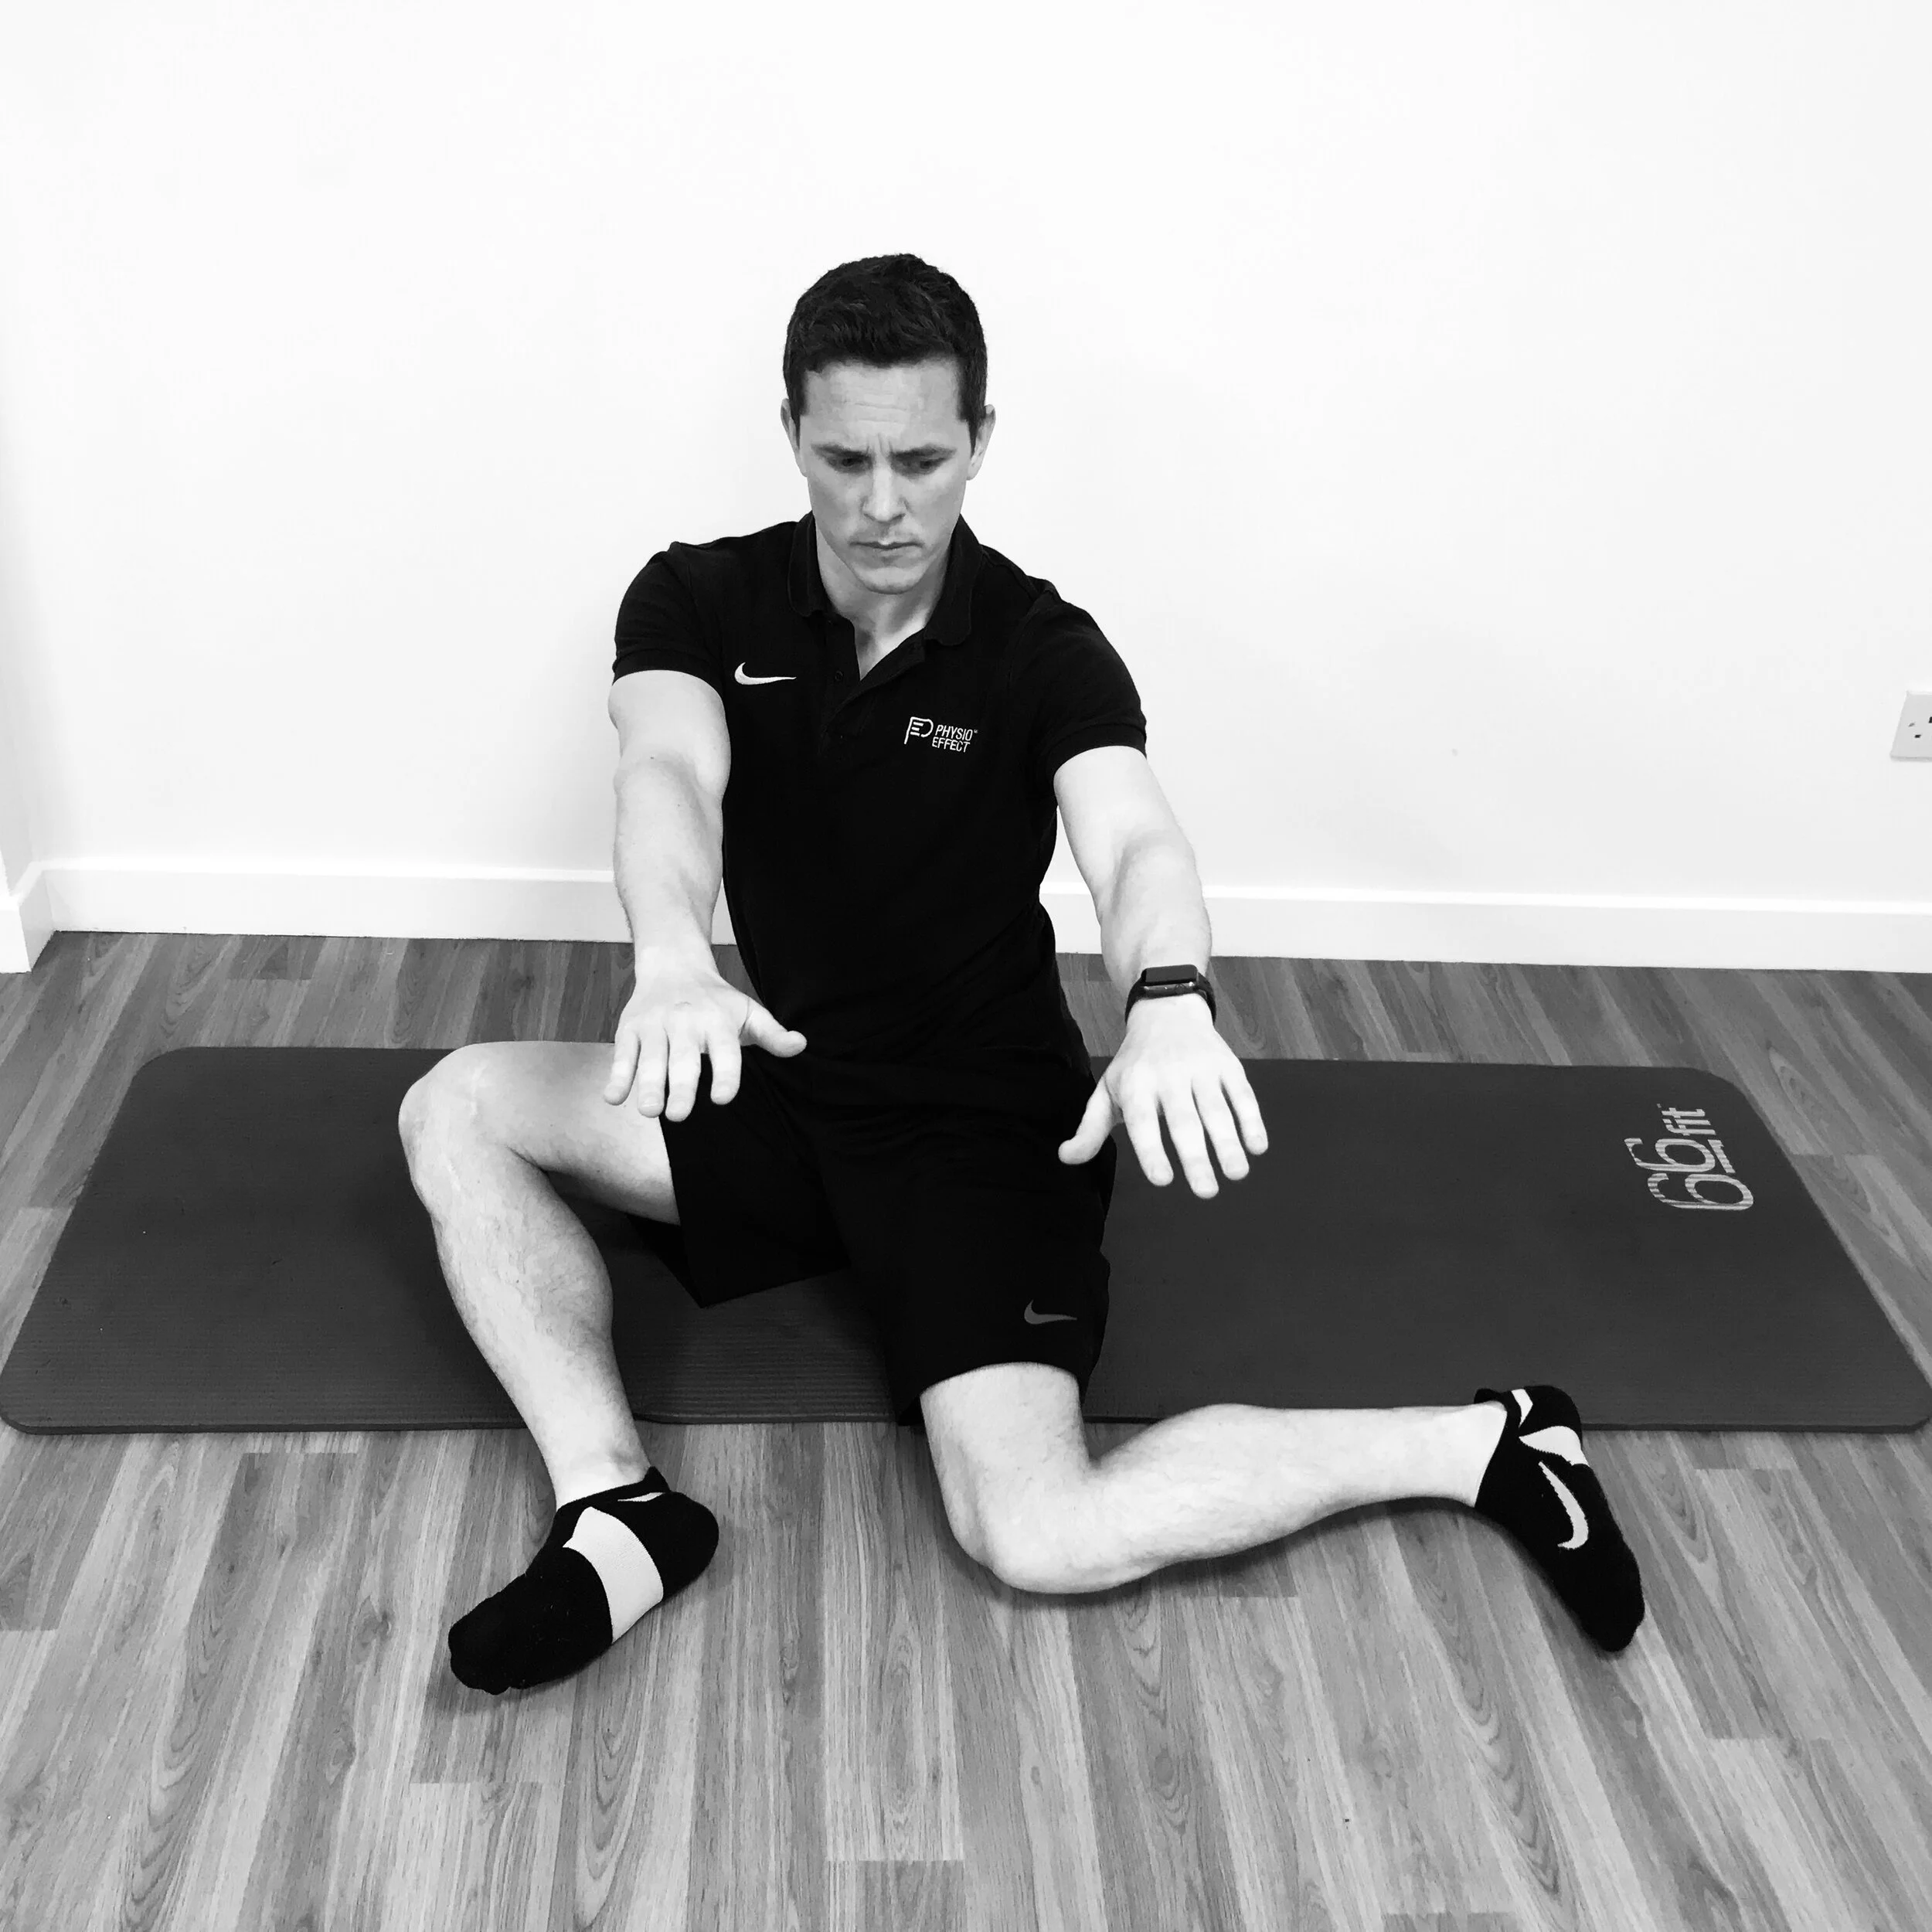
Exercise 3
Modified Pigeon
Begin in 90/90 hip and knee position. Gently rotate and square hips up facing forwards
Gently lean chest forwards through your hips and rotate slowly leaning over the forward knee
Option to gently contract front leg pushing knee into floor, hold 5-10 seconds and release. Repeat 5-10 times.
Work into and explore stretch for at least 60 seconds

1- Modified Pigeon 90/90 Sitting

2- Modified Pigeon- forward lean & rotate over front knee
Exercise 4
Modified Pigeon Active Hip Internal Rotation Lift
Begin in the modified pigeon 90/90 sit with slight forward lean supporting weight on hands
Gently lift back foot off the floor. Squeeze and hold for 5 seconds. Repeat for at least 5 contractions
You will repeat this exercise for the opposite side once you’ve completed the routine on one side

1- Modified Pigeon Forward Lean on Hands

2- Modified Pigeon Active Hip Internal Rotation
Exercise 5
Modified Pigeon Hip Active External Rotation
Begin in the modified pigeon 90/90 sit with torso rotated facing forward leaning weight back with hands behind you
Gently lift the knee (with inside touching floor) & rotate outward through hip. Squeeze and hold for 5 seconds. Repeat for at least 5 contractions. Ensure opposite leg remains still with outside knee resting on floor
You will repeat this exercise for the opposite side once you’ve completed the routine on one side

1- Modified Pigeon Chest Open

2- Modified Pigeon Active Hip External Rotation
Exercise 6
90/90 Sitting Lift to High Kneeling
Begin in approximate 90/90 sitting as shown, use hands to maintain balance without leaning on floor
Gently lift through the hips into controlled high kneel. Squeeze the buttocks and hold for a few seconds. Return to start position and repeat 30-60 seconds
Switch legs so back leg begins as forward leg and vice versa. Repeat active sitting movement 30-60 seconds.
1 - 90/90 Sitting on floor (no hand support)

2 - High Kneeling
Exercise 7
Frogger
Begin in all 4s, forearms on floor. Walk knees open keeping insteps of feet and inside shins rotated inward in contact with floor
Gently rock back through hips/pelvis as if taking bum closer to heels, squeeze knees into the floor and hold/release for 5-10 second repetitions.
Gently work into and explore stretch for at least 60 seconds

1 - Frogger Start Position

2 - Frogger Rock Back Position
Exercise 8
Deep Lunge Hip Opener with Arm Rotations
Begin in lunge position, extend out back leg as far as is comfortable. Lean forward and try to come to rest on forearms. Actively drive open front knee/hip rotating out onto outside border of foot.
Take inside arm next to front leg and rotate upwards to ceiling with a straight arm. Stretch open through shoulder, chest and spine. Hold for 5 seconds at top position, return to start driving elbow back to the floor and repeat for 10 repetitions.
Switch legs front to back and vice versa. Repeat process.

1 - Deep Lunge, Forearms to floor, drive front knee open

2 - Deep Lunge Arm Rotations
Thank You
Thanks for taking the time to read this guide, we hope you find it useful. Please share with anyone else who might benefit and if you have any questions comment and let us know. Don’t forget to download your free hip mobility cheatsheet. Good luck and enjoy your improved hip health.

Deep Lunge with Arm Rotation
Tight shoulders? This routine will fix you up
5 step shoulder stretch routine to relieve stiffness and tension. Discover a new range of motion and rid yourself of nagging tightness in your shoulders and upper back
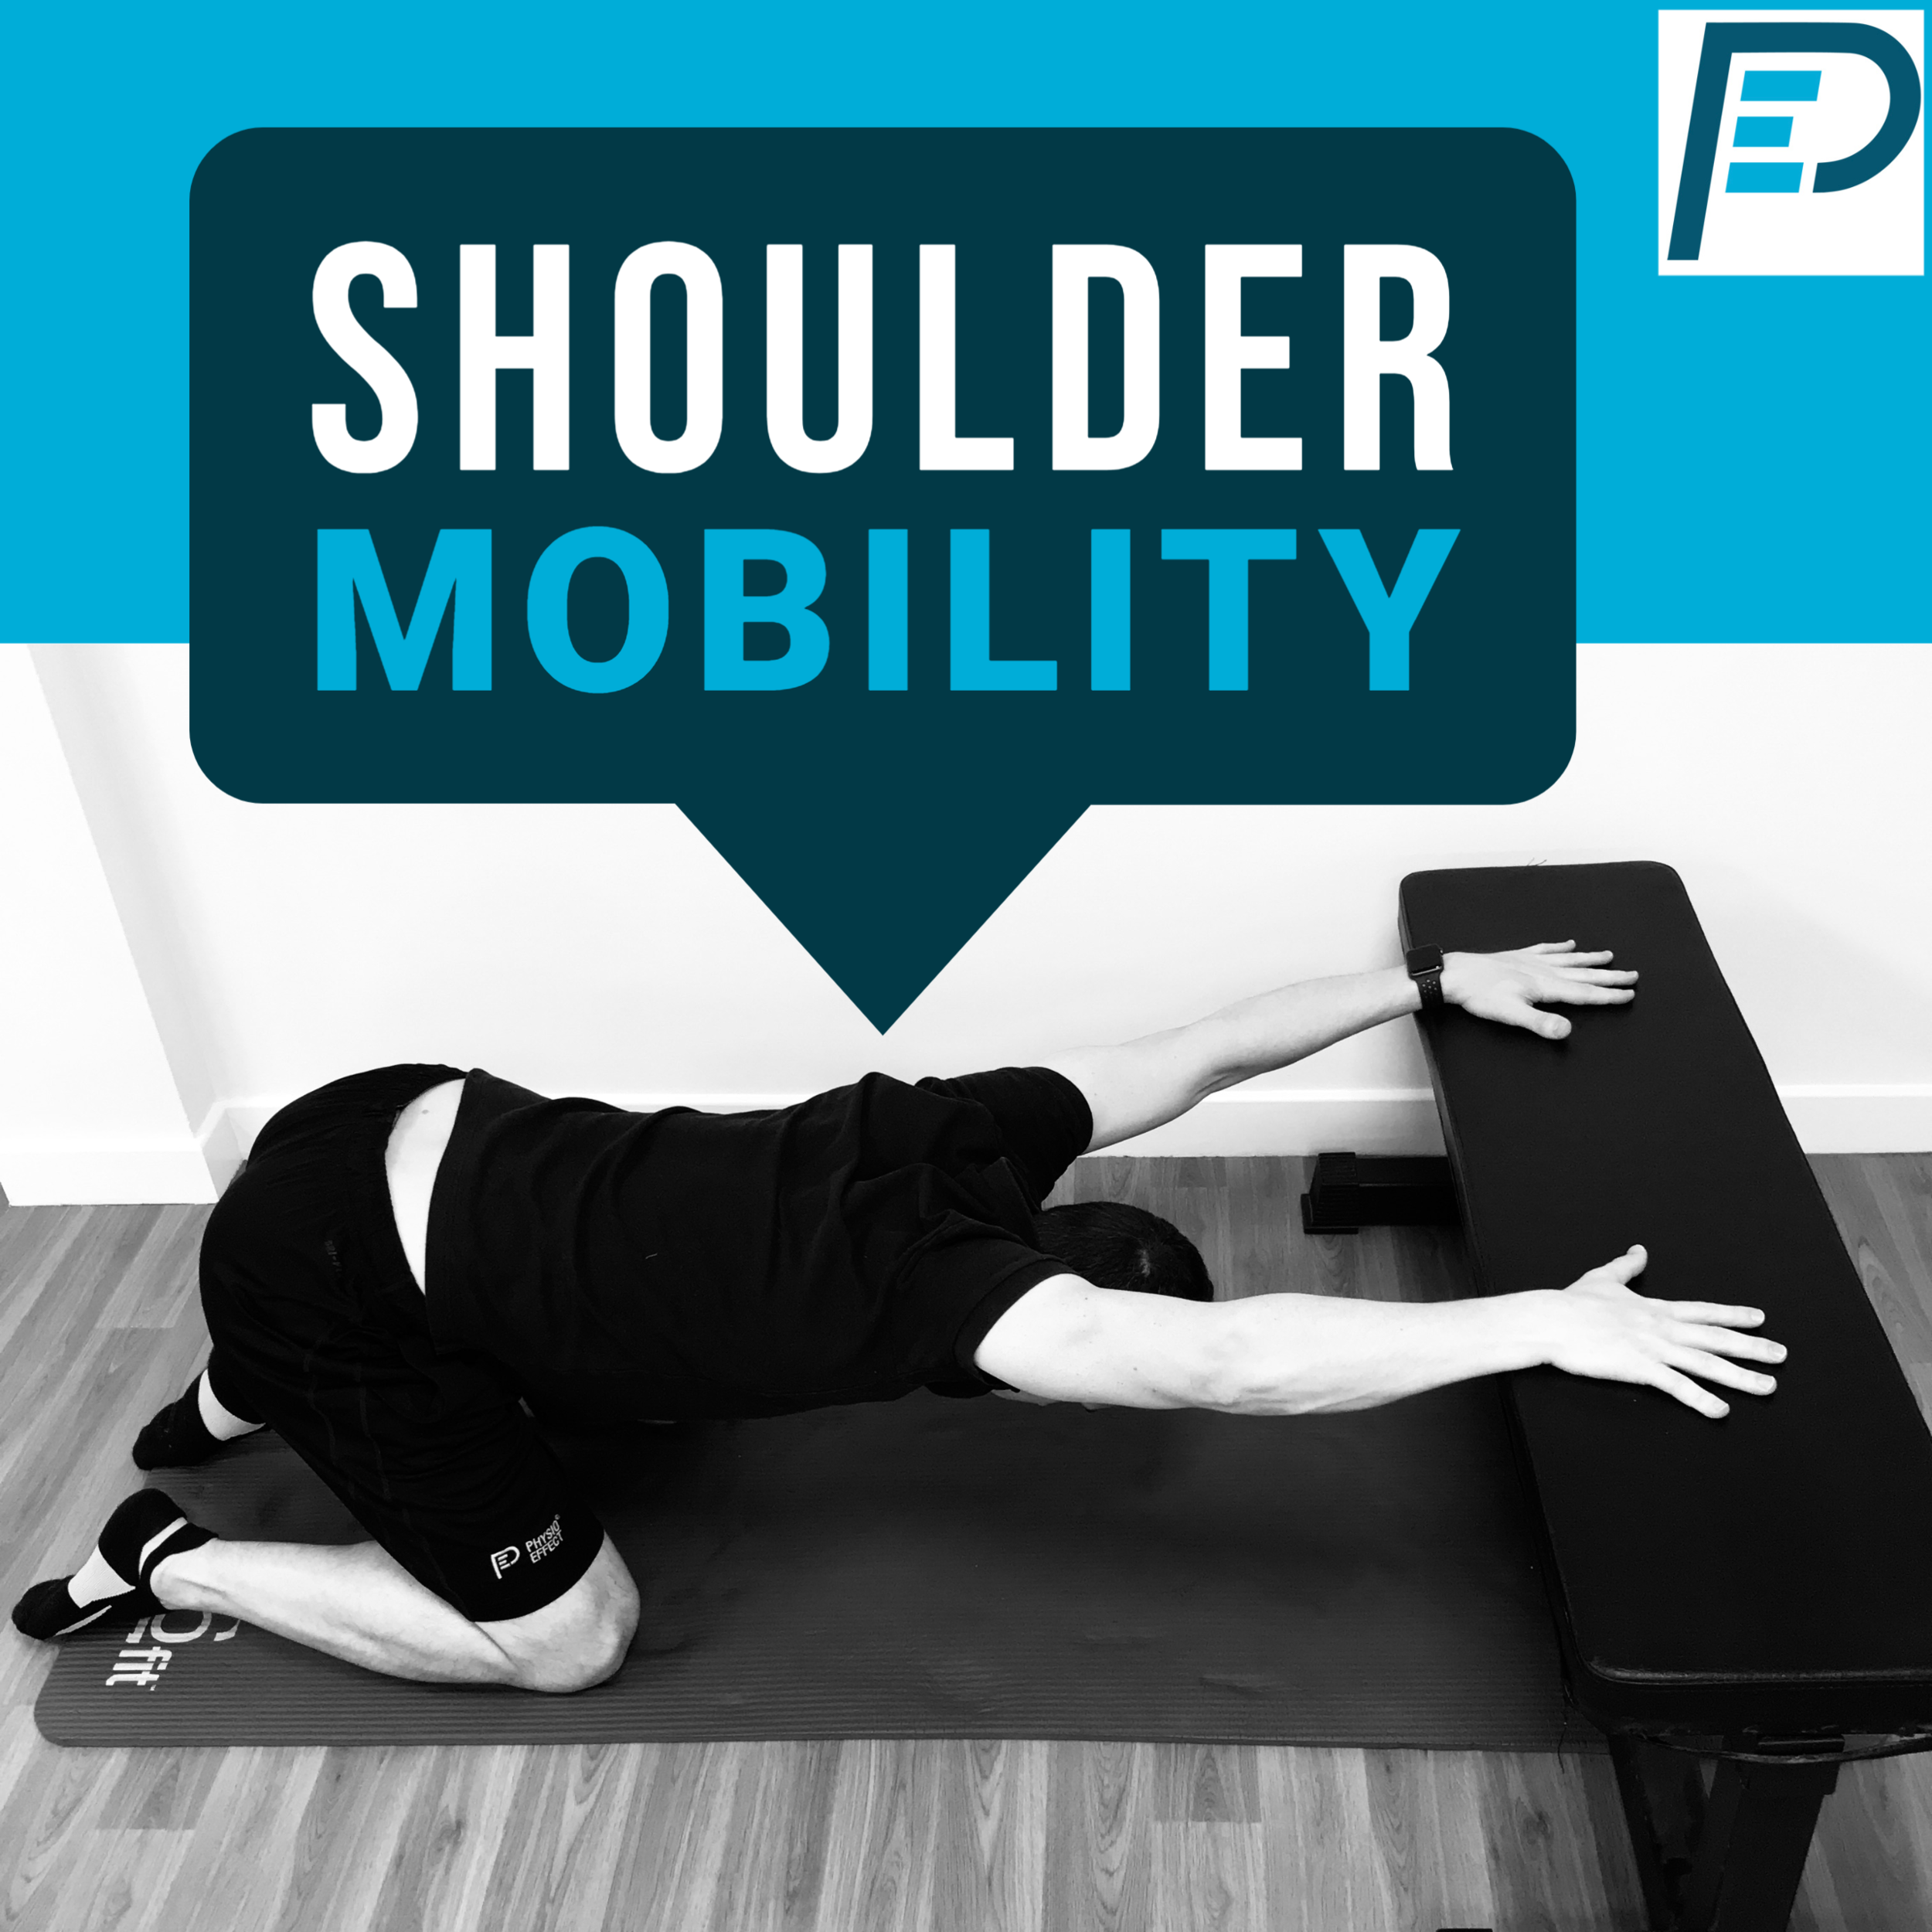
Why are my shoulders so tight?

Familiar Hunchback Posture?
Shoulders are a big sticking point for many of us. We constantly assess and help people with long histories of stiff, tight, achy shoulders and upper backs. More often than not there is no significant injury history but very commonly there is a base of sedentary behaviour, such as office work and driving, and a significant lack of any structured stretching or mobility exercise. Welcome to our modern lives!
Most shoulder pain can be fixed without the need for invasive surgery but it can take time to undo a lifetime of poor habits which have lead to soft tissue adaptations with weakness in some areas and tightness or stiffness in others.
1/2 Crucifix Chest Stretch
Shoulders are very mobile and we put them through a lot over our lifetime with an expectation they will be fine with no real consideration given to tuning or maintenance work. Tightness and pain can easily creep in and often presents initially as discomfort reaching overhead, pain opening a door, or a struggle to weight bear through our arms. This can develop to more constant nagging pain and stiffness and a reduced ability to perform daily tasks or enjoy physical exercise or activities.
Many people just put up with having a dodgy shoulder and accept it as a new norm but with the right guidance and exercises most situations can be at least significantly improved if not completely fixed. Like everything in life though you won’t get something for nothing and commitment to changes in habit and daily routines will be required. A balance of stretching and strengthening exercises is normally key and we have provided a great starting point here with our 5 point stretching routine.

Let’s get started!
We must bear in mind that every body is different as is each individuals unique history and circumstances so please use this routine as a guide to start improving your shoulder health and flexibility but do so carefully. Start slowly and gently and never push in to pain. Work to better your own range of motion but do not compare yourself to the video or anyone else. Practice daily and be patient but also persistent. If you can only do part of the movement or a modified / reduced range that is fine, just do what you can. Of course as with all advice please consult with a health professional if you have significant pain or loss of normal function.
Mobility Flow Video:
Exercise 1
Shoulder rolls / Scapular circles
Begin in all 4s position.Hands fixed under shoulders shrug shoulders to ears thenslide back and down and release. Then spread shoulder blades apart stretching across upper back, relax and allow shoulders and back to hollow.
Try to perform this as a slow circular rolling motion working in various directions
Perform this movement for 60 seconds

1- Shoulder shrug

2- Shoulder spread
Exercise 2
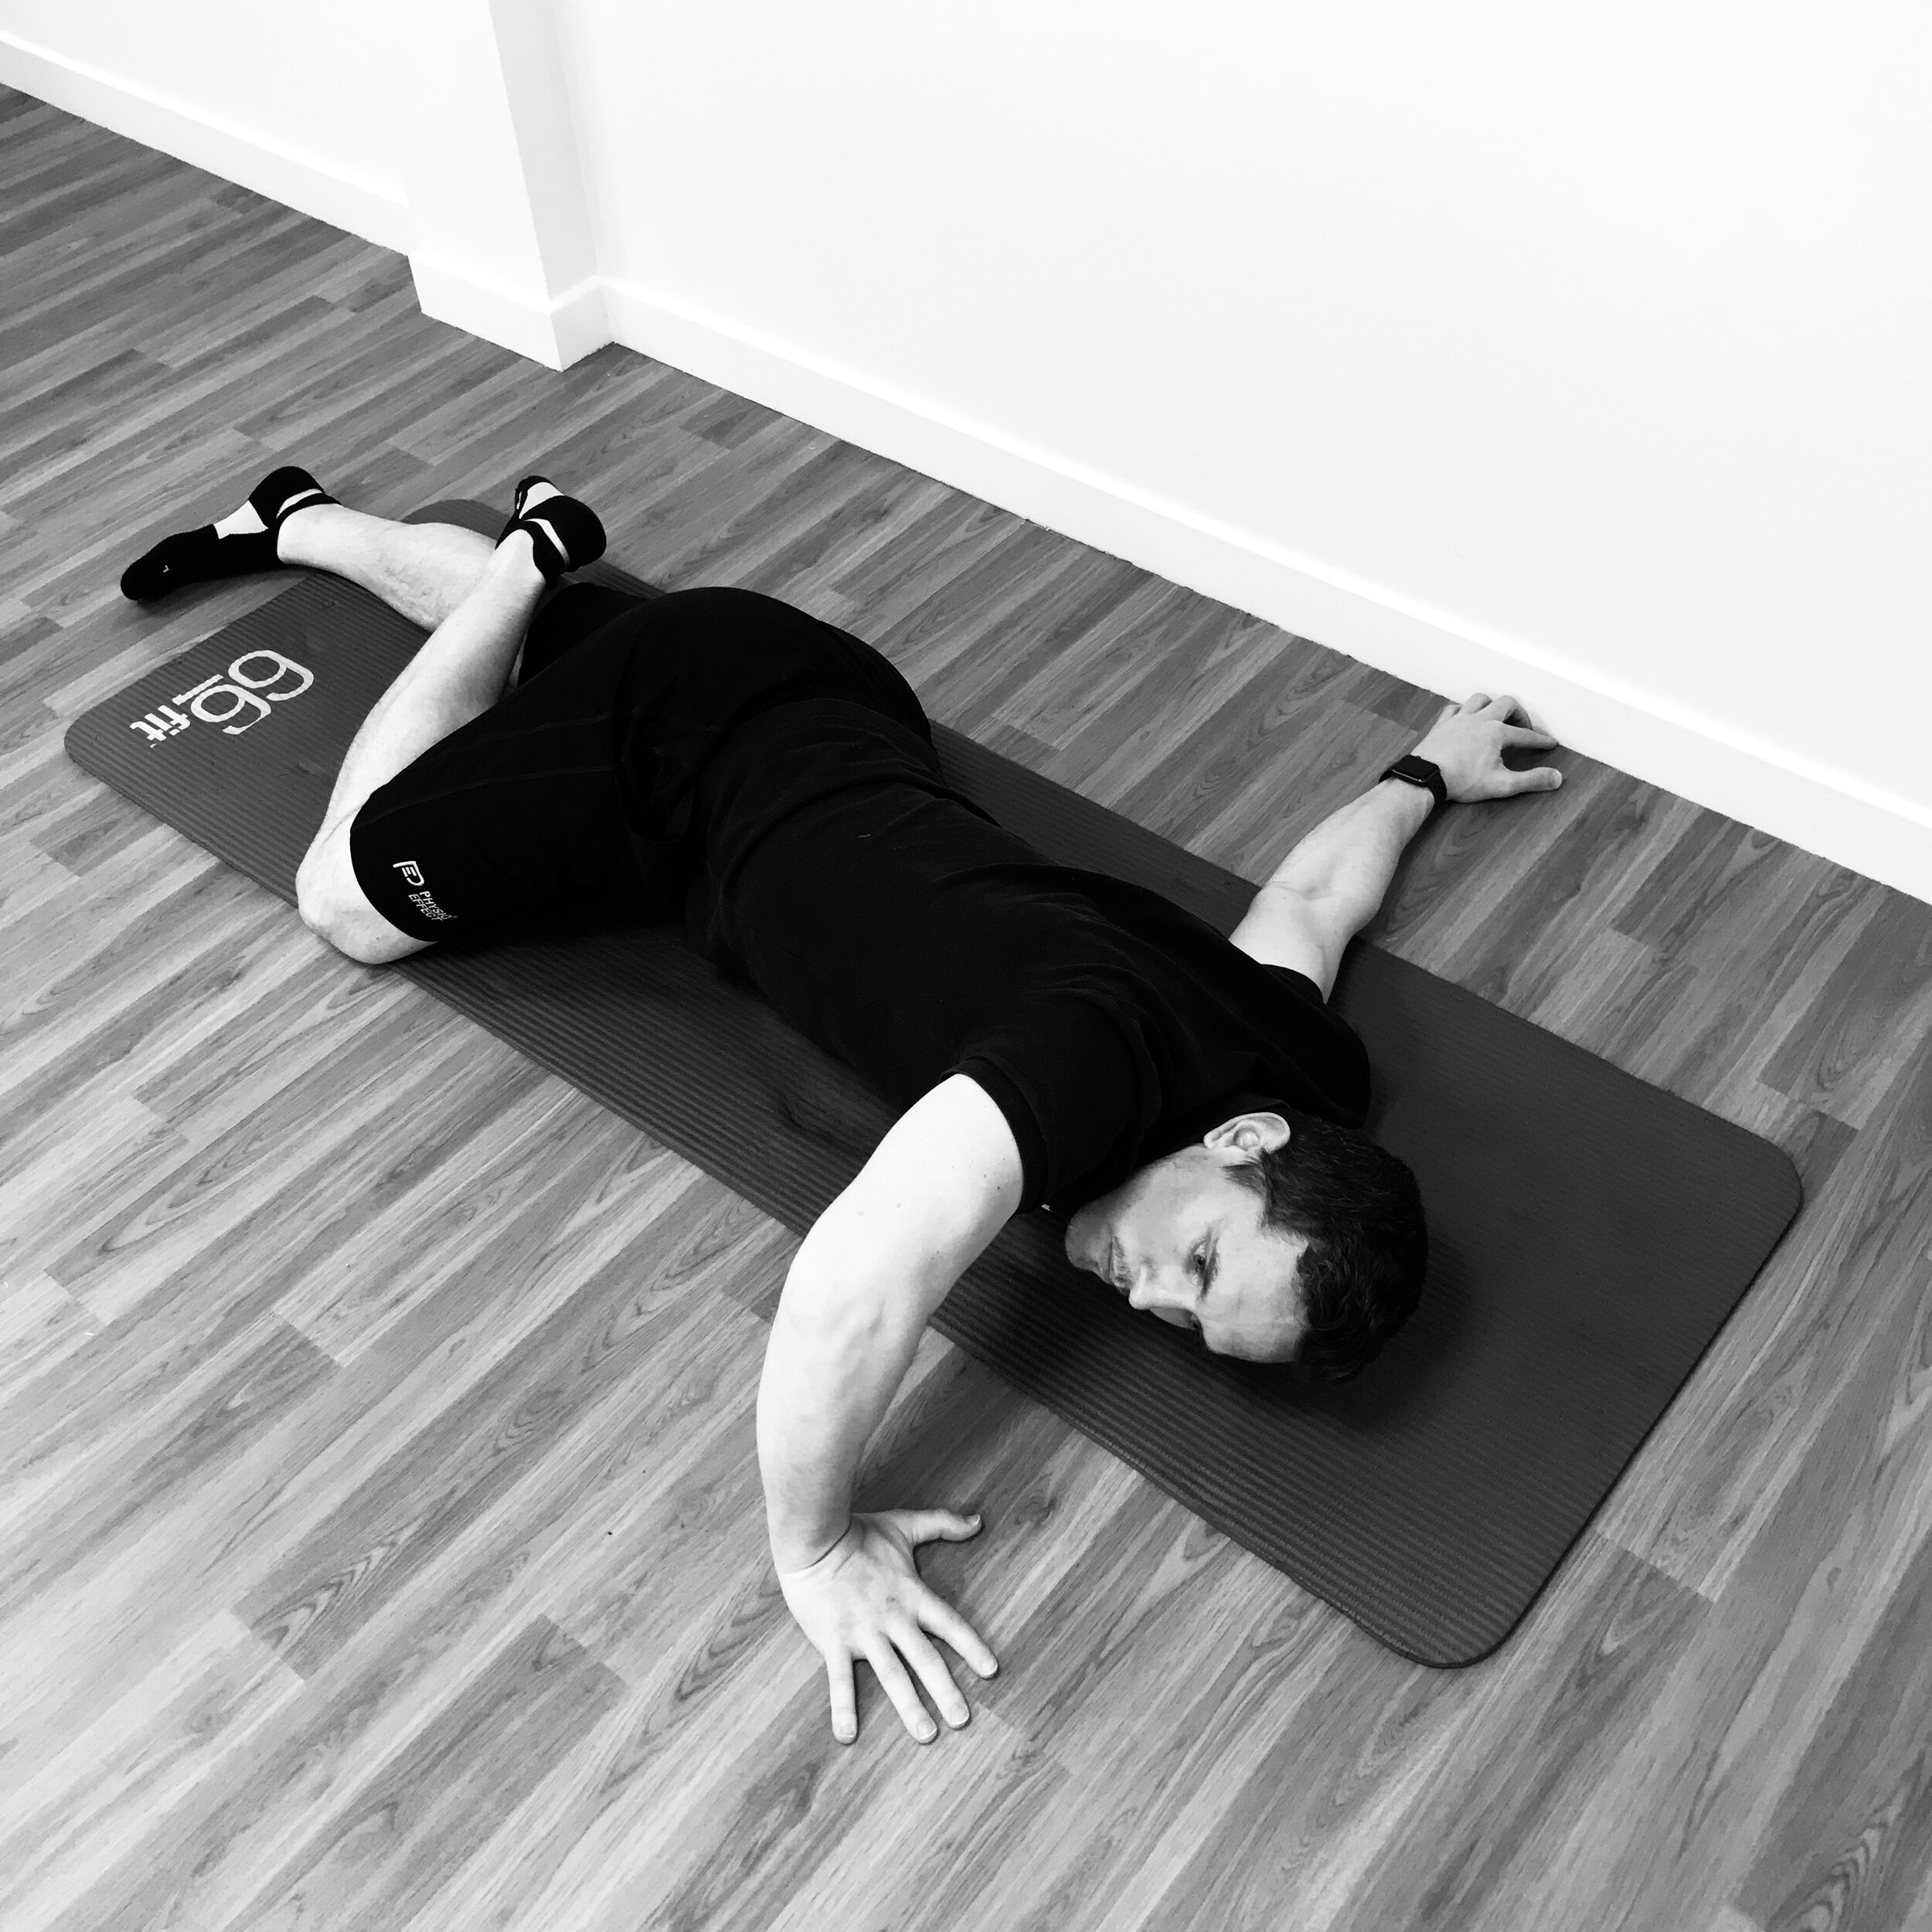
Elevated Arms to Partial Childs Pose / Prayer Stretch
Begin in all 4s position with arms straight out elevated on flat surface. Gently sit bottom back towards heels and let weight drop down between shoulder blades and through upper back
When in position try gently squeezing shoulders together and releasing and light pressing through the hands with slight twist/rotation movement
Try breathing in deeply and coming out of the stretch slightly then breathing out slowly and dropping deeper into stretch
Explore the stretch position with subtle movements and breathing for 60 seconds +

1- 4 point kneel arms elevated

2- Sit weight back and down between shoulders
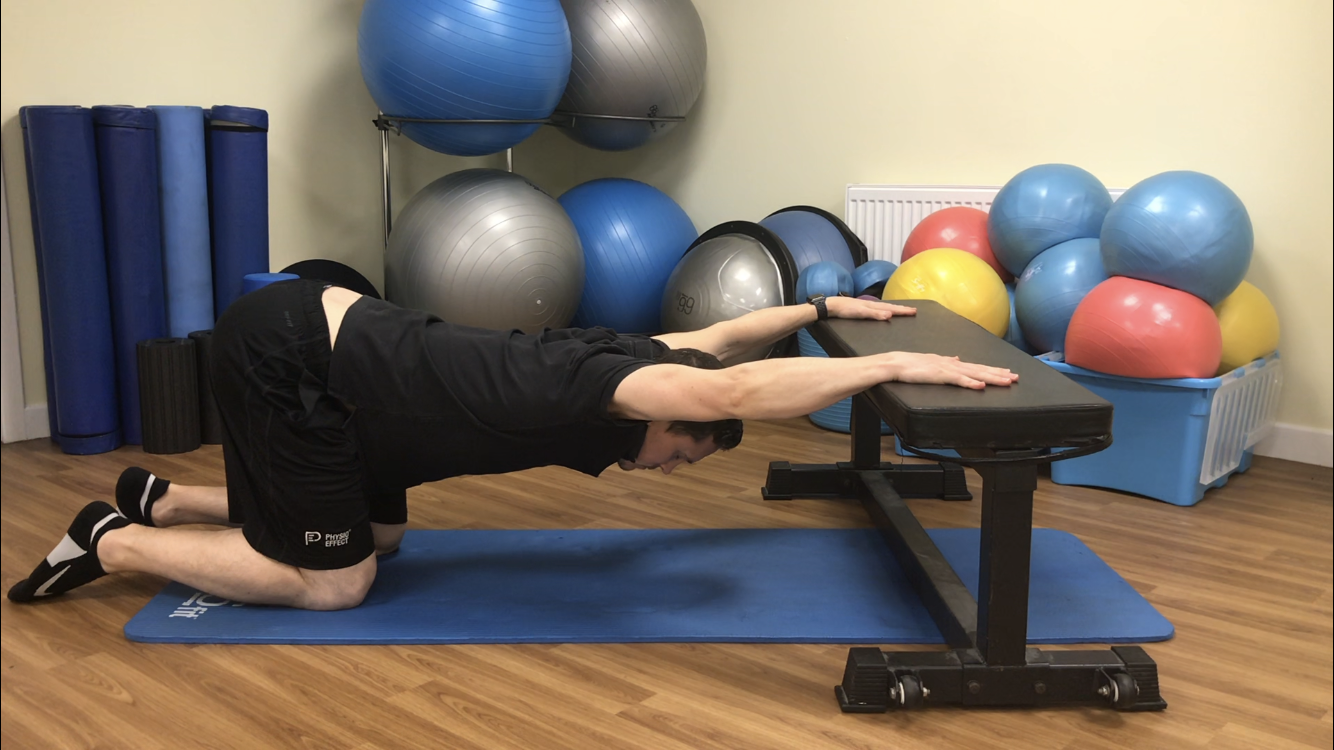
Prayer Stretch (Option 2)
Perform stretch as above but move to have elbows resting on flat surface with arms positioned in ‘Prayer’ posture
Sit weight gently back and down relaxing between shoulder blades and across upper back. Try to let head bypass the bench (surface)
Try breathing in deeply and coming out of the stretch slightly then breathing out slowly and dropping deeper into stretch
Explore the stretch position with subtle movements and breathing for 60 seconds +

Prayer Stretch Start Posture

Prayer Stretch - Sit back position
Exercise 3
Shoulder Dislocates (Stick or Band)
Begin in high kneeling or standing - Holding a stick or band keep arms straight and core tight, slowly bring arms straight overhead and around down towards lower back. Allow shoulder blades to gently shrug then rotate and slide down as you circle arms overhead
Return to start point slowly ensuring not to over-arch through lower back
Repeat for 10-15 repetitions

1- Shoulder Dislocates - Stick (Overhead)

2- Shoulder Dislocates Stick (behind back)
Exercise 4
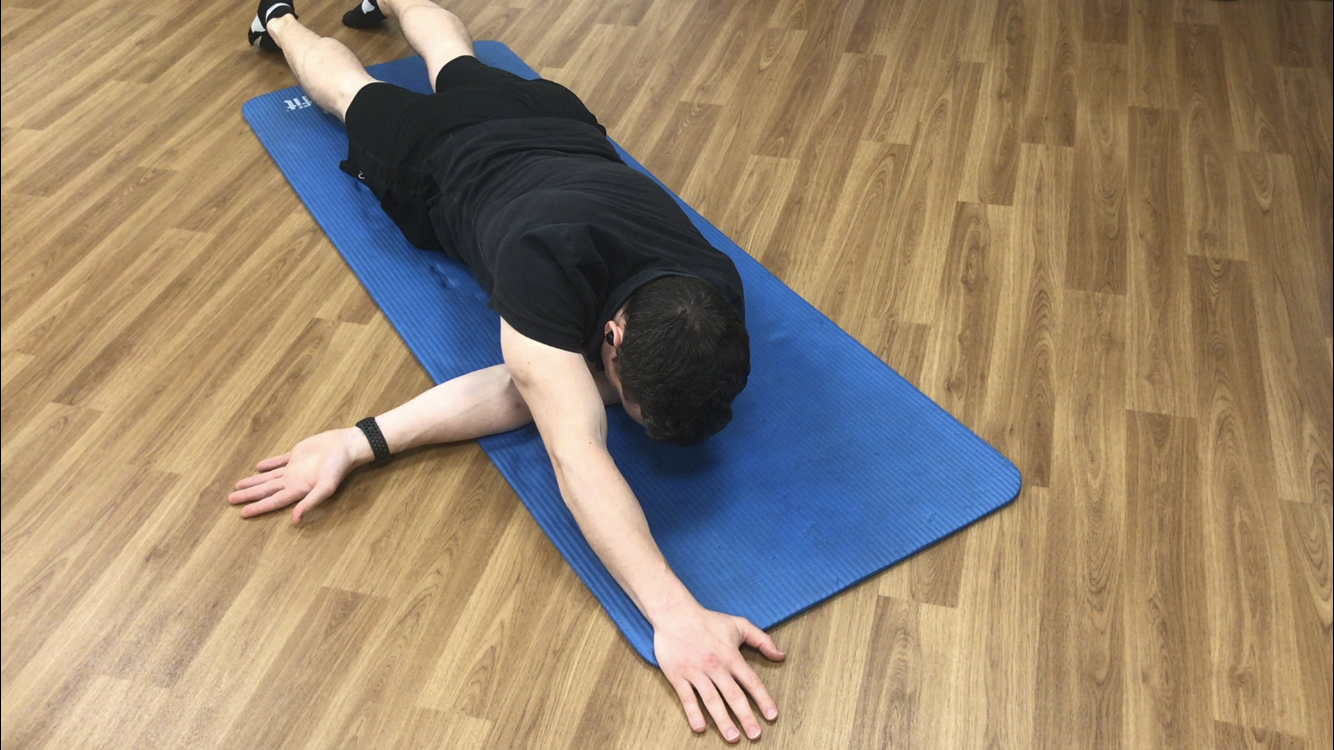
‘L’ Position Prone Shoulder Stretch
Begin lying on your front. Gently reach with shoulder to be stretched under and across your body at shoulder height with palm facing up. Allow other arm to stretch straight overhead forming an ‘L’ shape with your arms
Gently rotate into the stretch as if trying to square up shoulder blades increasing the pull/stretch felt in back of the shoulder reaching across body. Hold and release this motion for several repetitions
Work in this position for 60 seconds + on each arm

1- ‘L’ Position Shoulder Stretch Part 1
2- ‘L’ Position Shoulder Stretch Part 2
Exercise 5
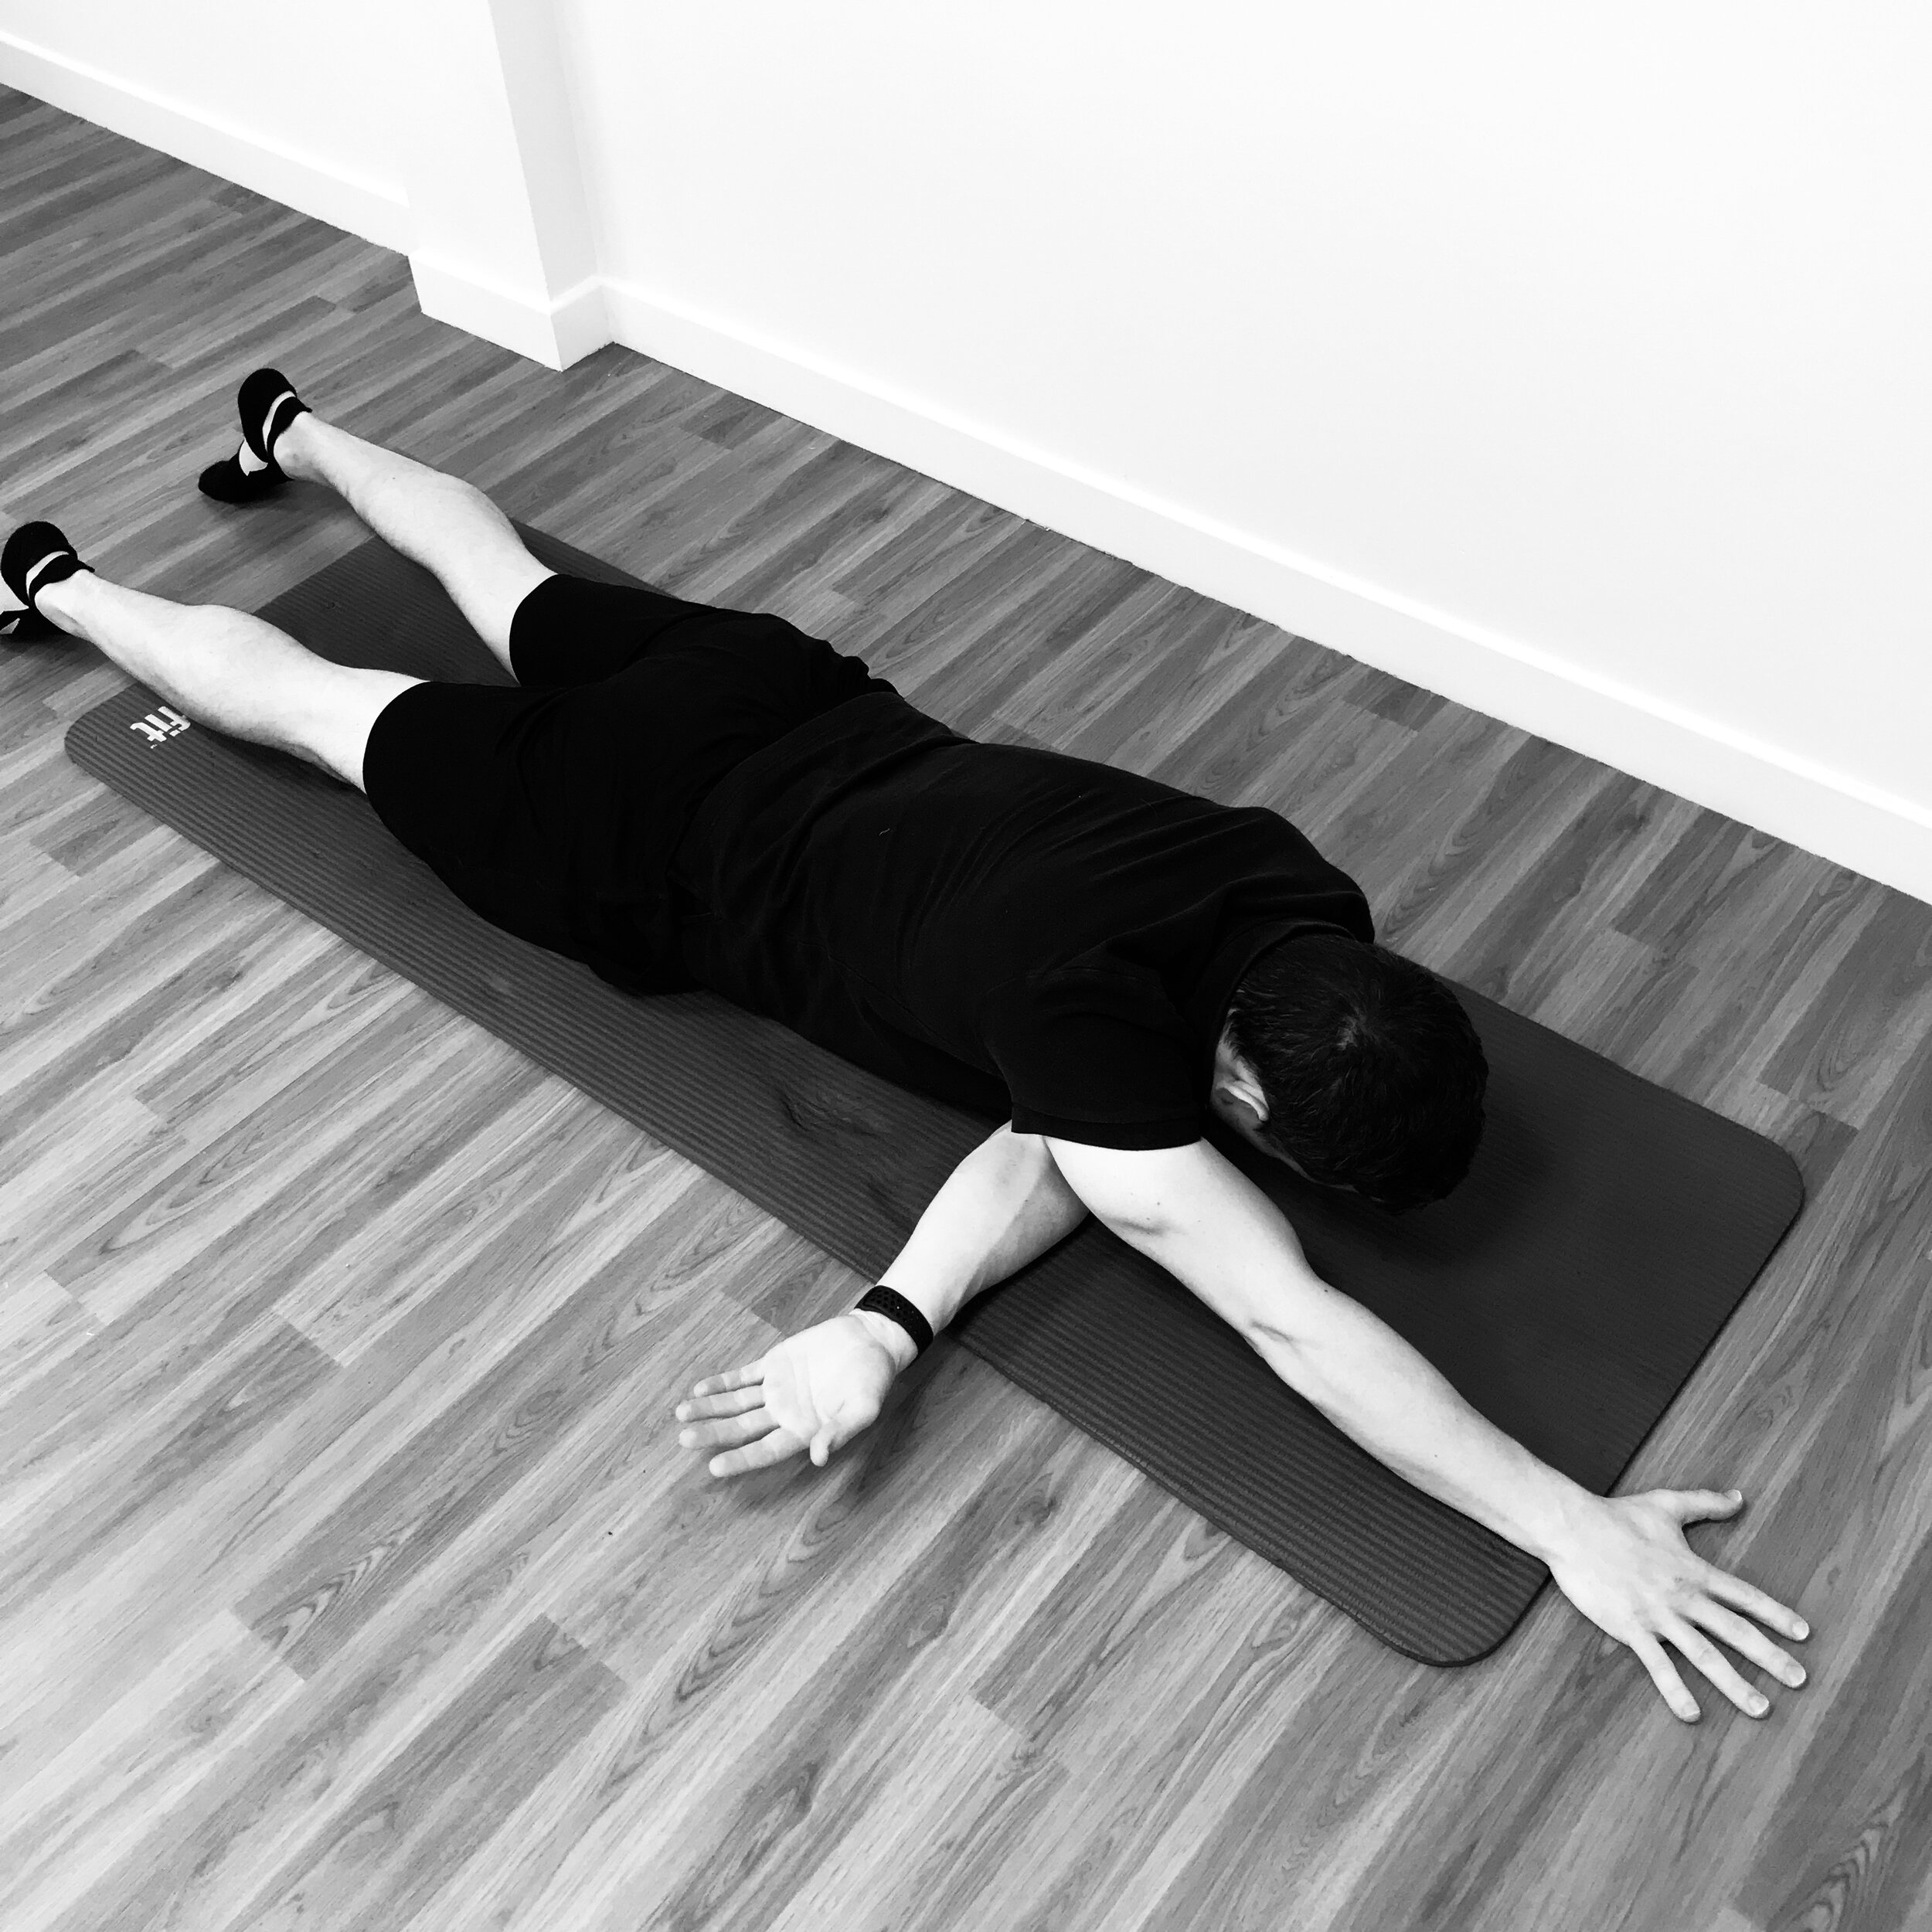
1/2 Crucifix Chest Stretch
Start face down with side to be stretched arm extended fully out at shoulder height palm down. Opposite arm is bent at 90 degrees at elbow hand at shoulder height ready to push into stretch
Gently push with bent arm while rolling weight of legs over to create a strong opening stretch of the chest of the straight arm
Gently push in and out of the stretch holding for a few seconds then releasing and repeat
Explore this stretch for 60 seconds + on each arm

1- 1/2 Cucifix Start Posture

2- 1/2 Crucifix Chest Opening
Thanks for taking the time to read this guide, we hope you find it useful. Please share with anyone else who might benefit and if you have any questions comment and let us know. Don’t forget to download your free mobility cheatsheet. Good luck and enjoy your improved shoulder health.
‘L’ Position Prone Posterior Shoulder Stretch

Back Strengthening Exercises for Desk-Based Workers
Let one of our Physios, Danny Wray, take you through a set of exercises which will help to strengthen your back and hips and that help counteract the negative effects of sitting.
At Physio Effect we routinely treat the general population for injuries and pain which can be attributed to a sedentary lifestyle. We have previously discussed the risks posed by excessive hours of sitting and how this is reaching almost epidemic levels in the Western world. Today's article provides some general exercise recommendations that can go some way to reducing this risk and counteracting the negative effects of sitting.
In an ideal world, those of us who have sedentary or sitting based occupations should aim to move, stretch, and be active for at least 1-2 minutes of every hour. While some of the exercises shown here may not be suitable for your particular work environment, any effort to perform a routine of this nature for 5-10 minutes before or after work or during a lunch break would go a long way to reducing the risk of pain and injury. General exercise and safe varied movement of any kind is also highly recommended.
Exercise 1 - Thoracic Rotation

Thoracic Rotation Start
Start on all fours with one hand placed behind your head.
Slowly turn the elbow towards the ceiling allowing your trunk to rotate and stretch
Hold at top position for 3-5 seconds. Repeat x 10 with each arm
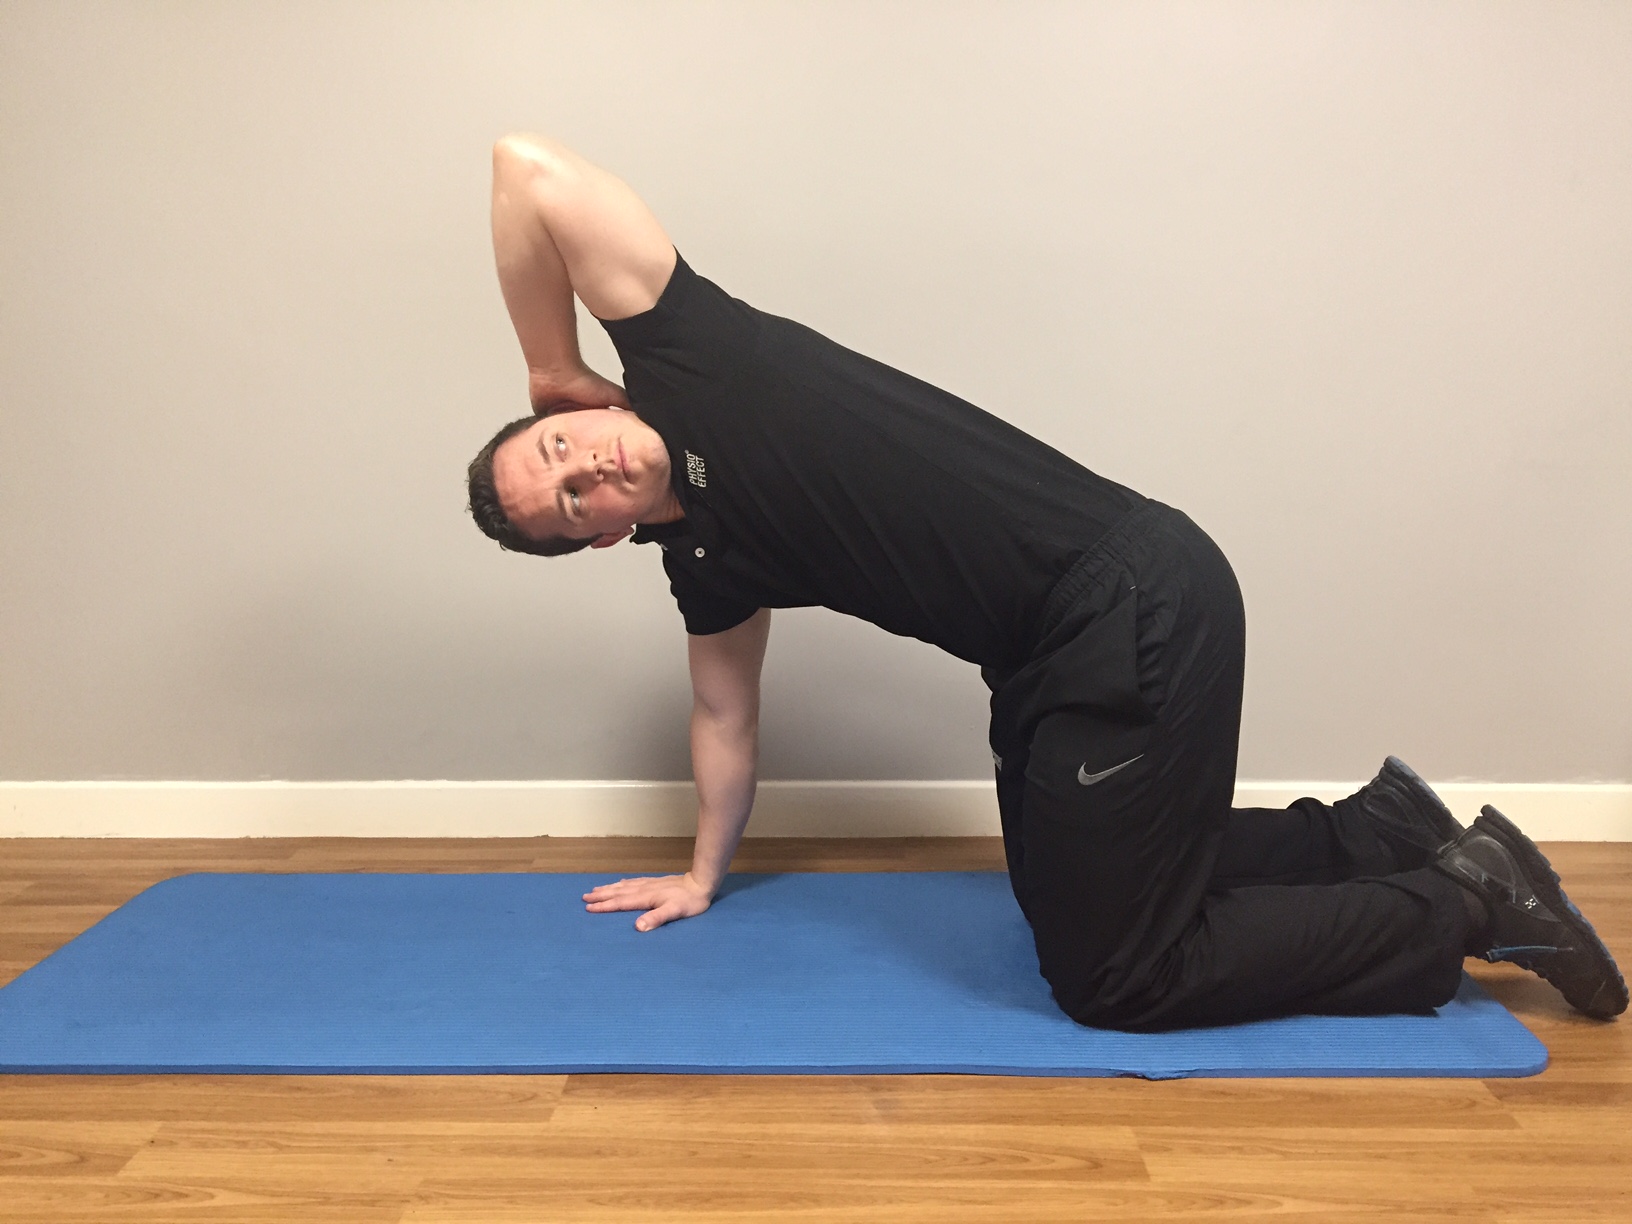
Thoracic Rotation Finish
Exercise 2 - Dart
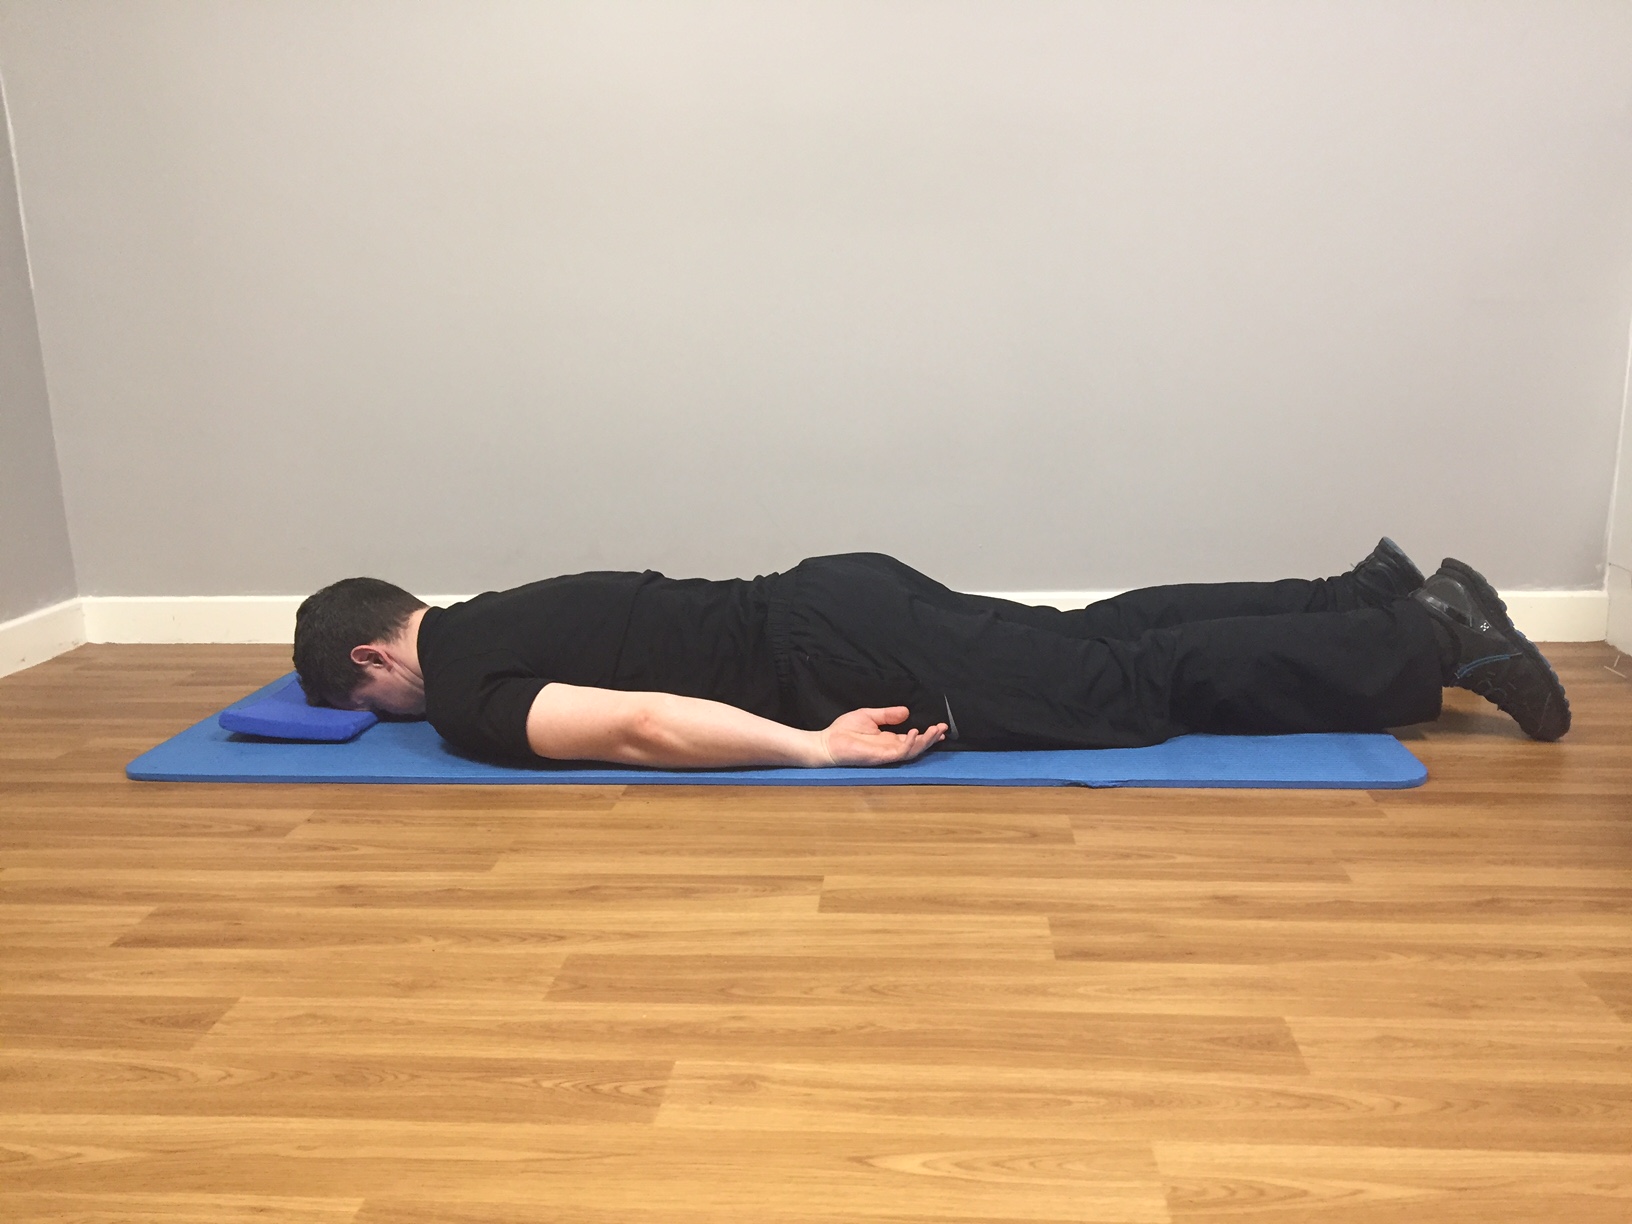
Dart - Start Position
Lay face down with thin pillow or folded towel for head support
Arms by your side, gently stretch your fingertips away from your shoulders allowing your shoulder blades to glide downward and slightly inward
Palms facing your hips, have your arms floating just off your side and not touching the floor
Keeping the back of your neck long and eyes looking to the floor, gently lift your head and upper body just off the floor - imagine lifting from your breast bone
Hold the finish position 3-5 seconds. Repeat 10 times 1-2 sets

Dart - Finish Position

Dart - Finish - Detail
Exercise 3 - Hip Flexor Stretch

Hip Flexor Stretch Start Position
Take a kneeling / lunge position as shown - use support of wall or furniture for balance if required
On the kneeling side gently engage your buttock and lower abdominal muscles - imagine you are tucking your tailbone in between your legs
You should feel a stretch at the front of your hip/ thigh. If balance allows gently raise the arm on the same side as the kneeling knee.
Hold the stretch for 30 seconds minimum and repeat 2-3 times each side.

Hip Flexor Stretch Finish Position
Exercise 4 - Cobra

Cobra Start Position
Lay face down with hands palms down about shoulder height
Using your arms slowly press out peeling your upper body slowly off the floor
Remain heavy in your hips trying to keep them in contact with the floor - relax your buttock muscles
Hold the finish position for 5-10 seconds, return to the start and repeat 5-10 times

Cobra Finish Position
Exercise 5 - Shoulder Bridge
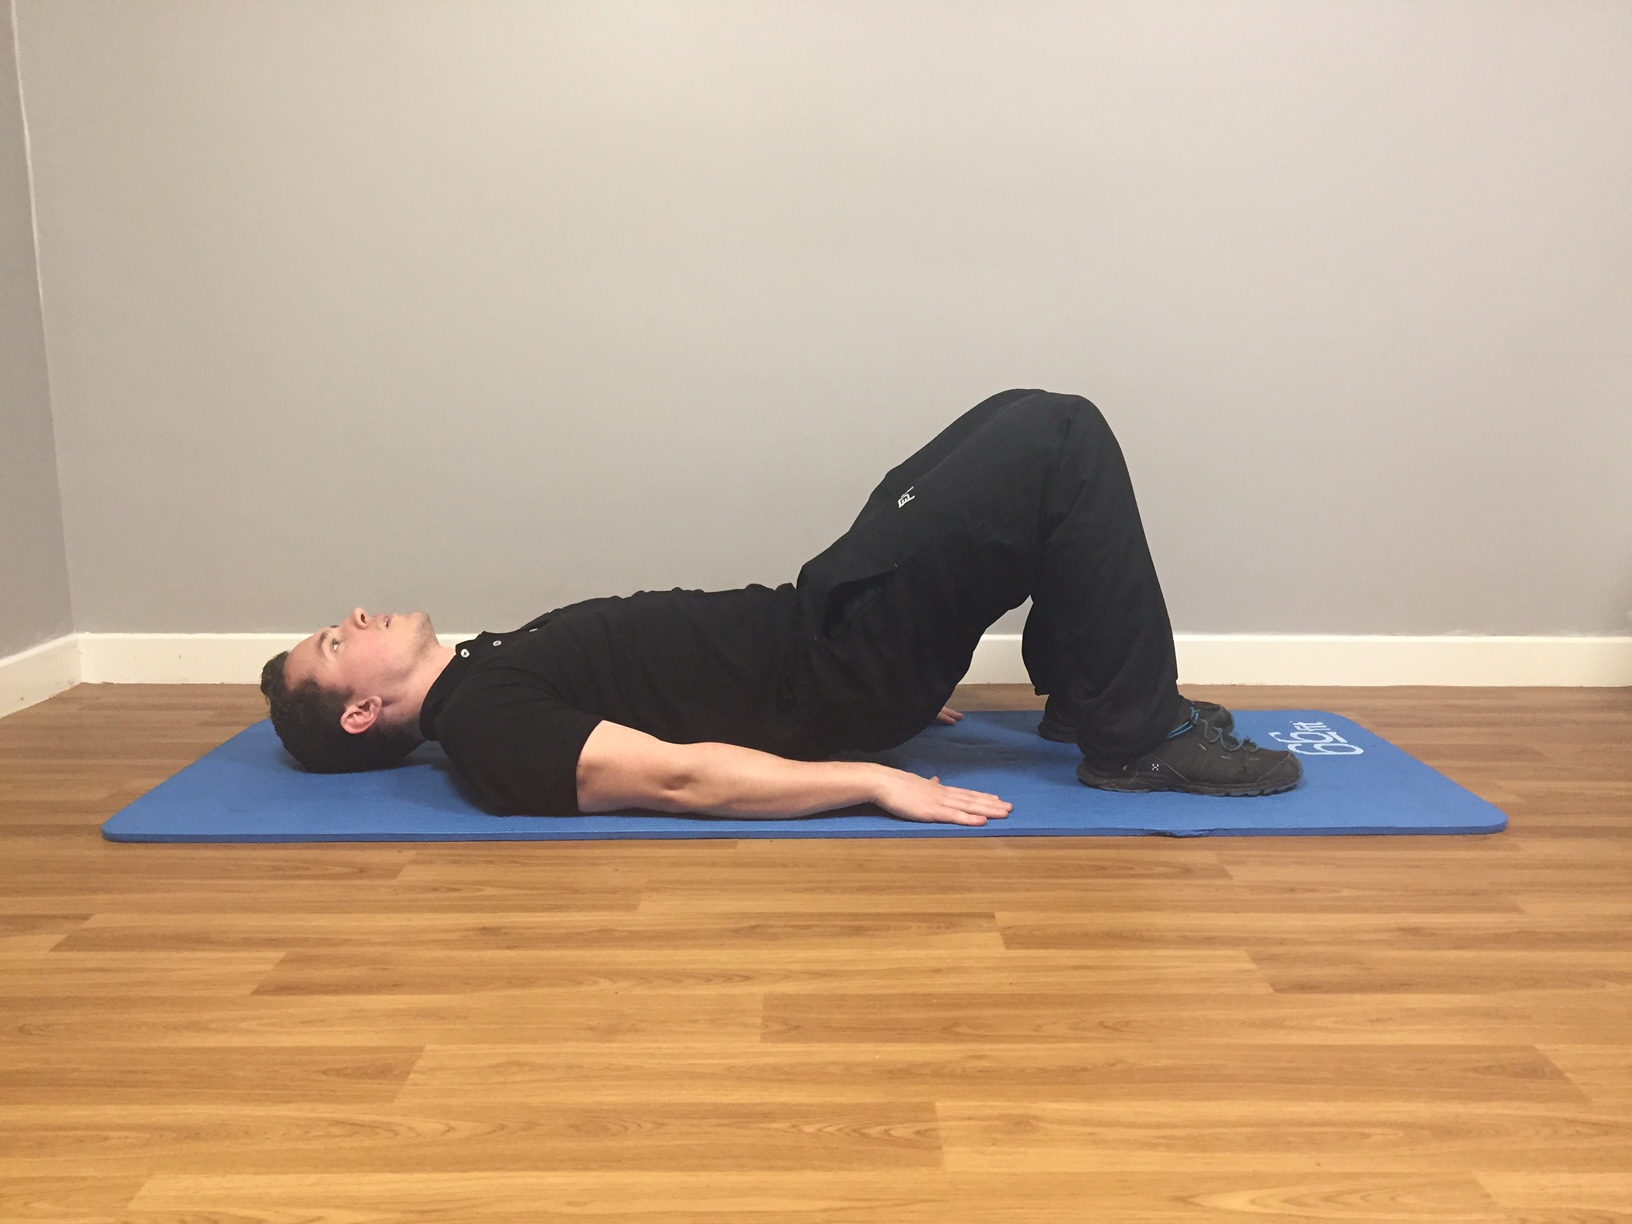
Shoulder Bridge Start Position
Lay flat on your back with feet shoulder width apart and knees bent
Using your lower abdominals gently tilt your pelvis to press your lower back flat to the floor
Pressing through your heels, using your buttock and abdominal muscles gently peel your spine up from the floor starting with your tail bone.
Finish with your weight resting across your shoulder blades and your shoulders, hips and knees in a diagonal line
Hold finish position for 3-5 seconds, return to start and repeat 10 times for 2-3 sets.
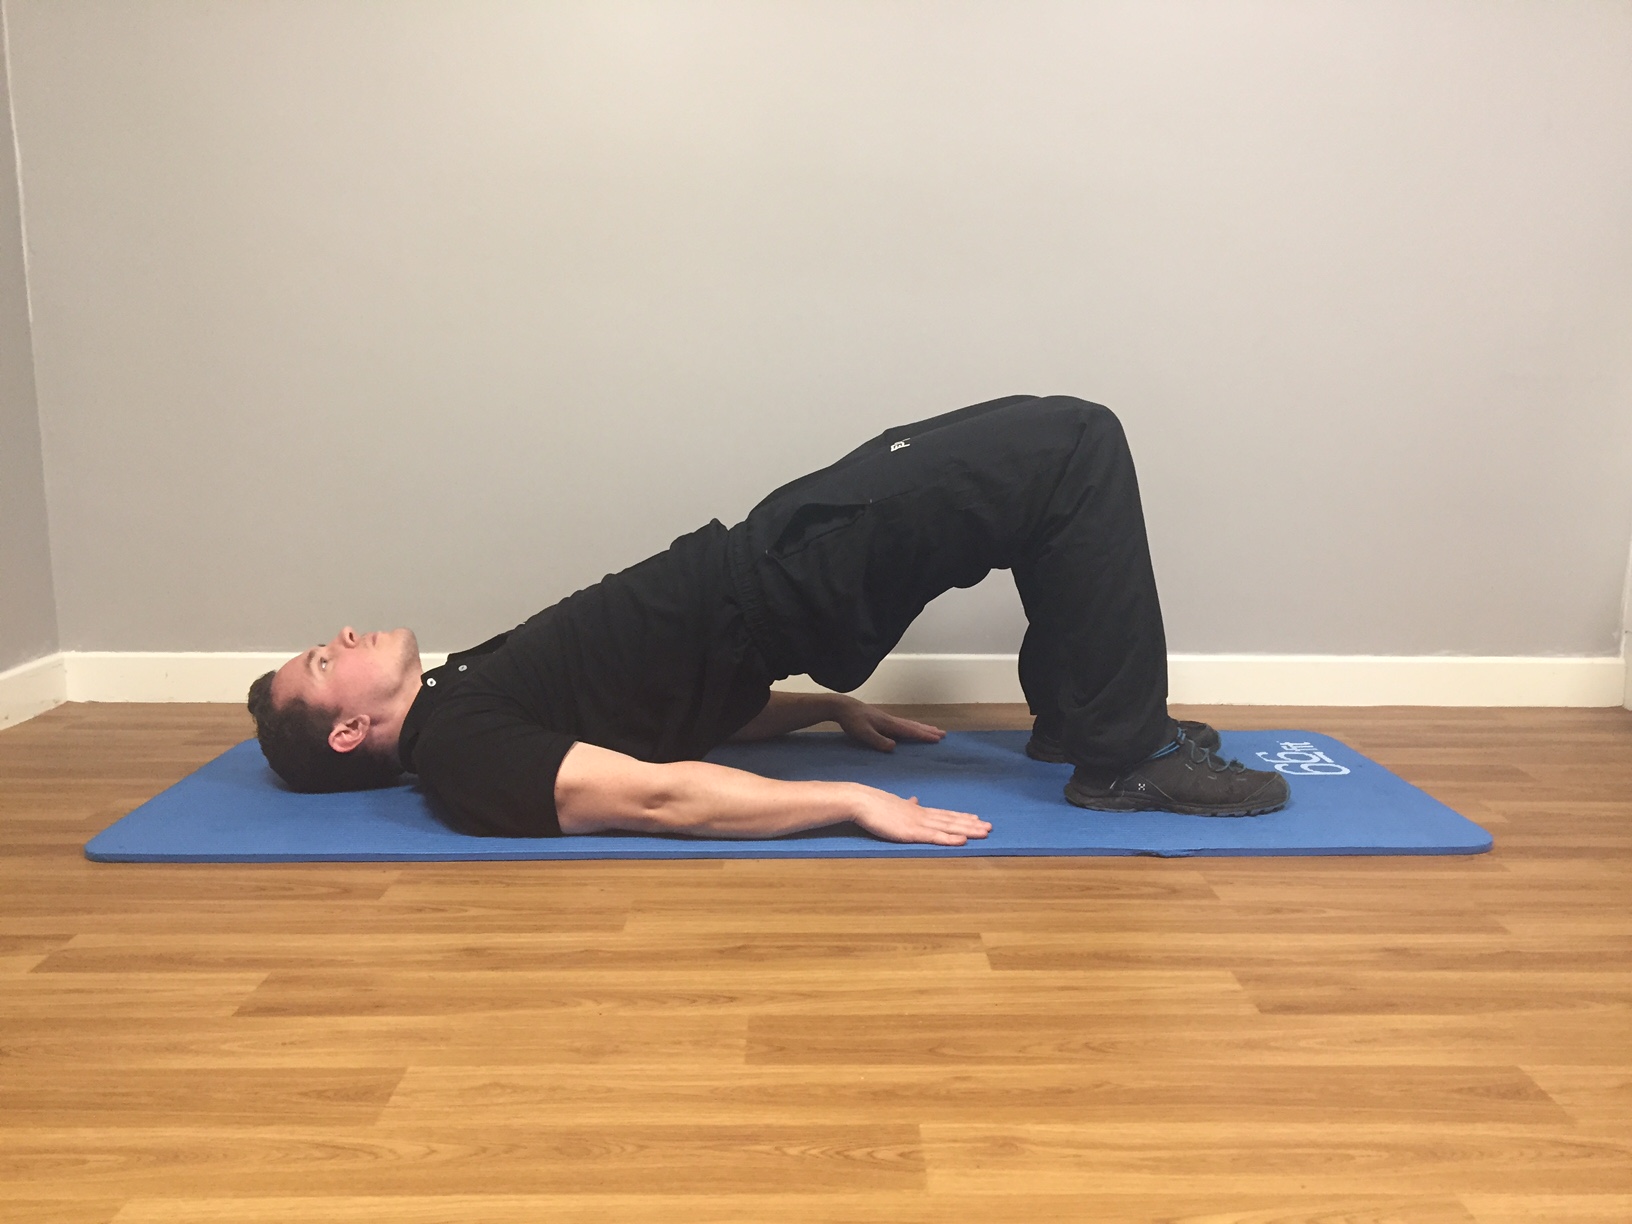
Shoulder Bridge Finish Position
Exercise 6 - Superman

Superman Start Position
Start in all fours position with knees under hips, hands under shoulders and spine relaxed
Slowly extend out opposite arm and leg pointing the toes behind and the fingertips to the front
Keep gentle tension in your lower abdominals - think about drawing your bellybutton in towards your spine
Try to maintain spinal position throughout the movement, return slowly to start position
Repeat with opposite arm and leg, try 10-12 repetitions for 2-3 sets.

Superman Finish Position
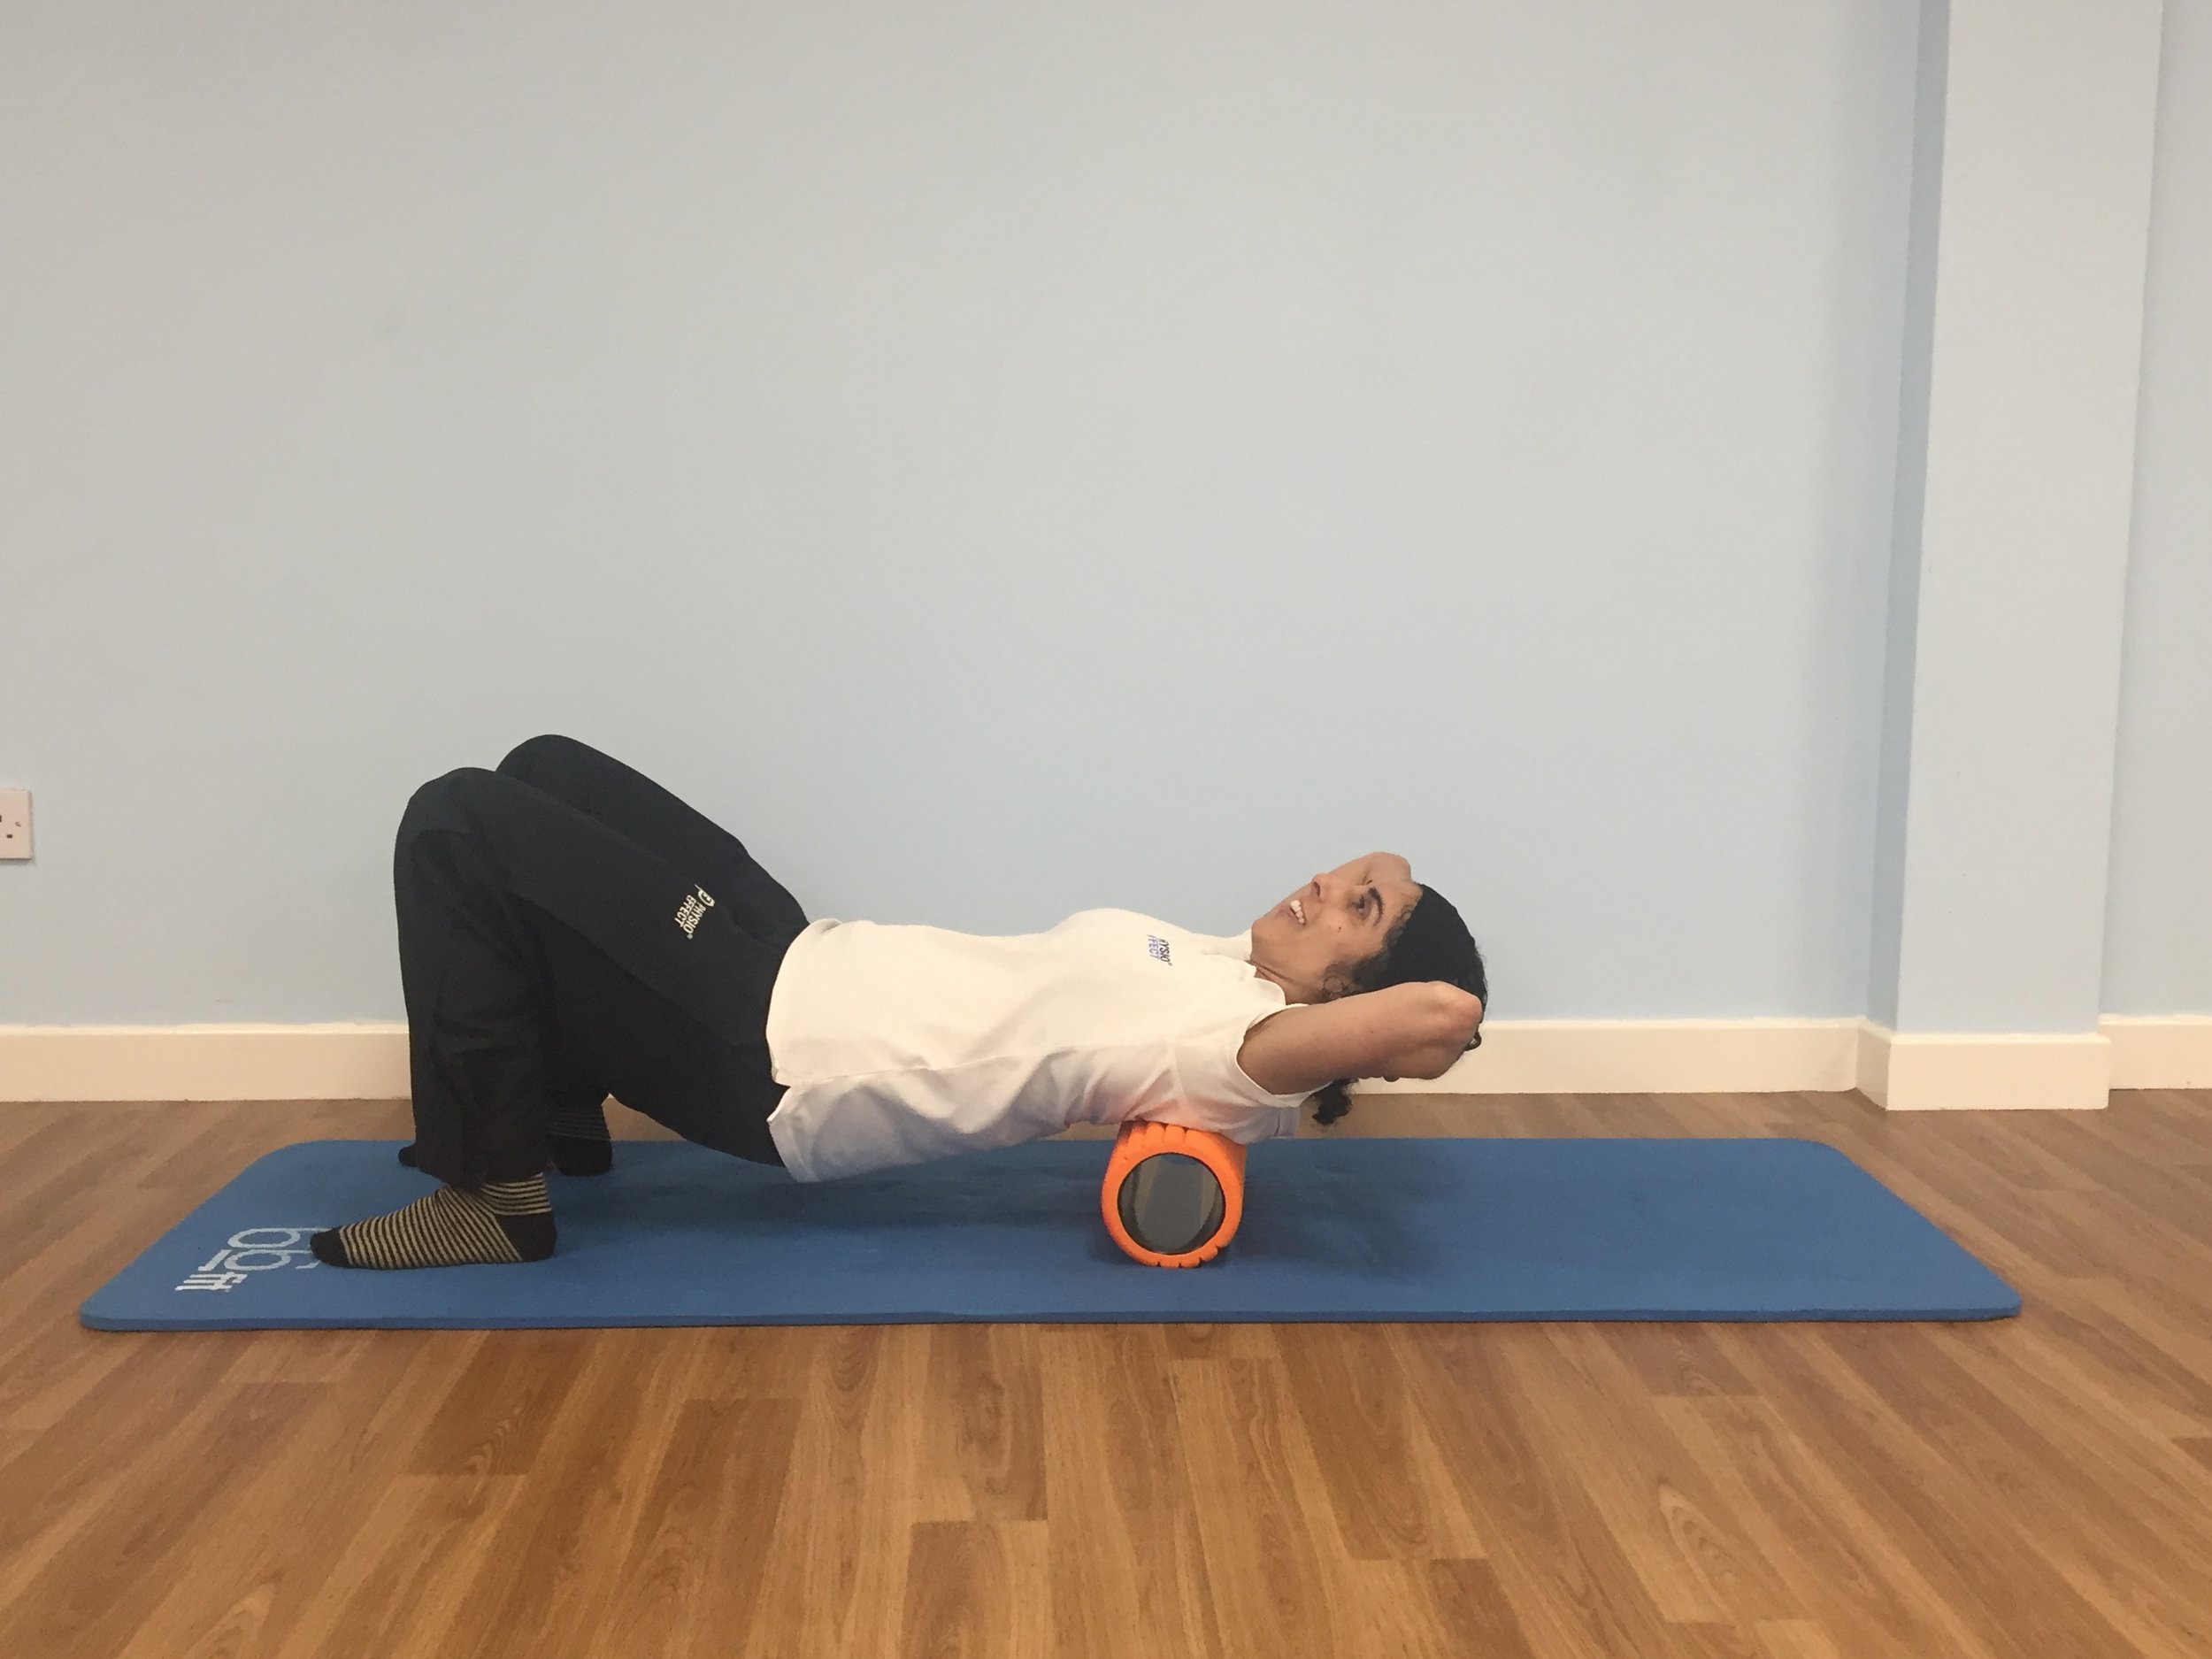
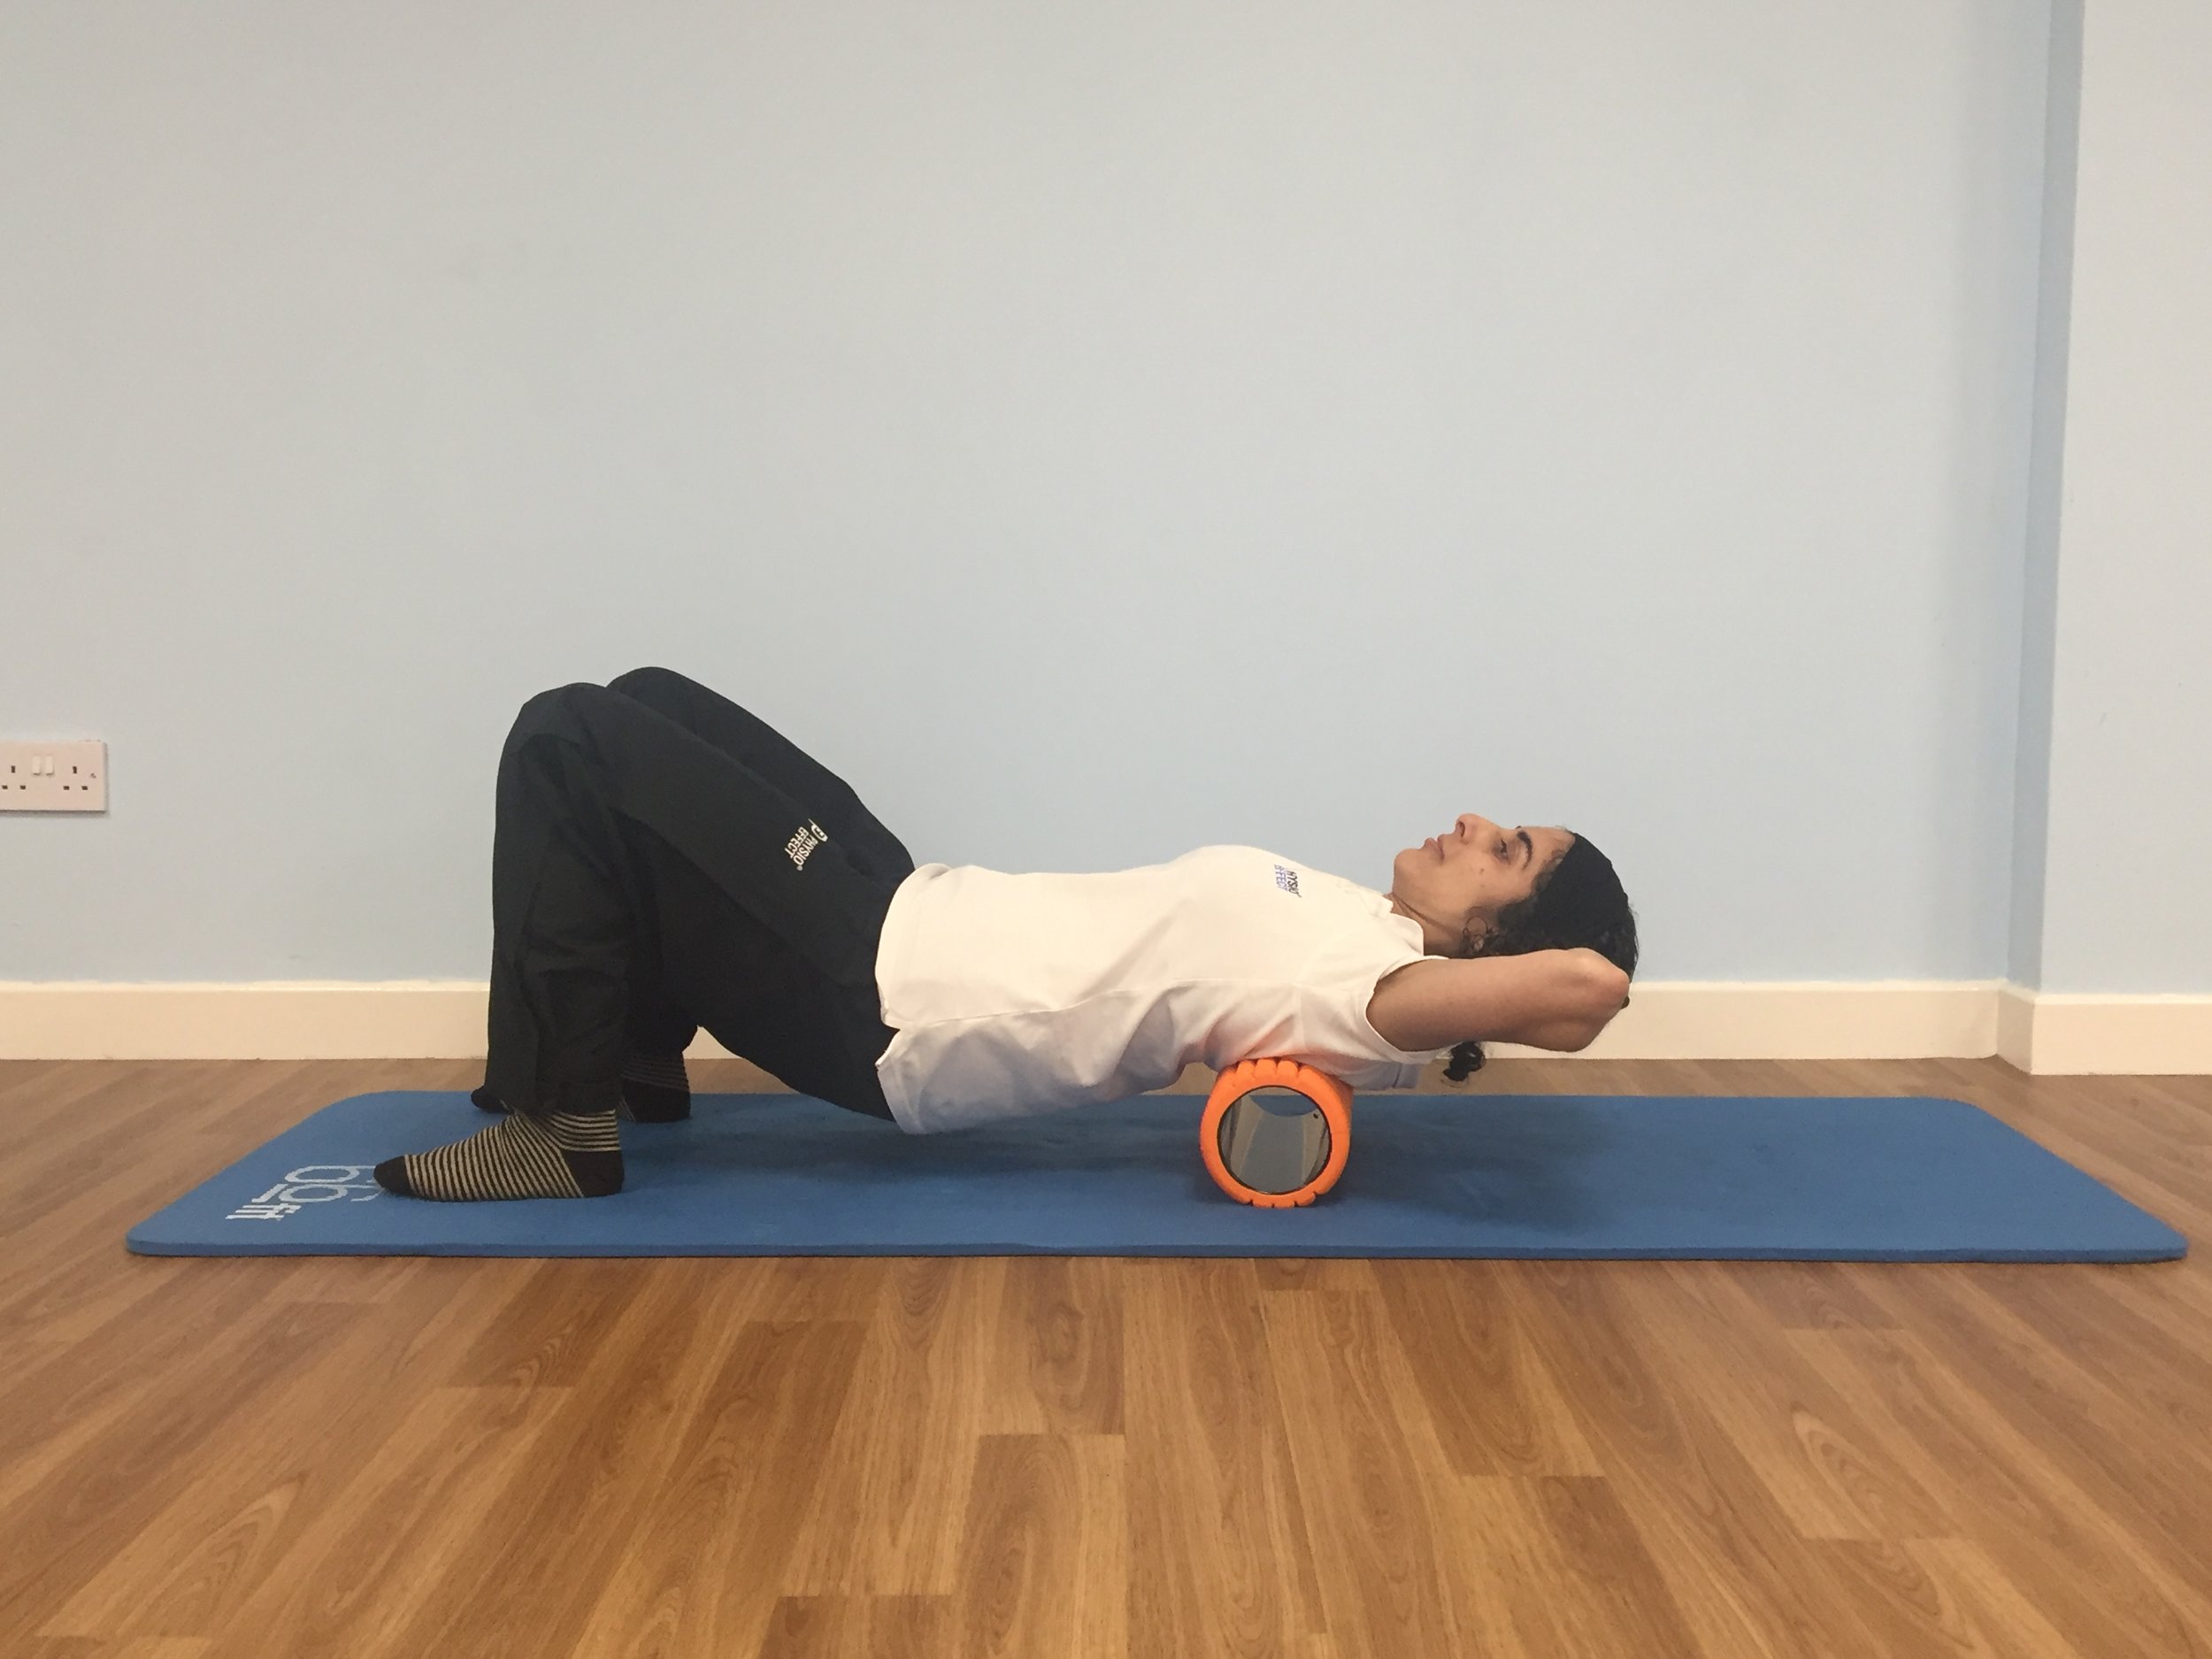
Exercise 7 - Thoracic Extension with Foam Roller

Thoracic Extension with Foam Roller Start Position
Lying on your back with knees bent and feet flat, place a foam roller under your mid-upper back as shown
Take a deep breath in and then, as you exhale, slowly extend back over the roller to stretch your back. Try to keep your lower abdominals engaged to avoid over-arching your lower back
Support your head with your hands and be careful to stay relaxed in your neck. If you find this too intense or uncomfortable, try using a pillow or pillows to rest back onto
Hold the finish position for 2-3 breath cycles, return to start position and repeat 5 times
Move the roller to another position in your mid-upper back and repeat the process, aim to work on 3-5 positions along your spine

Thoracic Extension with Foam Roller Finish Position

Thoracic Extension with Foam Roller Alternate Finish Position
Exercise 8 - Pec Stretch

Pec Stretch Start Position
Stand as shown with arm at approximately shoulder height and palm to forearm placed against the doorframe
Slowly turn your body away by stepping your feet around to open and stretch the front of your chest and shoulder
Lean gently into the stretch, keeping your neck relaxed, hold for 30 seconds+, repeat x 2 on each side
Alternatively, use a doorway to position both arms in the stretch position, step forward to feel the chest and shoulder open and stretch. Hold 30 seconds+, repeat x 2.

Double Pec Stretch Position
While these are general exercise recommendations suitable for the majority of the population they are not prescriptive for any specific pain or injury. These exercises should be performed slowly and gently in a range of movement suited to your own level of ability and flexibility. The exercises should not cause any pain and we recommend that if you are in any doubt or if you are suffering from spinal or joint pain issues you should consult a healthcare professional for advice.
At Physio Effect we provide a wide range of services allowing us to not only treat your pain or injury but ensure that you are given the best advice specific to your individual needs to prevent your problem from recurring.

#KnowledgeShare – Shoulders Month – Rotator Cuff
We see a lot of clients coming to us with shoulder injuries – sometimes it’s not what they think! In this new video, Danny gives us a the basics (and a bit more!) on the rotator cuff!
23rd February 2017
We see a lot of clients coming to us with shoulder injuries – sometimes it’s not what they think! In this new video, Danny gives us a the basics (and a bit more!) on the rotator cuff!

#KnowledgeShare – Shoulders Month – Mobility Exercises
Physio Effect physiotherapist Jonny Kilpatrick demonstrates some exercises to improve overhead range of movement using small equipment you’ll find in your gym
Here's Jonny from a few years ago demonstrating some exercises to improve overhead range of movement using small equipment you'll find in your gym

#KnowledgeShare – Back Mobility
It’s back month here at Physio Effect Glasgow - how to use a foam roller to help with back pain
17th March 2017
It’s Back Month here at Physio Effect! Here’s Jonny (and Ash) showing us how to use the foam roller for a bit of mobilisation!
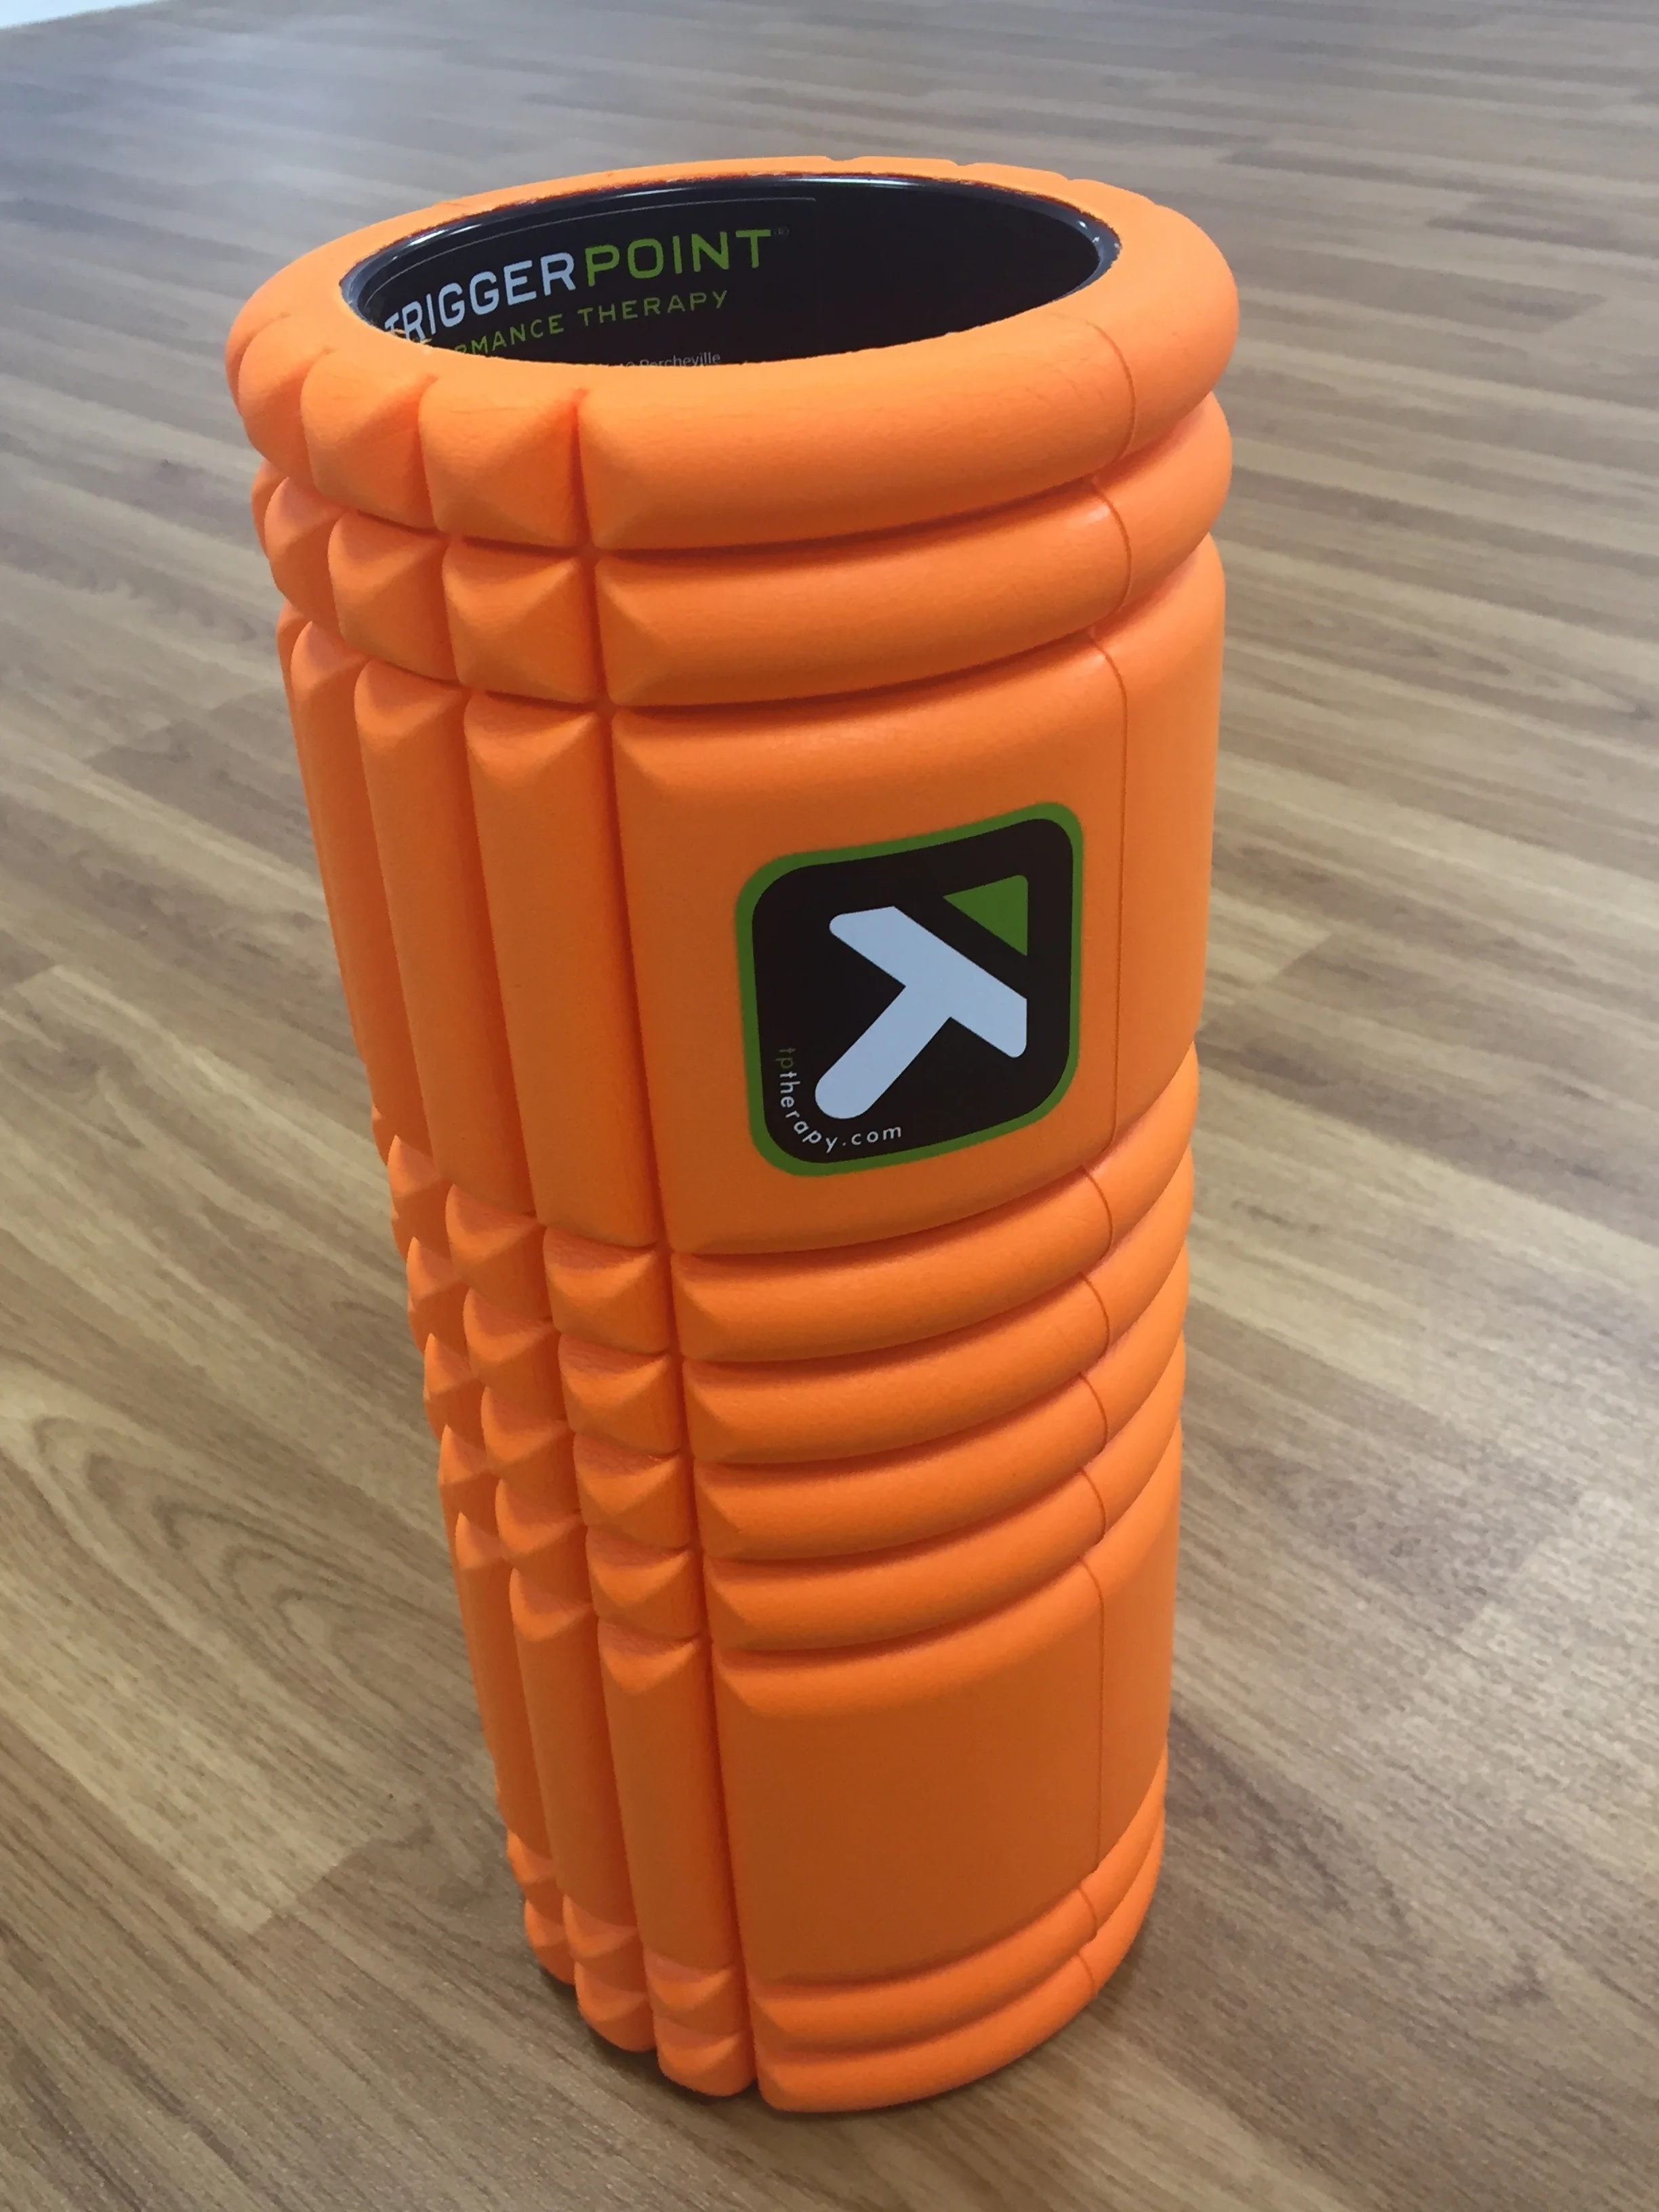
Foam Rolling: What is it? What’s the Evidence? How to apply it!
Self-myofascial release is a name given to the use of equipment or tools to perform self-massage and stretching with the aim of increasing joint range of motion and improving muscle recovery and performance. One of the most commonly used tools is a foam roller. You will often see people in gyms attempting to manoeuvre their bodies in various positions over one of these rollers.
Foam Rolling
What is it?
Self-myofascial release is a name given to the use of equipment or tools to perform self-massage and stretching with the aim of increasing joint range of motion and improving muscle recovery and performance. One of the most commonly used tools is a foam roller. You will often see people in gyms attempting to manoeuvre their bodies in various positions over one of these rollers.
Most commonly rollers will be used in a way that the body is positioned with the roller in contact with a specific muscle or muscle group. The user then uses gentle motion to stretch and massage the area while controlling the pressure exerted by adjusting their position and the weight going through the area.
The theory is that using foam rollers used to massage and stretch our muscles, joints and soft tissues can make them more pliable thereby increasing range of motion. It is also theorised that pressure applied to soft tissues can stimulate change through the central nervous system by sending signals which alter the tissue activity and reduce tension levels.
What’s the evidence?
In general terms, self-myofascial release using a foam roller appears to have short-term effects of increasing joint range of motion without exhibiting any negative effects on muscle or joint performance. There is also some evidence to suggest that post exercise muscle soreness can be reduced while muscle recovery is enhanced when foam rolling is used after strenuous or intense exercise.
The overall summary of the evidence to date suggests that foam rolling is a safe tool to use prior to or after exercise to assist with warm up and/or recovery. However, the research is limited and fails to come to a consensus on what the optimal methods, techniques or frequency of foam rolling should be. There is not yet enough research or evidence to define the best way to roll specific muscles or how many sets or repetitions is appropriate.
How can I apply it?
The general consensus is that foam rolling is safe and can be a welcome addition to assist in warm up and recovery. While we do not have enough evidence to create exact protocols there is room here for individual preference and some experimentation to see what works best for you. From personal experience and from reviewing the literature we would suggest trying:
3-5 sets of 30+ second repetitions on each targeted muscle or muscle group
Apply gradual pressure in various planes and directions.
For larger or longer muscle groups consider dividing the application into 2-3 areas
Consistent application aiming for a minimum of 3 times per week
Slight discomfort during application is acceptable but strong or intense pain is not
Position yourself carefully to avoid unnecessary strain on other muscles or joints
Below are a few examples of positions used to foam roll various muscles

Foam rolling outer thigh

Foam rolling upper back

Foam rolling calf muscle
A word of caution
Foam rolling can be a useful adjunct to any exercise or training routine and may also be used by more sedentary individuals to reduce muscle and joint stiffness. Foam rolling, however, is not an appropriate tool for treating damaged or injured tissues and we would warn that it should not be used as such. Always seek advice from a qualified professional if you are in any doubt.
Foam rolling does not replace or negate the need for adequate warm up and the use of correct techniques when exercising. We would suggest using foam rolling to compliment your existing training or exercising routine but not to replace any aspect.
————————
Article written by Daniel Wray – Senior Physiotherapist and Director at Physio Effect
The dedicated team at Physio Effect provide a full package of services that will ensure you’re supported through your pain management, injury prevention, assessment, recovery and helping you achieve your ultimate performance goals. We offer a range of services including Physiotherapy, Sports Massage, Craniosacral Therapy, Clinical Pilates and Yoga.

Kinesio-Taping
Despite the clear lack of evidence for its use the spread of kinesio-taping throughout health and sport practices does not appear to be waning. As a Physiotherapist with more than 10 years in clinical practice I have been officially trained and certified as a kinesio-tape practitioner and while I recognise the lack of hard clinical evidence I do still have a place for using kinesio-taping in my practice.
Article written by Daniel Wray – Senior Physiotherapist and Director at Physio Effect
6th November 2017
What is Kinesio-taping?
Kinesio-taping is a commonly used form of support taping applied to the muscles and joints of the body. There’s a good chance you will have seen this brightly coloured tape on a friend or colleague or through its wide use across many sports including football, tennis and swimming. Tape is normally applied by a trained health and fitness professional and can stay in place anything from 24 hours up to one week. The tape can stay in place after bathing or swimming and its breathable elastic properties mean it is generally well tolerated by the skin.
The theory behind kinesio-taping suggests that it works via its unique elastic properties lifting the skin to improve fluid movement and alleviate pain. A suggested mechanism of how this works is the alleviation of pressure on pain receptors interrupting the normal transmission of pain signals to the spinal cord. Other popular notions suggest that application of kinesio-tape can help stimulate and strengthen a weakened muscle or relax and release a stiff or tightened muscle depending on the level of tension applied to the tape. It may also offer support and restriction of movement when this is required as part of treating injured tissues or joints.
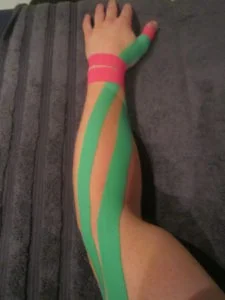
Kinesio taping application for shoulder support
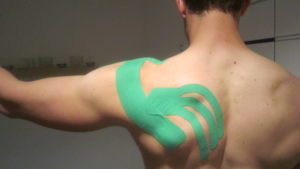
Kinesio-taping application for shoulder support
What’s the evidence?
As Physiotherapists and health professionals it is central to good practice that we seek out solid evidence to support the use of any therapy or treatment. Kinesio taping falls almost entirely into a category of little to no hard scientific evidence supporting its use. There have been numerous studies and systematic reviews of the evidence that conclude that kinesio-taping offers little to no clinically significant benefit. It appears most of the evidence and positive reviews from patients and health professionals to support kinesio-taping are anecdotal or based on single case reports or small samples.
Should I use kinesio-taping?
Despite the clear lack of evidence for its use the spread of kinesio-taping throughout health and sport practices does not appear to be waning. As a Physiotherapist with more than 10 years in clinical practice I have been officially trained and certified as a kinesio-tape practitioner and while I recognise the lack of hard clinical evidence I do still have a place for using kinesio-taping in my practice.
There is no clear evidence that proves any clinical risk in using kinesio-taping and anecdotally within practice I have had many patients report a sense of support or relief associated with the tape application. There may well be an element of placebo effect here but as long as that effect is positive and the potential benefits or lack thereof have been openly and realistically explained to patients then I see no issue with kinesio-tape use as part of a bigger clinical picture.
The use of kinesio-taping should not be considered as a complete treatment for any injury or condition and patients should understand it has limited evidence. Kinesio-taping should be considered as one aspect of treatment and any practitioner using it should be able to provide a rationale for doing so even if this comes down to personal clinical experience over specific evidence. Kinesio-taping should not be considered the mean to the end and should be an adjunct to support a full treatment and rehabilitation plan based on careful evidence based clinical assessment.
Article written by Daniel Wray – Senior Physiotherapist and Director at Physio Effect
The dedicated team at Physio Effect provide a full package of services that will ensure you’re supported through your pain management, injury prevention, assessment, recovery and helping you achieve your ultimate performance goals.